Zoo Promo: Working with Voice-Over in Premiere Pro
What This Tutorial Covers
VO as Anchor
Build the edit around the narration's timing.
B-Roll Layering
Visual content that supports — not overrides — the VO.
Audio Mixing
Music levels that complement the spoken track.
Noble Desktop's Video Editing & Motion Graphics Certificate teaches Premiere Pro alongside After Effects, DaVinci Resolve, and the full motion design toolkit.
Dive into the intricacies of video editing with Premiere Pro in this tutorial, covering voice-over editing, adding music, working in the audio workspace, and more, as you create a promotional video for a local zoo.
Exercise Preview
Editing Voice-over
- To import the files we want to work with into our project, switch to the Desktop and navigate to Class Files > Premiere Pro Class > Zoo Promo > Capture.
- Use Cmd–A (Mac) or CTRL–A (Windows) to select all 3 folders.
- With Premiere visible, drag and drop the folders onto the Project panel at the bottom left.
- Click in an empty space of the Project panel to deselect everything.
In the Project panel, expand the audio bin then double–click TB_audio.aif.
In the Source Monitor, click the Play button
 to preview this file.
Below the audio preview, click and drag from the Drag Audio Only icon
 down to the Timeline and drop it on track A1 at the beginning.
Press the
\key to zoom in and make the clip fill the timeline.Let’s see if there’s any parts of the voice-over we need to fix. Feel free to play through again.
We can better see what we’re editing, hover your cursor over the Timeline and hit the tilde (~) key.
Increase the height of the A1 track (drag the line between A1 and A2 downward) so you can see it better.
We know that there’s a pop that we want to get rid of around 3;08 so move the playhead there now.
Use the zoom slider or zoom tool
 to zoom in on the clip.
Hit the Right Arrow key to hear it. (It’s a little subtle.)
Press the C key (for C ut!) to choose the Razor tool
 . We’ll use it to cut out the portion of the audio with the pop sound.
Make sure the playhead is at 3;08.
Using the Razor tool
, click at the playhead to make a cut.- Move the playhead to 3;10 and click again.
- Hit the Up Arrow and Down Arrow keys to jump between the cuts. Cool!
- Hit the tilde (~) key to go back to the complete Editing workspace.
- In the Tools panel, click on the Selection tool
 .
. - In the Timeline, click on the little piece of audio you just cut to select it.
- Hit the Delete key to get rid of it.
- Wait, that left a gap! Choose Edit > Undo or hit Cmd–Z (Mac) or CTRL–Z (Windows).
In the Timeline, CTRL–click (Mac) or Right–click (Windows) on the little piece of audio you just cut and choose Ripple Delete. This deletes the selection, and moves all the content after it up… filling in what would have been empty space. Much better!
Adding Music
In the Project panel, in the audio bin, double–click If_I_Had_a_Chicken.mp3.
We only want to use a portion of this song, about as long as the promo. To do so, we need to choose the part we want and add it to our timeline. The music starts with a few frames of silence, so we’ll have it begin after that. In the Source Monitor, drag the playhead to 0;08 (or click into the timecode, type 8, and hit Return/Enter).
- Press the i key to mark the in point where our edit will start.
- Move the playhead to 10;01.
- Hit the o key to mark where our music excerpt will end.
Look at the bottom right of the Source Monitor to see the timecode there, which shows the duration of our selection (9;24). It’s not as long as the total duration of our promo (in the Program Monitor we see that it’s 11;18), so this will be a factor in where we place it.
Below the audio preview, click and drag from the Drag Audio Only icon
down to the Timeline and drop it anywhere on track A2.We’ve found that it works well to start the music just after the intro part of the narration. In the Timeline, move the playhead to 3;10.
Click and hold inside the music clip and drag it so that the start of the clip lines up with the playhead at 3;10. It ends a little after the narration ends, but we think that works well too in this case.
Move the playhead to 0;00 and press Spacebar to preview from the beginning. Sounding good!
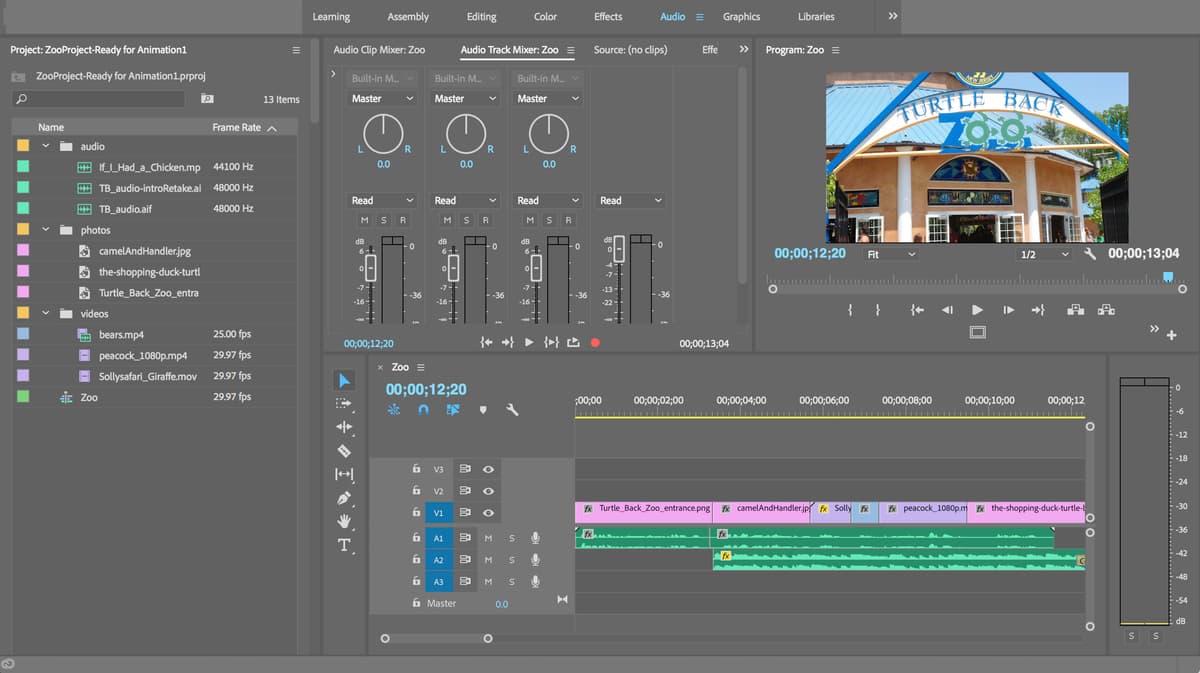
The Audio Workspace
You may have noticed that the music is a bit loud relative to the narration. We should lower its volume. At the top of Premiere, click the Audio tab to switch to the Audio workspace.
NOTE: You don’t necessarily need to change workspaces to edit audio. This just makes it easier to access the panels we need.
Hover your cursor over the Audio Clip Mixer panel and hit the tilde (~) key to make it full screen so we can better see what we’re doing.
Click the Audio Track Mixer tab (the second tab).
This shows the audio levels of each of our tracks, and allows us to adjust volume levels on a track by track basis, rather than by individual clips.
Hit the Spacebar to play the audio. Watch the levels as it plays… Yep, definitely too loud!
Notice in the last Master column on the far right, 15 is the topmost level. Typically when audio levels hit 0, they’re too loud. We should be aiming for an overall Master volume of around –9.
Let’s lower the music’s volume. In the A2 column (look at the bottom for the A2 label), drag the volume slider down to the –9 level.
Hit the tilde (~) key to go back to the workspace view.
Press Spacebar to preview some of the audio in the timeline… We think this sounds pretty good at this point.
Right now the music stops abruptly where it’s cut. We can add some finesse by fading out. On track A2, hover over the right end of the music clip until you see the red bracket with an arrow
 .
.CTRL–click (Mac) or Right–click (Windows) on the end of the clip and choose Apply Default Transitions.
In the Timeline, move the playhead to around 11;00 to preview the ending and hear it fade out.
Adding the Photos & Videos
Next, we’ll place the photos and videos into the timeline and adjust their durations to match the narration. This phase of the editing process is known as a content cut: it shows the editor and client a basic roadmap of what imagery appears and when. Don’t worry about the size or physical positioning of the clips yet—that will be adjusted later.
Switch back to the Editing workspace by clicking it at the top.
Make sure it’s showing what we want by clicking the panel menu
 to the right of Editing and choosing Reset to Saved Layout.
At the bottom of the Program Monitor, click the Safe Margins icon
 to view the grid (if it isn’t showing already).
In the Project panel, expand the photos bin. Feel free to double–click any of the photos to check out what we have.
It makes sense to start the zoo promo with a photo of the zoo’s entrance. Double–click Turtle_Back_Zoo_entrance.png. When we set preferences, we set Still Image Default Duration to 3 seconds. When we place this image, it should default to 3 seconds long.
From the Project panel, drag Turtle_Back_Zoo_entrance.png and drop it at the beginning of track V1.
Move the playhead to the beginning of the timeline and hit the Spacebar to preview.
The next image we want is the camel and handler. It should start just before the narrator says, “We have a wide variety of animals…”. In the Timeline, move the playhead to 3;10.
At the top left of the Timeline, make sure snapping
 is turned on (it should be blue).
Drag camelAndHandler.jpg from the Project panel to V1, snapping it into place at 3;10. Don’t worry about the image being too big right now—we’ll be fixing it later.
Drag out the right end of the Turtle_Back_Zoo_entrance.png clip to meet the camel image so there’s no gap.
When the narrator says “giraffes”, we want the camel photo to be replaced by a giraffe video, naturally! This should happen around 5;21. Move the playhead there.
- We could go ahead and trim the right end of the camel clip to match the playhead now, or to save a step, we can just overwrite that portion with the next clip. Expand the Project panel’s videos bin.
Drag giraffe.mp4 and drop it over the end of the camel clip so that it starts at exactly 5;21 (where the playhead is). You should see that it replaced the extra end part of the camel clip.
The giraffes clip is really long, and it’d be easier to work with if we shorten it now. Move the playhead to 6;21 after the narrator says “giraffes”.
Hit C to choose the Razor tool
and click on the giraffes clip where the playhead is.Hit V to choose the Selection tool
.Select the second part of the giraffes clip on the Timeline and press the Delete key.
Adding the Rest of the Photos & Videos
Hit the Spacebar to play. You’ll hear the narrator next says “bears”.
Hit the Up Arrow key to move the playhead back to the previous cut (6;21 in this case).
In the Project panel, double–click bears.mp4.
This video is pretty long, so let’s choose just the portion we want to use. In the Source Monitor, play and scrub through (by dragging the small blue playhead) to find a section you like (such as 1:04:24 to 1:05:14), then do the following:
- At the beginning of your selection, hit i to add the in point.
- At the end of your selection, hit o to add the out point.
- The total length of your selection should be around 0:16. (Check the timecode at the bottom right of the Source Monitor.)
From the bottom center of the Source Monitor, drag the Drag Video Only icon
 to drop the clip onto the Timeline after the giraffes clip.
You may have noticed that this clip has both video and audio
 .
.
Setting in & Out Points in the Timeline
We want to use the peacock video for the “and seriously exotic birds” section. But first we need to find out how long of a video clip we’ll need to fill in this section. We can do this by temporarily changing the in and out points for the sequence (that is, the overall timeline for the Zoo Promo). In the Timeline, move the playhead to 7;11 and press i to mark an in point.
Move the playhead to 9;14 (after the voiceover says “seriously exotic birds”) and press o to mark an out point.
Look at the bottom right of the Program Monitor. You should see a timecode that says 2;04. That’s the duration of the selected area in the Timeline. We want the peacock clip to fill this space.
In the Project panel, under videos, double–click peacock_1080p.mp4.
Drag the Drag Video Only icon
over the Program Monitor and drop it where it says “Overlay”. This is another way to edit in Premiere Pro.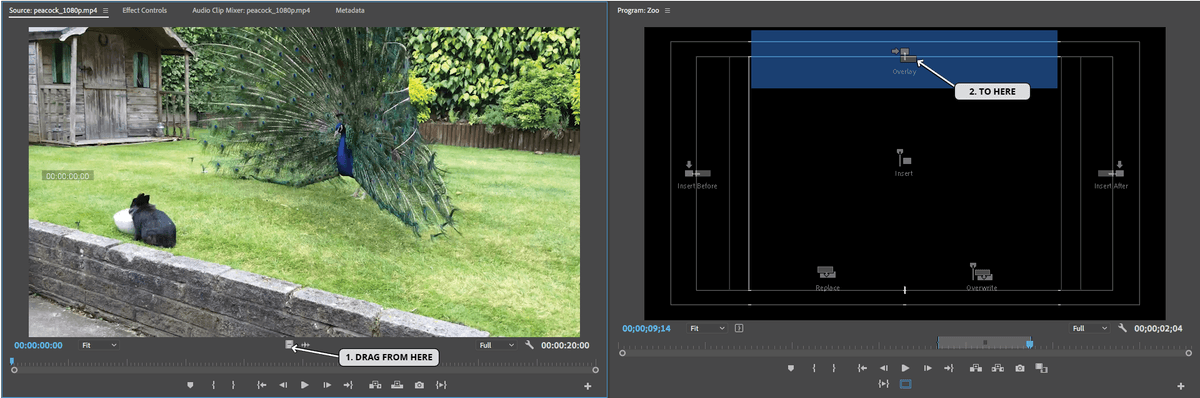
The in and out points in the Timeline, clear automatically!
- For the ending, add the-shopping-duck-turtle-back-zoo.jpg at 9;15, from the photos folder in the Project window.
- Drag the end of the last image out to when the music ends (at 13;04).
- Go to the beginning of the Timeline and hit Spacebar to see what we’ve got so far.
Do a File > Save.
Leave this project open. In the next exercise, we’ll work on editing the images and adding some animation.