Premiere Pro VHS Effect
VHS Look Recipe
Noble Desktop's Video Editing & Motion Graphics Certificate teaches Premiere Pro alongside After Effects, DaVinci Resolve, and motion design fundamentals.
We did a black and white effect to make a mid-century look but what about awesome footage effects from the '90s?
With this VHS effect, you can make any film you shoot appear like you dug it out of your attic and pulled off your camcorder. It involves a few identical layers with slightly altered Effects and a fun overlay layer to give it that totally tubular, radical '90s look.
Body
1. In the Effects panel, type in Wave Warp.
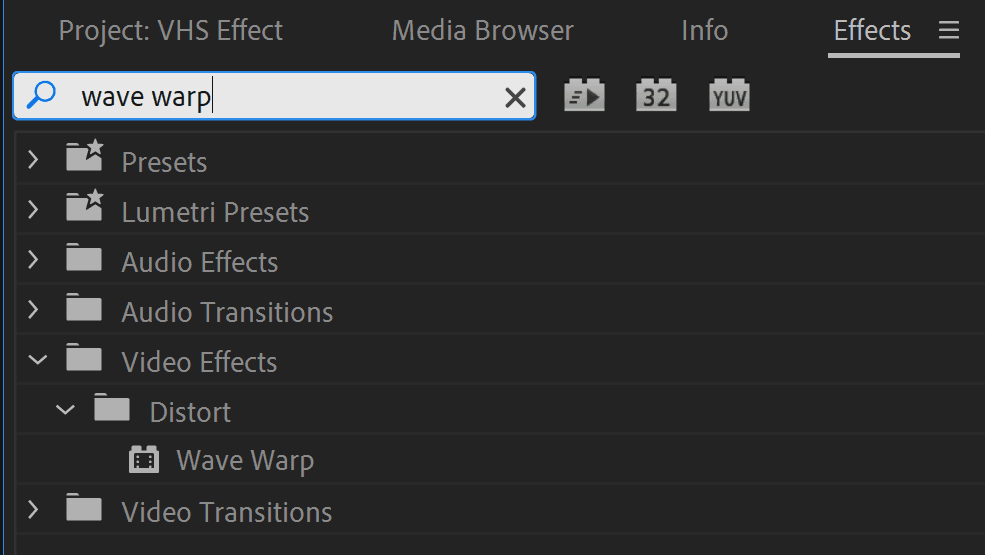
2. Drag and drop the Wave Warp effect onto the Adjustment Layer already placed into the project for your convenience.
3. Now type in Noise in the Effects panel.
4. Drag and drop the Noise effect onto the same Adjustment Layer.
5. In the Effect Controls panel that appears in the top left, find the Wave Warp effect you applied earlier.

6. Change theWave Type to Square.
7. Now alter theWave Width to 600.
8. TheDirection should be 180°.
9. And finally, theWave Speed is .1.
10. Now let's go down to the Noise effect in the Effect Controls panel.
11. Up the Amount of Noise to 45.
12. HitSpacebar. This will show you the first Effects you've applied, giving the footage that old, grainy effect you'd get on camcorders from the '90s. It's a strong start!
Chromatic Aberration
1. Ok, we'll be working with the three footage layers on the bottom.Shift-Click to select all three Winter layers.
2. In the Effects panel, type in Color Balance.
3. Drag and drop the effect onto aWinter layer. Since they're all selected, it will drop onto all three.
4. Now deselect the layers by clicking anywhere else in the program.
5. Select the top Winter layer.
6. In the Effect Controls panel, scroll down to the new Color Balance effect.
7. Change the Green to 0.
8. Change the Blue to0.
9. Navigate to the Opacity settings in the same panel.
10. Change the Blend Mode to Screen.
11. Now select the middle Winter footage.
12. Go into the Color Balance effect there and change the Red to0.
13. Change the Blue to0.
14. Change the Blend Mode of the layer to Screen.
15. Go up to the Scale of that layer.
16. Change it to 105, to slightly displace the footage relative to the other two identical ones.
17. Finally Select the bottom Winter footage layer.
18. In this one's Color Balance effect, change theRed to0.
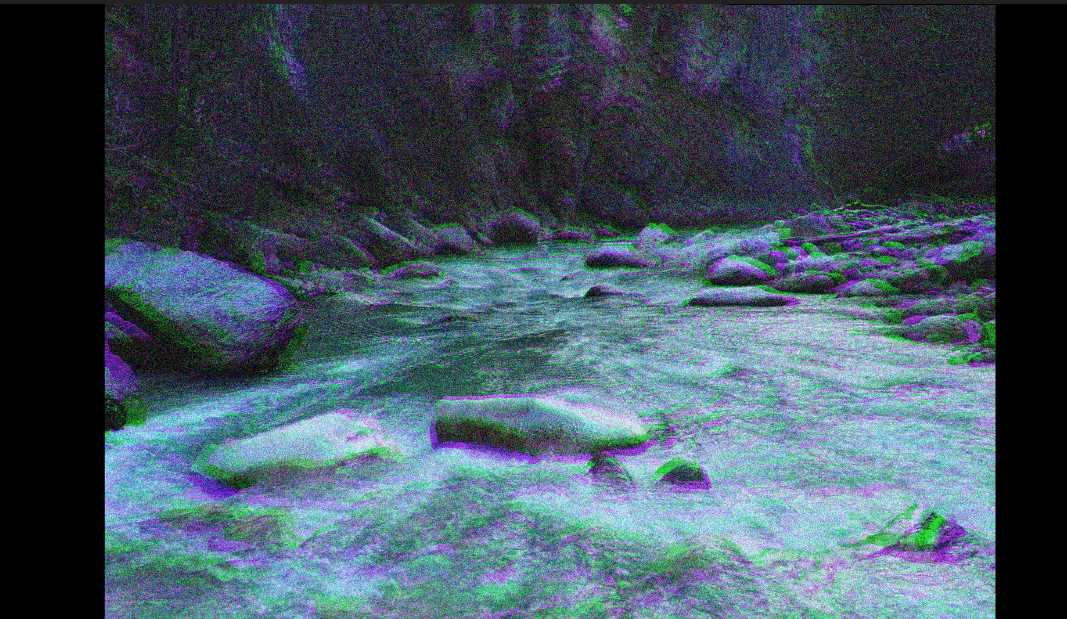
19. Change the Green to 0. This will make what's known as chromatic aberration, a visual effect that distorts the RGB channels of footage. It tended to be rather prominent in old VHS tapes, so we've just recreated the effect. Here's what we have so far:
VHS Overlay
1. This is a very easy step. Select the Blank VHS Tape layer.
2. Toggle the visibility on. 
3. In Effect Controls, change the Blend Mode to Screen. You've now got a nice little timestamp detail to really sell the full VHS effect.