Travel Video: Intro to Premiere Pro
What This Tutorial Covers
Project Setup
Sequence settings, bins, and import workflow.
Basic Editing
Cuts, trims, and the source/program monitors.
Audio Basics
Levels, fades, and music integration.
Noble Desktop's Video Editing & Motion Graphics Certificate teaches Premiere Pro alongside After Effects, DaVinci Resolve, and the full motion design toolkit.
Master the basics of Premiere Pro with this comprehensive tutorial that covers topics like creating a sequence, importing files, working with the editing workspace, manipulating timecode, adding audio and video to the timeline, and building a short travel promo video for United Airlines.
Exercise Preview
The Editing Workspace
At the bottom left of the Project panel, click the List View icon
 . This is the view we’ll be working in for this class. Feel free to check out Icon View
  but make sure to switch back to List View before moving on.
At the bottom right of the Project panel, click the New Item icon
 . Notice this is another way you can create a new sequence.
Click anywhere outside of the menu to close it.
In editing terminology, folders containing media are called “bins.” Double–click the videos bin. This will open its contents in a new tab.
Go ahead and close it by clicking the panel menu
 next to it and choosing Close Panel.
If you’re no longer in the Project panel, click the Project: yourname-Travel tab. (You could also click the double arrows
 at the top right of that panel area (the section at the bottom left of the main window) and choose Project: yourname-Travel.)
Click the twirly arrow
 next to videos to expand it.
Double–click on any of the videos.
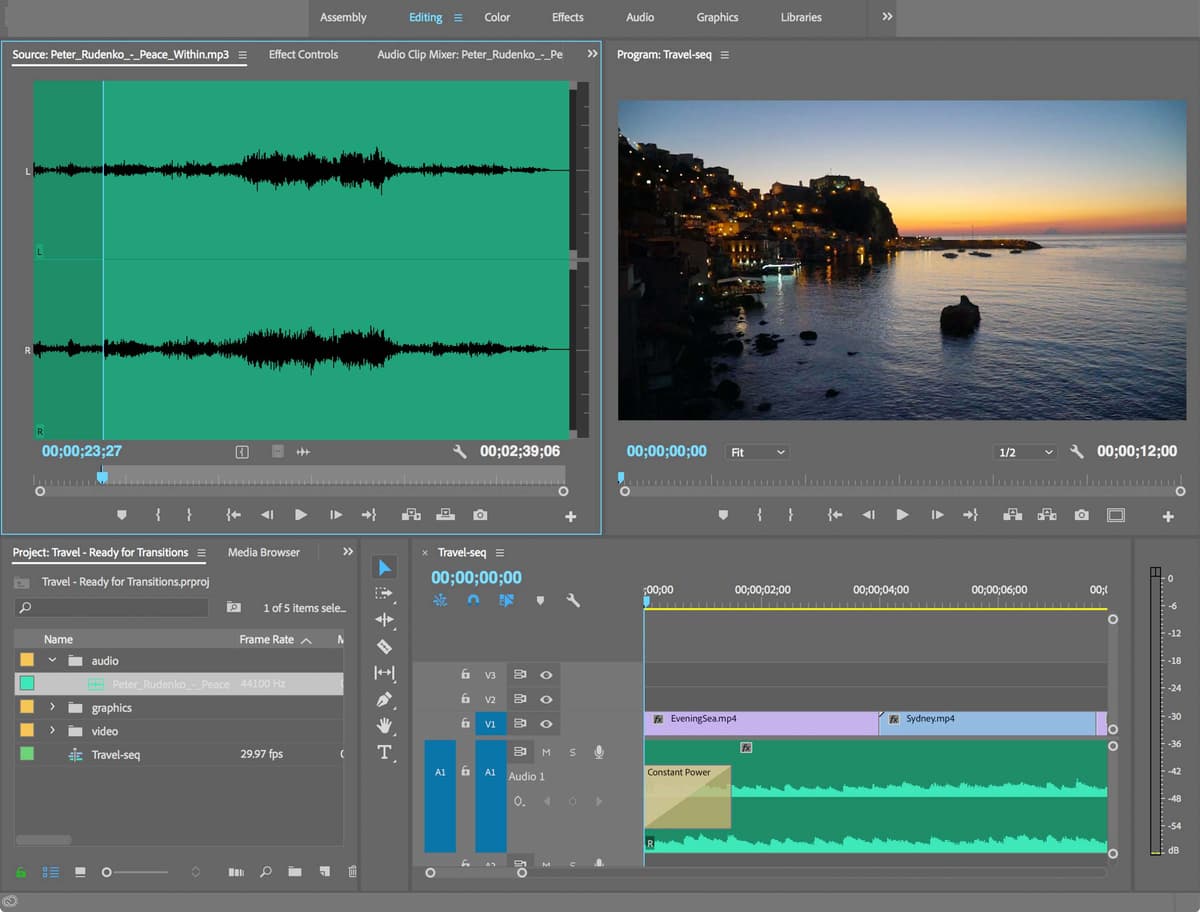
Notice the video opened in the top left Source Monitor (in other video editing programs, this is called the Clip Viewer or Viewer).
Here we can preview clips and choose any sections we want to add to our timeline. This is similar to isolation mode in Adobe Illustrator or Photoshop, or like the Layer View in After Effects.
At the top right is the Program Monitor (in some other video editing programs this is called the Canvas). This is where you can preview the edit that you’re building in the Timeline.
The wide panel at the bottom of the interface, with numbers along the top is the Timeline. This is where you’ll build your edit with video and audio clips along with any text, graphics or effects.
Between the Project panel and the Timeline panel is the Tools panel. (We’ll learn about these tools as we go through the exercises.)
Timecode
Take a look at the upper left of the Timeline panel. You should see the number 00;00;00;00. This shows the sequence timecode. Remember that at the beginning of the exercise we set our project to a frame rate of 30 fps (frames per second) by choosing the DSLR 1080p30 preset.
As is often the case with video projects, not all the videos we’ve been provided with have the same frame rates.
To see an example, in the Project panel, make sure you’re in List View
.With the video bin expanded, look at the Frame Rate column to the right of the video names. Notice all the different frame rates!
Double–click EveningSea.mp4 to open it.
In the Source Monitor, click into the timecode at the bottom left of the video, type 24, then hit Return/Enter. This takes you to 24 frames into the video.
Hit the Right Arrow key to move one frame forward. Notice that the timecode jumps to 1:00. This happens because this video is 25 fps. Similarly in a 30 fps video clip, the next frame after 0:29 is 1:00.
NOTE: Drop frame timecode is when 2 frame numbers are skipped every 1 minute, except for each tenth minute. Drop frame is the broadcast standard. Drop frame timecode is displayed with semi-colons between numbers (rather than colons). We will be editing this project in drop frame timecode.
Adding Audio to the Timeline
In the Project panel, close up the video bin by clicking the little down arrow
 to the left of the video folder.
Expand the audio bin then double–click Peter_Rudenko
_-_Peace_Within.mp3, to load it into the Source Viewer.You should see two sets of timecode at the bottom. The one on the left indicates the current timecode. The one on the right shows how long the clip’s duration is. 3;03;05 is quite long for a short promo video: 3 minutes, 3 seconds and 5 frames!
We want to cut out a piece of the audio that is only around 12 seconds long.
At the bottom of the Source Monitor, move the blue playhead to 23;27. This is a good point in time to start our 12-second music excerpt.
Notice that this clip is using drop frame timecode.
NOTE: You can use the Left and Right Arrow keys to get to the precise timecode you need.
To set the in point of the audio clip, at the bottom of the Source Monitor, click the Mark In button
 (left frilly bracket).
It will be easier to edit our music in the Timeline. Below the audio waveform preview, click and drag from the Drag Audio Only icon
 down to the Timeline and drop it on track A1 at the beginning as shown below:
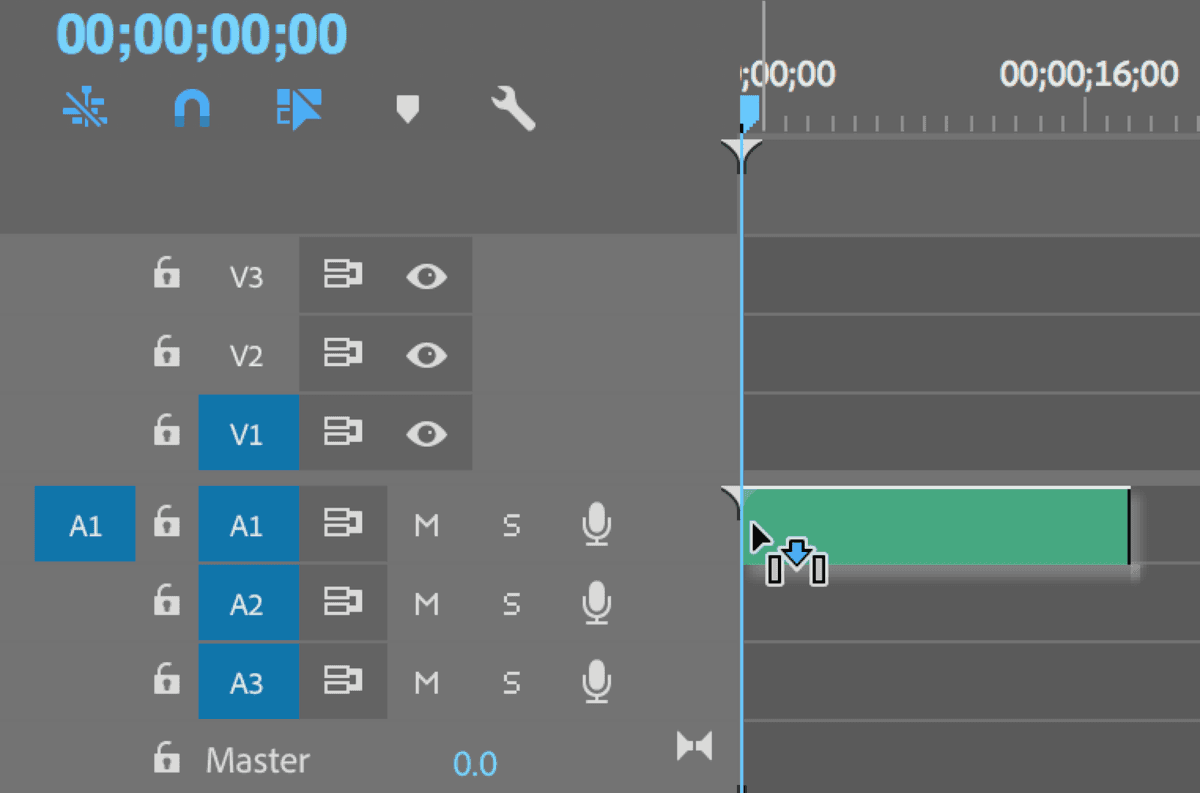
Play through to find a good spot to end the music. We’ve done some of the groundwork for you, and found that around 12 seconds is a good ending point.
Let’s zoom in to the clip we just added in the Timeline so we can better see what we’re working with. At the bottom of the Timeline, click and hold on the right circle on the right side of the zoom slider and drag it left.

Notice the clip getting larger. (If you’re familiar with After Effects, this is like the “mountains” zoom slider.)
NOTE: You can drag between the two circles to scroll left or right in the Timeline.
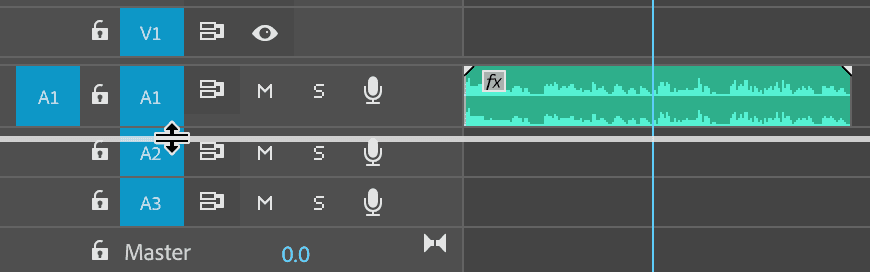
To view the waveform more clearly, on the left side of the Timeline, drag the line between A1 and A2 downward to increase the height of the A1 track.
At the top left of the Timeline click the Timeline Display Settings button
 and make sure Show Audio Keyframes is unchecked if it isn’t already.
The timecode at the top of your Timeline is the time for your edit, whereas the timecode in your Source Monitor is the timing of your clip. This means that the timecode in your Timeline is going to tell you how long your video is going to be. Click on the Timeline timecode to make it editable, type in 1129 then Return/Enter to take you to 11;29 (right where a new phrase begins in the audio clip).
NOTE: You’ll also see the same timecode reflected at the bottom of the Program Monitor, the window to your upper right-hand side.
To cut the audio we want to use a different tool. In the Tools panel, click on the Razor tool
 .
.At the top left of the Timeline, just below the timecode, make sure the Snap
 option is on (it should be blue, not gray).
NOTE: You can also turn it on/off by hitting the S key.
With the Razor tool, hover in the Timeline over the playhead. When you feel it snap to the playhead, click to cut the audio clip at this point in time.
NOTE: The Razor tool is only good for cutting things. You can’t use it for selecting things. So once you’ve cut something, it’s a good practice to switch back to the Selection tool
 .
.Zoom out on the Timeline by dragging the right circle of the zoom slider
 towards the right until you see the entire audio clip.
Zooming in the Timeline
The Zoom tool
 can also be used to zoom in and out on the Timeline. To access it, hit the Z key or in the Tools panel, click and hold on the Hand tool
  and then choose it. With the Zoom tool, click on the Timeline to get closer to it. Hold Opt (Mac) or ALT (Windows) while clicking, to zoom out.
- Click on the Selection tool .
Hover over the first short clip in the Timeline, and notice that a tooltip shows the duration of the clip (11;29).
Click on the second section you cut to select it. Notice that when you select a clip in the Timeline, the outline and waveform turn white.
Press the Delete key on the keyboard to remove it.
Creating Audio Fades
We want the music to feel like it’s starting at the beginning of this excerpt, and stopping at the end. A great way to achieve this is by adding fades.
Zoom in a little on the Timeline by using either the zoom slider (drag the right circle left), or click on the Timeline with the Zoom tool
.Move the playhead to the beginning of the Timeline.
Hover over the beginning of the clip hover until your cursor changes to a red bracket
 .
.CTRL–click (Mac) or Right–click (Windows) and select Apply Defaut Transitions.
Conveniently, the default transition for audio is a fade called Constant Power.
With the playhead at the beginning of the Timeline, below the Program Monitor click the Play button
 to play though.
Not bad! The fade-in is not quite long enough however.
To adjust the duration of the transition, double–click on the Constant Power transition.
In the Set Transition Duration window that opens, enter 115 to change Duration to 1;15 (1 second and 15 frames), and click OK.
Move the playhead back to the beginning and play
through again to hear that it’s sounding better, more subtle.We also want to add a fade-out at the end so that the audio doesn’t just stop abruptly. Move the playhead to the end of the clip.
CTRL–click (Mac) or Right–click (Windows) on the end and select Apply Default Transitions.
Double–click on the fade transition and type in 200 to set the Duration to 2;00 (2 seconds).
NOTE: Fade-outs are a good way to signal to the audience who the audio or video is ending!
Adding Video
In the Project panel, close up the audio bin by clicking the down arrow
to the left of the audio folder.Expand the videos bin.
Double–click on the EveningSea.mp4 clip to open it in the Source Monitor. Keep in mind that this clip has a Frame Rate of 25fps.
It’s often a good idea not to start a clip at the very beginning, especially if you’re adding transitions, or shuffling shots around.
Let’s leave some space before the beginning of this clip by starting it about a second in. In the Source Monitor, move the playhead to 1:00.
Click the Mark In button
to mark the in point where we want the clip to begin.From the bottom center of the Source Monitor, click and drag the Drag Video Only icon
 to the Timeline and drop it at the beginning on track V1 (the first video track).
Notice that it’s been loaded into the Program Monitor as well.
Move the playhead to the beginning and hit Spacebar to play through, noticing that the next musical phrase starts around 4;00.
Move the playhead to 4;00 so we can cut the clip here. You may need to zoom out on the Timeline, to see this.
Select the Razor tool
.In the Timeline, click on the EveningSea.mp4 clip at the playhead to cut it.
Switch to the Selection tool
.Select the second section of the EveningSea.mp4 clip and press the Delete key.
- The next shot in our sequence is the Sydney Opera House video. Try dragging out Sydney.mp4 from the Project panel to the Timeline and drop it anywhere.
Notice that it comes with audio tracks along with the video… but we only want the video! That’s where the Drag Video Only icon
(at the bottom of the Source Monitor) really comes in handy. Undo by hitting Cmd–Z (Mac) or CTRL–Z (Windows).NOTE: You can easily tell which clips have audio or not by looking at the icons in the Project panel. A clip that has
next to it contains video only, while a clip with  contains video and audio.
Instead, we want to load it into our Source Monitor first and then only pull the visuals down into the Timeline. In the Project panel, double–click Sydney.mp4.
We think the Sydney clip looks really nice when the yellow boat is in front of the Opera House. In the Source Monitor move the playhead to 3:06, a nice place to begin this clip.
Set the in point by clicking the Mark In button
.Click and drag the Drag Video Only button
to the Timeline, dropping it on V1 right next to the EveningSea.mp4 clip.Hit Spacebar to play from where the playhead is located, listening for the next good spot to insert the final clip.
We think 7;20 is a nice natural sounding transition point in the music, so move the playhead there now.
In the Project panel, double–click LakePanorama.mp4 to open it in the Source Monitor.
In the Source Monitor, move the playhead a little forward in time to 1:07 and click the Mark In button
or press the i key to mark the in point.Click and drag the Drag Video Only button
, placing the clip on the V1 track at the playhead. It should snap to the playhead as we have snapping turned on.In the Timeline, select and Delete the last section of the Sydney.mp4 clip that has been displaced. You may need to zoom out of the Timeline to see this.
Using the Selection tool
, hover over the end of the LakePanorama.mp4 shot in the Timeline (which currently extends past the end of the music). Wait till you see the red bracket  , and then drag it to the left so it snaps to the end of the music. This is another easy way to shorten or lengthen a clip in the Timeline.
Go to File > Save to save your work so far.
Move the playhead to the beginning of the Timeline and hit Spacebar to preview what we’ve got so far.
Not bad! It could definitely use some finesse, but it’s good to have all the media laid in! Leave this project open. In the next exercise, we’ll work on adding transitions and the company logo.