The Interview: Creating a Multicam Sequence in Premiere Pro
What This Tutorial Covers
Multicam Sync
Sync multiple camera angles by audio waveform or timecode.
Multicam Source Sequences
Combine angles into a single editable sequence.
Real-Time Switching
Cut between angles in real-time playback.
Noble Desktop's Video Editing & Motion Graphics Certificate teaches Premiere Pro alongside After Effects, DaVinci Resolve, and the full motion design toolkit.
Delve into the world of professional video editing with this comprehensive tutorial on Adobe Premiere Pro, exploring features such as creating a multicam clip, editing a multicam sequence, and using a rolling edit to create an engaging interview video with multiple camera angles.
Exercise Preview
Creating the Multicam Sequence
We will create a special multicam sequence that combines our source footage and synchronizes the various camera footage. This will allow us to easily switch between camera angles while editing while staying in sync.
In the Project panel, select WS_couch7.mov.
We select this first because it contains our best audio. The order in which we select the clips is important, as we’ll see shortly.
- Hold Cmd (Mac) or CTRL (Windows) and click on CU1_Shanarra7.mov.
Hold Cmd (Mac) or CTRL (Windows) and click on CU2_Laune7.mp4.
CTRL–click (Mac) or Right–click (Windows) on any of the 3 selected clips and choose Create Multi-Camera Source Sequence.
In the window that opens, set the following:
- Change the name at the top to Interview-Multicam.
- Set the menu to the left of the name to Custom (so it does not add anything extra before that name).
- Under Synchronize Point, choose Audio. This will analyze the audio in each camera’s footage and use it to sync the footage! This is why you always record audio in every camera (it doesn’t have to be great quality audio, but you need the audio for syncing).
- Next to Sequence Preset, keep the default Automatic.
- Keep Move source clips to Processed Clips bin checked on.
- Under Audio, set Sequence Settings to Camera 1. This will use the audio from the first footage we selected, which contains our best audio.
- For Audio Channels Preset, keep the default Automatic.
- Under Camera Names, choose Use Clip Names.
Click OK.
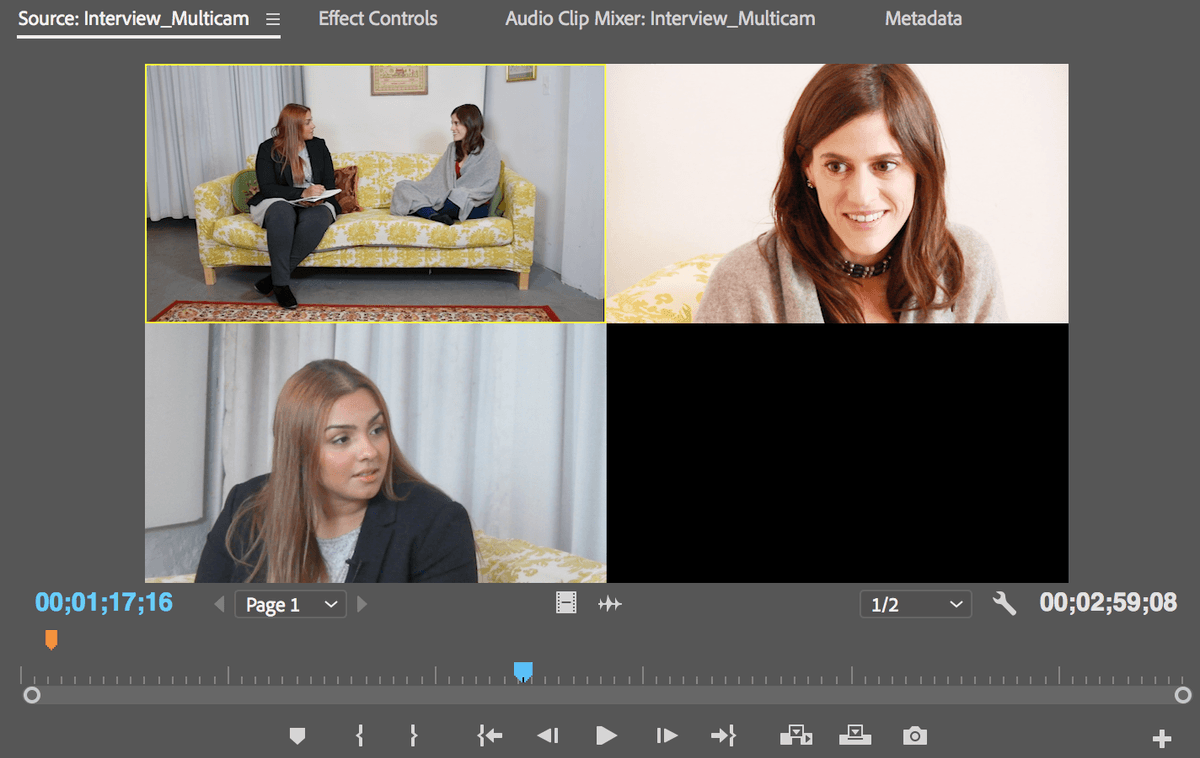
In the Project panel, double-click Interview-Multicam.
In the Source Monitor, play through some footage and notice:
- All 3 clips are shown simultaneously and have been synced! (In the beginning and end some cameras will show black because they didn’t start/stop recording all at the same time.)
- The cameras appear in the order in which we selected the clips when creating the multicam sequence.
- In the Project panel, CTRL–click (Mac) or Right–click (Windows) on Interview-Multicam and choose Sequence Settings.
At the top, change Timebase from 59.94 frames/second to 29.97 frames/second.
NOTE: 59.94 is the frame rate of the first camera footage we used (which was accidentally set on the camera before recording). The other cameras are 29.97 fps and we don’t need such a high frame rate for a low motion interview.
- Click OK.
We need to create a new sequence so we can edit the multi-cam source sequence we just created. CTRL–click (Mac) or Right–click (Windows) on Interview-Multicam and choose New Sequence From Clip.
In the Project panel, there are 2 things named Interview-Multicam with different icons:
- This icon
 is for the sequence we just made. It should currently be selected.
 - This icon
 is for the multicam.
- This icon
Rename the new sequence
to Interview-Multicam-edit.In the Timeline, click on the Interview-Multicam clip to select it. (This should be the only clip there.)
Move the playhead forward (past 30 seconds).
At the top of the keyboard in the row of numbers, press the 2 key to switch to the interviewee shot.
NOTE: You cannot use the number pad for these shortcuts (they are used to type in timecode). Use the numbers at the top of the keyboard.
Press the 3 key to switch to the interviewer shot.
Press 1 to change back to the wide shot. So convenient!
Removing Unwanted Sections
Let’s go through the footage and isolate the portion of the interview we want to show. If the interview were longer, this is also the point at which we would remove portions of the video and audio that we won’t be using, including extraneous chatter and long pauses.
- In the Timeline, move the playhead to just before the interviewer (Laune) asks the first questions, “Have you ever had any life-changing experiences…” (which should be at 58;16). This is the beginning of the audio we want to use.
At the top left of the Timeline:
- Make sure Snap
 is on (the icon is blue).
 - Make sure Linked Selection
 is on (the icon is blue).
- Make sure Snap
Hit C to get the Razor tool
 .
.Click on the clip where the playhead is to cut it.
Move the playhead to just after “rapid pace” (this should be around 01;19;07), after the interviewer (Laune) looks down at her notes.
Click on the clip where the playhead is to cut it.
Hit V to get the Selection tool
 .
.We want to keep the middle section we just cut, and remove the unwanted beginning and ending parts. Click on the last section of video (starting around 01;20;00) to select it.
Hit Delete. Notice both the video and audio were deleted there.
Click on the first section of video to select it.
- CTRL–click (Mac) or Right–click (Windows) on the selection and choose Ripple Delete.
- Hit the
\key to make the remaining part fill the Timeline. Play through to see and hear how the conversation sounds.
Save the project by hitting Cmd–S (Mac) or CTRL–S (Windows).
Editing the Multicam
Next, we’ll be cutting between the three camera angles at key moments in the conversation. One of the main reasons we want to do this here is to make the scene more interesting to watch than from one angle alone. Among the many things that can be done with editing: hiding bad shots by cutting away to better shots, setting the pace of a story, adding dramatic tension, creating metaphorical visual connections between subjects that may not otherwise be apparently connected, and the list goes on.
With the multicam feature in Premiere, we can type the number corresponding to the camera angle we want to use. Remember when we selected the source clips in a specific order then created the multicam? That is how we specified the clip order:
- 1 = Wide shot of both people on couch
- 2 = interviewee (Shanarra)
- 3 = interviewer (Laune)
Hit the 2 key (on the top row of number keys).
- Hit 3.
- Hit 1 to return to the wide shot.
At the top left of the Timeline click on Linked Selection
to turn it off. The icon should turn white to indicate it’s off.We don’t need to cut the audio when we’re changing camera angles.
Move the playhead to 4;16, just before Shanarra says “Oh wow”.
Hit C to get the Razor tool
.Click on the video clip at the playhead to cut it.
Hit V to get the Selection tool
.In the Timeline, click on the 2nd clip.
Hit the 2 key (on the top row of number keys). The video switches to the Shanarra close up!
Play the video and pause after Shanarra says, “I feel like this moment is life changing.” We want to cut back to the interviewer (Laune) just before Shanarra finishes saying this.
Move the playhead to 10;00, toward the end of “this moment is life changing.”
Choose the Razor tool
by hitting C.Cut at the playhead.
Hit V to get the Selection tool
.Select the 3rd clip.
Type 3 to switch to the Laune close up shot.
Move the playhead to 11;11, or just before Shanarra’s line “Our cells are changing…”
Hit C to choose the Razor tool
.Cut at the playhead.
Hit V to get the Selection tool
.Select the 4th clip.
Type 1 to switch to the wide shot.
We want to cut back to Shannara when she says “at a rapid pace.” Move the playhead to 15;15.
Choose the Razor tool
and cut.With the Selection tool
, click the 5th clip.Type 2 to cut to Shannara.
With the Razor tool
, make a cut after Shannara finishes saying “pace” at 17;00.Select the 6th clip and switch to the wideshot by typing 1.
Play through the entire edit to see what things look like so far.
Using a Rolling Edit
When Shannara says “life changing” it would be nice if we could get a bit more of a reaction from Laune. To do this, we can shorten Shanarra’s close-up (second shot) and extend Laune’s close-up (third shot) using something called a rolling edit.
Move the playhead to about 8;26 and play to see the part we want to change. This is where Shanarra finishes saying “I feel like this moment” and is about to say “is life changing.”
In the Tools panel, click and hold on the Ripple Edit tool
 , and choose the Rolling Edit tool
  (or hit the letter N on your keyboard).
With the playhead still at 8:26 turned on, hover over the cut-line between clips 2 and 3 and drag to the left until the edit-point snaps to the playhead.
NOTE: The Rolling Edit tool only works when over a cut, not over a clip.
Play it back starting around 8 seconds. As you can see, the Rolling Edit tool shortened Shanarra’s close-up and extended the next close-up of Laune without putting the clips out of sync!
But, this is not quite what we wanted–Laune is licking her lips at the start of her close-up! Let’s roll that edit back a little.
Use the Rolling Edit tool
to remove the lip-lick and give her a better reaction.Play to see the change.
That’s it for now. Hit Cmd–S (Mac) or CTRL–S (Windows) to save and leave the project open.
Real-Time Switching for Mult-Cam Editing
This exercise showed how to manually make cuts and switch cameras. Another approach is to visually make cuts in real-time while watching the footage. Here’s how:
- At the bottom right of the Program Monitor, click the Button Editor icon
 .
. - Find the Toggle Multi-Camera View icon
 and drag it down into the lineup of used buttons below.
 - Click OK.
- In the icons below the Program Monitor, click the Toggle Multi-Camera View icon . Now you can see all the cameras as you play!
- Start at the beginning of the timeline, play the video.
As you watch the video, choose a camera by either:
- Clicking on a camera in the Program Monitor.
- Pressing the keystroke for the desired camera (1,2, 3, etc.).
- You will not see the cuts being made in real-time, but when you stop the playback you’ll see all your cuts have been made!
- You’ll want to go back over your edits and use the Rolling Edit tool to adjust as needed.