April 1, 2026Kalika Kharkar Sharma/15 min read

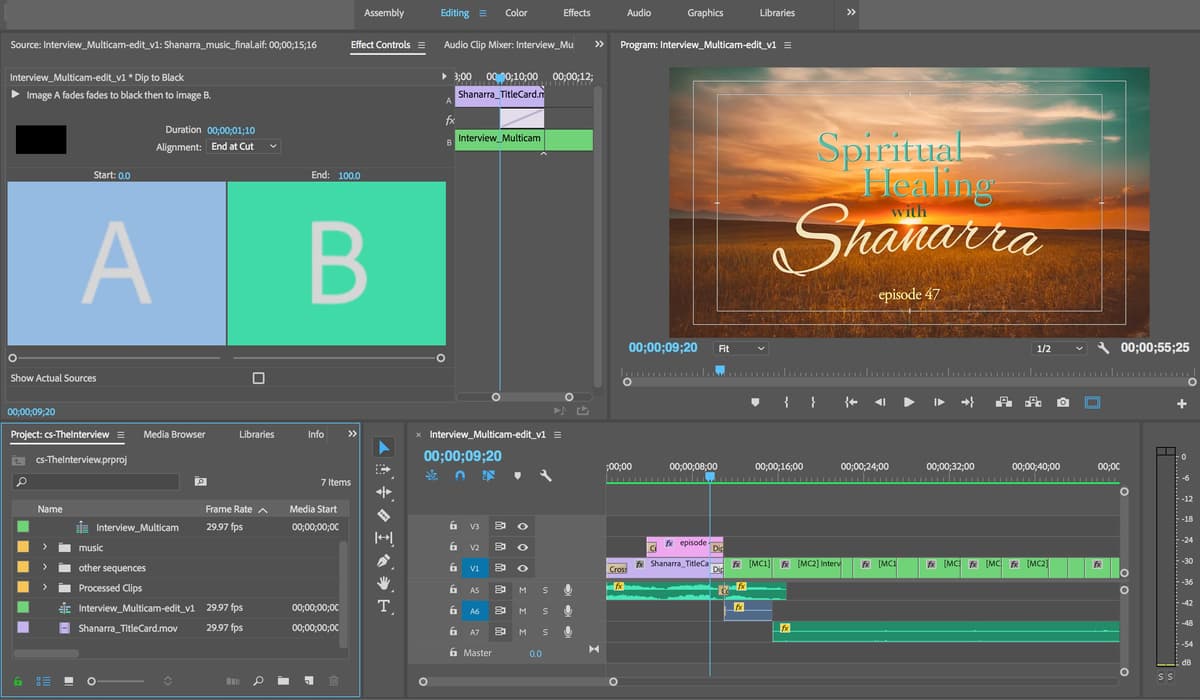
The Interview: Adding Titles, Transitions, & Editing Music in Premiere Pro

Master professional video editing techniques in Premiere Pro

What You'll Learn

Title Sequence Integration

Import and customize pre-made title sequences. Learn to adjust timing and add smooth fade transitions.

Professional Transitions

Apply dip to black effects and cross dissolves. Create seamless visual flow between clips.

Audio Enhancement

Boost audio levels, add background music, and balance multiple audio tracks for professional sound.

Topics Covered in This Premiere Pro Tutorial:

Importing the Title Sequence, the Dip to Black Transition, Adjusting Audio, Adding Background Music

Exercise Preview

ex prev 2b

Project Continuity

This exercise builds on the previous multicam interview setup. If you haven't completed Exercise 5C, use the provided starting project file to catch up.

Exercise Overview

In this exercise, we'll continue developing our Shanarra interview video by implementing professional finishing techniques that elevate your content to broadcast quality. You'll master the art of seamlessly integrating pre-made title sequences—a critical skill for client work where branding elements are often provided separately. We'll also explore sophisticated transition work and audio balancing techniques that distinguish amateur productions from professional content. These skills form the foundation of advanced post-production workflows used in documentary filmmaking, corporate videos, and streaming content.

Re-Previewing the Final Video

  1. You should still have yourname-TheInterview open in Premiere Pro. If you closed it, re-open it now by going to File > Open Project then Desktop > Class Files > Premiere Pro Class > Multicam Interview. We recommend completing the previous exercise (5C) before starting this one, as the workflows build upon each other. If you haven't finished it, follow the sidebar instructions below.

If You Did Not Do the Previous Exercise (5C)

  1. If a project is open in Premiere Pro, go to File > Save, then File > Close Project.
  2. Go to File > Open Project and navigate to Desktop > Class Files > Premiere Pro Class > Multicam Interview > Finished Projects.
  3. Double–click on Interview-Ready for Title Sequence.prproj.
  4. Go to File > Save As. Name the file yourname-TheInterview.prproj and save it back into the Multicam Interview folder.
  • If you don't already have the final video (Shanarra Interview.mp4) open in QuickTime, re-open it from the Multicam Interview > Final Movie folder. Having this reference open allows you to understand the professional pacing and flow we're aiming to achieve.

  • Play through the video carefully and analyze the following sections we haven't completed yet. Understanding these elements before implementation helps you make informed creative decisions:

    • The opening features a polished title sequence fading in over a sunset image—a classic technique that establishes mood and professionalism. We'll import this pre-made sequence and integrate it seamlessly into our timeline.
    • At 0:07, notice the elegant fade to black followed by a dissolve to the wide interview shot. This "dip to black" transition creates a natural pause that signals a shift from introduction to main content—a technique borrowed from broadcast television.
  • Keep this reference video open throughout the exercise. Professional editors constantly reference their target output to ensure consistency and quality.

  • Quick Start Setup

    1

    Open Base Project

    Navigate to Finished Projects folder and open Interview-Ready for Title Sequence.prproj

    2

    Save As New File

    Use Save As to create yourname-TheInterview.prproj in the Multicam Interview folder

    3

    Preview Reference

    Open Shanarra Interview.mp4 to see the final video structure and timing

    Importing the Title Sequence

    Working with pre-made title sequences is a common scenario in professional video production. Clients often provide branded opening sequences, or you might reuse sequences across multiple projects. This workflow demonstrates how to efficiently integrate external Premiere Pro projects while maintaining media links and preserving the original animation work.

    1. From the Project panel, open the Interview-Multicam-edit sequence (if it's not already open).

    2. Press the \ key to zoom the Timeline so you can see all clips at once. This keyboard shortcut is essential for timeline navigation—if it makes clips too small, press \ again to return to your previous zoom level.

    3. We need to create space for the title sequence at the beginning. Click anywhere in the Timeline panel to ensure it has focus—this step is crucial for the next selection command to work properly.
    4. Press Cmd–A (Mac) or CTRL–A (Windows) to select all clips in the timeline.

    5. Choose the Selection tool selection tool from the toolbar.

    6. Drag all selected clips to the right approximately 15 seconds (precision isn't critical here). You'll see a tooltip showing the exact duration you've moved them—this visual feedback helps maintain consistency across multiple edits.

    7. Go to File > Import to begin the project import process.

    8. Navigate to Desktop > Class Files > Premiere Pro Class > Multicam Interview > Projects to Import.

    9. Select Title Card.prproj and click Import (Mac) or Open (Windows).

    10. In the import dialog that appears, configure these critical settings:

      • Under Project Import Type, choose Import Entire Project—this preserves all sequences, bins, and organizational structure
      • Check Create folder for imported items—this prevents imported assets from cluttering your main project panel
    11. Click OK to proceed with the import.

    12. If you encounter a dialog about missing media, this is common when moving projects between systems. Here's how to relink them efficiently:

      • The first missing file (indicated by no checkmark) should be pre-selected, likely Shanarra_title.psd
      • Click the Locate button at the bottom right
      • Navigate to Desktop > Class Files > Premiere Pro Class > MultiCam Interview > Capture. Find Shanarra_title.psd in the graphics subfolder and double-click it.

        Once you locate one file, Premiere Pro's intelligent relinking should automatically reconnect the remaining files in the same directory structure.

      • If you see a message about missing preview files, simply click Skip All—these will be regenerated as needed.

      NOTE: If you accidentally close the link window or files remain offline, select the missing files in the Project panel, CTRL–click (Mac) or Right-click (Windows), and choose Link Media to restart the process.

    13. In the Project panel, expand the newly created Title Card bin to access its contents.
    14. Drag the TitleCard sequence to the beginning of your timeline on track V1.

    15. Notice that this sequence imports with audio, which conflicts with our interview audio. Press Cmd–Z (Mac) or CTRL–Z (Windows) to undo this action.

    16. Instead, let's import video only. In the Project panel, CTRL–click (Mac) or Right-click (Windows) the TitleCard sequence and choose Open in Source Monitor.

    17. From the bottom of the Source Monitor, locate and drag the Video Only button drag video only icon to the beginning of your timeline.

      This creates what's called a "nested sequence"—the entire TitleCard sequence becomes a single clip within your main edit, preserving all its internal animations and effects.

    18. Double-click the TitleCard clip in your timeline to peek inside its structure. You'll see all the individual clips, animations, and transitions that make up this sequence. This demonstrates the power of nested sequences for organizing complex motion graphics. Close this timeline tab (click the small X) to return to your main edit.

    19. Back in the Interview-Multicam-edit timeline, we need to trim the title sequence to the appropriate length. Position your playhead at 10;23.
    20. Drag the right edge of the TitleCard clip leftward until it ends at the playhead position.

    21. Professional titles typically fade in rather than cut in abruptly. CTRL–click (Mac) or Right–click (Windows) on the left edge of the TitleCard clip and choose Apply Default Transitions. This adds a cross dissolve for a smooth entrance.

    22. Navigate to the beginning of your timeline and preview the opening fade-in effect.

    23. Let's refine the fade timing for a more cinematic feel. Double–click the Cross Dissolve transition, enter 200 to set a two-second duration, then click OK. This longer fade creates a more elegant, professional introduction.

    24. While we're optimizing transitions, let's add a proper fade-out at the end of the interview. Navigate to your final interview clip, CTRL–click (Mac) or Right–click (Windows) on its right edge, and choose Apply Default Transitions.

    25. Set this closing Cross Dissolve to 2 seconds as well, maintaining consistency with your opening.

    26. Finally, let's clean up the gap between your title and interview content. CTRL–click (Mac) or Right–click (Windows) on the empty space between these elements on track V1 and choose Ripple Delete. This removes the gap and shifts everything leftward automatically.

    Timeline Organization

    Always create space at the beginning of your timeline before importing title sequences. Use Cmd+A to select all clips and drag them right about 15 seconds.

    Title Import Process

    0/4

    The Dip to Black Transition

    The "dip to black" transition is a sophisticated technique that creates a moment of pause between content sections. Unlike simple cuts or dissolves, this transition completely fades to black before revealing the next shot, creating psychological separation that's particularly effective when shifting from titles to main content. It's widely used in documentary work and narrative films to signal major story transitions.

    1. Access your effects library by going to Window > Effects.

    2. Navigate to Video Transitions > Dissolve and locate Dip to Black in the list.

    3. Drag Dip to Black and precisely drop it at the junction between the TitleCard and the first interview clip on track V1.

    4. If the transition doesn't automatically center itself between the clips, open the Effect Controls window and change the Alignment to Center at Cut. This ensures equal fade-out and fade-in timing.

    5. Play through this transition section to evaluate its effectiveness. The result should feel natural and professional, with a complete fade to black creating clear separation between your title sequence and interview content.

    6. To enhance this transition further, we'll add an audio fade-in that matches the video timing. First, ensure Linked Selection linked selection icon is disabled (appears white) at the top left of the Timeline. This allows us to work with audio independently since we already have a video transition in place.
    7. In the Timeline, CTRL–click (Mac) or Right–click (Windows) on the left edge of the audio clip on track A1 and choose Apply Default Transitions.

    8. Double–click the newly created audio transition on track A1.

    9. Set the Duration to 8 frames and click OK. This creates a subtle audio fade-in that complements your video transition without being overly dramatic.

    Linked Selection Control

    Turn off Linked Selection (make button white) when adding audio transitions separately from video. This prevents unwanted double transitions.

    Transition Types

    FeatureCross DissolveDip to Black
    Best Use CaseClip to clip blendingDramatic scene breaks
    Visual EffectSmooth blendFull black frame
    Professional FeelCasual transitionsCinematic breaks
    Recommended: Use Dip to Black for title-to-content transitions to create professional separation

    Adjusting the Audio

    Professional audio mixing requires careful attention to dialogue levels throughout your program. Interview audio often varies in volume due to microphone placement, speaker positioning, or environmental factors. The key is achieving consistent, clear dialogue that doesn't strain your audience while maintaining the natural dynamics of conversation. Modern Premiere Pro versions offer enhanced audio processing capabilities that make this work more precise than ever.

    1. To visualize audio levels for precise editing, ensure audio keyframes are visible by clicking the Wrench wrench near the top left of the Timeline and choosing Show Audio Keyframes.
    2. If the keyframe line isn't visible in track A1, drag the track's bottom edge downward to expand its height—this provides better visual control over audio adjustments.
    3. Move your playhead to 15;09, which marks the transition point where we switch camera angles. Careful listening reveals that the audio before this point is noticeably quieter than after—this is common in multicam interviews due to varying microphone distances.
    4. Select the audio clip on track A1 to prepare for level adjustments.
    5. In the Effect Controls panel, locate the Level parameter and click the Add/Remove Keyframe button keyframe dip gray to its right.

      This creates a keyframe keyframe end that locks the current volume level from this point forward—maintaining the good audio levels in the latter portion of your interview.

    6. Now we'll boost the volume for the quieter opening section. Position your playhead at 10;23, which corresponds to the start of the audible interview audio.
    7. In Effect Controls, change the Level value to 15 dB and press Return/Enter to confirm the change.

      Keyframe Strategy

      Set keyframes at audio problem points first, then adjust earlier sections. This locks in good audio while fixing problematic areas.

    Boosting Audio Levels

    Premiere Pro 2020 and later versions can boost audio levels up to 15dB (compared to the 6dB limit in earlier versions), providing more flexibility for recovering quiet dialogue. When 15dB isn't sufficient, explore the Channel Volume controls in the Effect Controls panel, where you can independently adjust Left and Right channels for additional gain.

    For extremely quiet audio that requires even more amplification, consider duplicating the audio clip to create an additional layer of sound—effectively doubling the volume while maintaining audio quality. This technique is preferable to excessive digital gain, which can introduce unwanted artifacts.

  • By default, Premiere Pro creates smooth transitions between keyframes, meaning your audio will gradually ramp from the 15dB boost down to 0dB (normal level). While this works for some situations, we want the higher level to maintain consistently until it reaches the second keyframe, creating a more controlled audio experience.

    To achieve this, we'll convert the first keyframe to a "Hold" keyframe:

    • In the Effect Controls panel, you'll see two keyframe diamonds next to the Level parameter keyframe end. The first keyframe may appear partially hidden, showing only its right edge.

      interview first audio keyframe

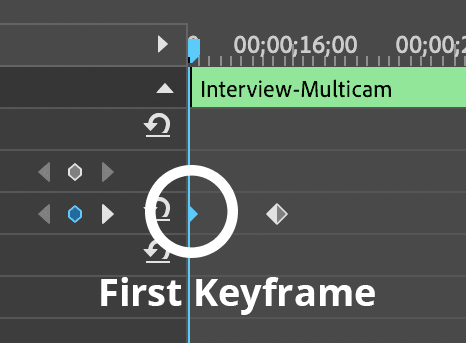
    • CTRL–click (Mac) or Right–click (Windows) on the first keyframe and choose Hold.

      NOTE: Hold keyframes appear as squares rather than diamonds, making them easy to identify visually.

  • Play through the audio section to verify that the interviewer's voice is now properly audible and matches the volume level of the later portions. This kind of precise audio matching is essential for professional productions.

  • Audio Boost Capabilities by Version

    Pre-2020 Premiere
    6
    Premiere 2020+
    15
    With Channel Volume
    30

    Hold Keyframes vs Linear Keyframes

    Pros
    Maintains consistent volume level
    No gradual volume changes
    Square shape indicates hold type
    Better for sudden audio level corrections
    Cons
    Can create abrupt audio jumps if not placed carefully
    Less natural than gradual transitions
    Requires precise placement at edit points

    Adding Background Music

    Background music in interview videos requires delicate balancing—it should enhance the emotional impact without competing with dialogue. Professional editors use music to guide viewer emotions and provide continuity between sections, but it must remain subliminal. The key is strategic volume ducking that allows music to support the opening and closing while stepping back during active conversation.

    1. In the Project panel, expand the Title Card folder and locate the music folder within it.

    2. Drag the music folder out of the Title Card folder to the main project level—this reorganization makes the music assets more accessible for future use.

    3. Expand the music folder and double–click Waterfall.mp3 to load it into the Source Monitor.

    4. Choose Markers > Clear In and Out to remove any existing edit points from previous work sessions.

    5. Zoom into the beginning of the audio waveform in the Source Monitor to precisely identify musical phrases.

    6. Navigate to 12;29 in the Source Monitor—this timing falls after the second complete musical phrase, creating a natural stopping point that won't feel abruptly cut off.

    7. Press o to set your out point at this position.

    8. From the bottom of the Source Monitor, drag the Drag Audio Only icon drag audio only icon to the beginning of track A2 in your timeline.

    9. Play the opening section to evaluate the music level—you'll likely find it's too prominent and competes with your title sequence audio elements.

    Music Integration Workflow

    1

    Organize Assets

    Move music folder out of Title Card folder for better project organization

    2

    Set Edit Points

    Clear existing in/out points, zoom in, and set out point at 12:29 after second musical phrase

    3

    Audio-Only Import

    Use Drag Audio Only icon to place music on A2 track at timeline beginning

    Adjusting Music Volume

    Professional music mixing for dialogue content follows established principles: music should enhance without overwhelming, and it should dynamically respond to the presence of dialogue. We'll create a sophisticated mix that allows the music to be present during titles, then gracefully recede as conversation begins.

    1. In the Timeline, select the music clip to access its audio controls.

    2. In the Effect Controls panel, locate the Volume section and click the stopwatch stopwatch blue next to Level to disable keyframes—we want a consistent initial level.

    3. Set the Level to –2 dB and press Return/Enter. This provides a subtle but noticeable presence without overwhelming the opening elements.

    4. As the interview dialogue begins, we need the music to recede further into the background. Position your playhead at 9;20—this timing precedes the main dialogue, allowing for a smooth transition.

    5. If track A2's audio keyframes aren't visible, expand the track height by dragging its bottom edge downward.

    6. Press P to select the Pen tool pen tool—this tool allows precise keyframe placement directly in the timeline.

    7. Click on track A2 at the 9;20 position to create a keyframe. You'll see this keyframe appear both in the timeline and in the Effect Controls panel, confirming the connection between these interfaces.

    8. Advance your playhead to 10;26, where the dialogue becomes more prominent.

    9. In the Effect Controls panel, adjust the Level to –8 dB to create your second keyframe. This creates an automatic volume ramp between the two keyframes—the music gracefully fades from –2dB to –8dB over this time span, settling into the background as dialogue takes priority.

    10. Return to the Selection Tool selection tool by pressing V.

    11. Play through the opening sequence to evaluate your mix. The music should feel supportive and professional, present enough to add emotional context but quiet enough that dialogue remains crystal clear.

    Music Volume Adjustments

    Timeline Start

    Initial Volume Reduction

    Set base music level to -2 dB for proper balance

    9:20

    First Keyframe

    Create keyframe at 9:20 to begin volume fade

    10:26

    Interview Fade

    Reduce to -8 dB at 10:26 when interview begins

    Adding the Closing Music

    Closing music serves a different purpose than opening music—it should provide resolution and emotional closure while gracefully fading out to avoid an abrupt ending. We'll use a different section of the same musical piece to maintain consistency while providing the sense of conclusion that professional productions require.

    1. In the Project panel's music folder, double-click Waterfall.mp3 again to reload it in the Source Monitor.
    2. Clear any existing markers by going to Markers > Clear In and Out.
    3. Navigate to 2;08;08 and press i to set your in-point—this section of the music provides the emotional resolution appropriate for closing.
    4. Move to 2;26;09 and press o to set your out-point, capturing a complete musical phrase.
    5. From the Source Monitor, drag the Audio Only button drag audio only icon to track A2, carefully aligning its right end with the conclusion of your final interview clip.

    6. Play through the transition between opening and closing music tracks. The musical continuity should feel natural, as if it's one continuous piece rather than two separate clips.

    7. Select the closing music clip in your timeline to adjust its levels.

    8. In the Effect Controls panel, configure the volume settings:

      • Click the stopwatch stopwatch blue next to Level to disable keyframes
      • Set Level to -8 dB to match the background level established during dialogue sections
    9. Professional productions never end abruptly—always include a graceful fade-out. CTRL–click (Mac) or Right–click (Windows) on the right edge of your ending music clip and choose Apply Default Transitions.

    10. Double–click the Constant Power transition that was just applied.

    11. Set the Duration to 200 (2 seconds) and click OK. This creates a smooth, professional fade-out that doesn't call attention to itself.

    12. Before finalizing, let's render your work for smooth playback. Go to Sequence > Render In to Out and allow Premiere Pro to process your timeline.

    13. Once rendering completes, position your playhead at the timeline beginning and press Spacebar to review your complete work. The result should demonstrate broadcast-quality pacing, audio balance, and visual flow.

    14. Save your progress with Cmd–S (Mac) or CTRL–S (Windows) and keep the project open for any final adjustments.

    Closing Music Setup

    0/5

    Key Takeaways

    1Always create timeline space before importing title sequences by selecting all clips and moving them right approximately 15 seconds
    2Use Video Only drag from Source Monitor when importing title sequences to avoid unwanted audio tracks
    3Premiere Pro 2020 and later allows 15dB audio boost compared to 6dB in earlier versions, with Channel Volume providing additional gain
    4Turn off Linked Selection when adding audio transitions separately from video to prevent applying transitions to both tracks
    5Hold keyframes maintain consistent volume levels without gradual changes, appearing as squares rather than diamonds
    6Dip to Black transitions create professional separation between title sequences and main content
    7Use the Pen tool to create precise keyframes for volume adjustments at specific timeline positions
    8Render your sequence after major edits using Sequence > Render In to Out for smooth playback preview

    RELATED ARTICLES