London Travel: Promo Video in Premiere Pro
What This Tutorial Covers
B-Roll Pacing
Cuts that match the energy of music and narration.
Color Grading
Lumetri color for a cinematic travel aesthetic.
Title Design
Branded title cards that introduce locations.
Noble Desktop's Video Editing & Motion Graphics Certificate teaches Premiere Pro alongside After Effects, DaVinci Resolve, and the full motion design toolkit.
Discover how to create a promotional video showcasing London travel using Premiere Pro, covering various topics like importing files, creating a sequence, setting in and out points, adding audio and video to the timeline, and using timeline tools.
Exercise Preview

Importing Files
Before you can work, video, audio, etc. must be imported into your project.
Choose File > Import.
Navigate to Desktop > Class Files > Premiere Pro Intermediate > London Travel Promo.
Click once on the Media folder to highlight it (do NOT go into the folder).
Click Import (Mac) or Import Folder (Windows).
At the bottom left of the Project panel, click on the List View button
 .
.In the Project panel, use the arrow
 to expand the Media bin.
Drag Disco Zombies_Drums Over London.mp3 to the New Bin
 button on the bottom right of the Project panel.
The bin’s name should still be editable. If it isn’t, click once on the bin’s name to make it editable.
- Rename the new bin 02—Audio.
NOTE: You can also right–click or CTRL–click (Mac) on the file and choose New Bin from Selection.
Click on the Video bin and press the Return (Mac) or Enter (Windows) key to make the name editable.
- Rename this bin 01—Video
Click the arrows to the left of each bin to collapse the 01—Video and 02—Audio bins and:
- Drag both sub–bins (01—Video and 02—Audio) out of the Media bin.
- Select the Media bin and hit Delete (Mac) or Backspace (Windows).
Click the arrow
next to 01—Video bin to see the files inside.Drag the divider between the Name and Frame Rate headers to the right to make it easier to read the long clip names.
Choose File > Save or press Cmd–S (Mac) or CTRL–S (Windows).
Creating a Sequence
A Premiere Pro sequence is the timeline where you assemble your videos, audio and images (if you have any) together. Let’s choose a part of our footage and start our sequence from that. In general, the rule of thumb in video editing programs is to create your sequence from whatever video represents the formatting of the majority of your footage.
In the Project panel, inside the 01—Video bin, double–click on The Tower Bridge in London.mp4 clip to open it in the Source panel.
Click on the playhead position (the timecode at the bottom left of the Source panel) to highlight the numbers.
Type 800 and press Return (Mac) or Enter (Windows) to move the playhead on the time ruler to 00;00;08;00 (8 seconds).
Press I on your keyboard, or click the Mark In button
 in the Transport controls to set the In Point of this clip.
Again click on the playhead position to select the timecode and:
Type 1223 and hit Return (Mac) or Enter (Windows) to move the playhead on the time ruler to 00;00;12;23 (12 seconds, 23 frames).
Press the O key, or click the Mark Out
 button in the Transport controls to set the Out Point for this clip.
Drag the video frame (the big video preview itself in the Source panel) and drop it in the empty Timeline panel where it says “Drop media here to create sequence”.
This creates a new sequence in the Project panel based on the clip, places the clip at the beginning of that sequence, and also names the sequence after the clip.
Locate the new sequence in the Project panel. You identify it by the sequence icon
 to the left of the name. It should be called The Tower Bridge In London (without.mp4 at the end).
CTRL–click (Mac) or Right–click (Windows) on the sequence’s name and choose Rename.
Rename the sequence London Travel Promo and click on any empty area of the Project panel to finalize the change.
NOTE: You may recall the preview movie was square, but this is a standard wide video. We’ll first create a standard aspect ratio video which will be used in some places, and then we’ll also create the square one you previewed.
Add the Audio
In the Project panel, expand the 02—Audio bin using its arrow
.Double–click on the audio icon to the left of Disco Zombies_Drums Over London.mp3 to open it in the Source panel.
In the Source panel, click on the playhead position timecode, type 30700, and hit Return (Mac) or Enter (Windows).
This moves the playhead to 00;03;07;00 (three minutes, seven seconds, and zero frames).
Press I on your keyboard, or click the Mark In button
to set the In Point.Again click on the timecode, type 34129 and hit Return (Mac) or Enter (Windows).
This moves the playhead to 00;03;41;29
Press O on your keyboard, or click the Mark Out button
to set the Out point.Drag the Drag Audio Only icon
 below the video frame in the Source panel and drop it onto the beginning of Audio 1 track on the Timeline (replacing the audio that’s already there).
NOTE: Unlike with video, you can’t drag in the Source panel’s preview window to add audio files to the Timeline.
To the left of the Audio 1 track, click on the Toggle Track Lock button
 to lock it.
NOTE: Locking a track protects all content on it. The area to the left of the timeline (where you can see the track names and switches) is called the Track Header.
Choose File > Save or hit Cmd–S (Mac) or CTRL–S (Windows).
Adding the Remaining Video to the Sequence
Now that you have a sequence created, it’s time to add the remaining video clips. Let’s start by adding a clip after the current one in our timeline.
In the Project panel, double–click on the Vehicles Traveling at Daylight.mp4 clip to load it into the Source panel.
In the Source panel, click on the timecode, type 615 and hit Return (Mac) or Enter (Windows).
- This moves the playhead to 00;00;06;15
- Press I on your keyboard to set the In Point of this clip.
Still in the Source panel, click on the timecode, type in 1114 and hit Return (Mac) or Enter (Windows).
- This moves the playhead to 00;00;11;14
- Press O on your keyboard to set the Out Point of this clip.
- This gives the clip an In/Out duration of 5 seconds.
- Click on the Timeline panel to make it active.
- Hit the
\(backslash) key to zoom in so the clips fill the Timeline. - Hold Shift and press the + (plus) key to expand the height of all of the video and audio tracks in the Timeline.
- In the Timeline panel, if necessary drag your playhead until it is over the first video clip. As long as the playhead is anywhere along the duration of this clip, the action we’re going to do next will work.
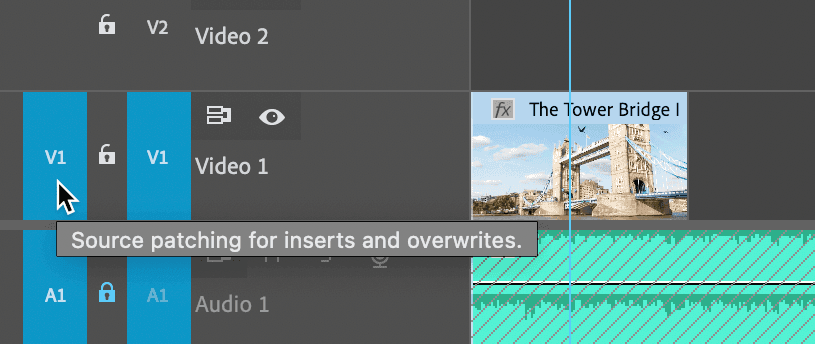
We’re going to do an insert, but first we must indicate which track we want that to happen on.
As shown below, on Video 1 track, click in the empty space to the left of the lock to set the Source patching for inserts and overwrites so it looks as follows:
In the Source panel, drag the Drag Video Only button
 into the Program panel and drop it onto Insert After (the farthest right overlay).
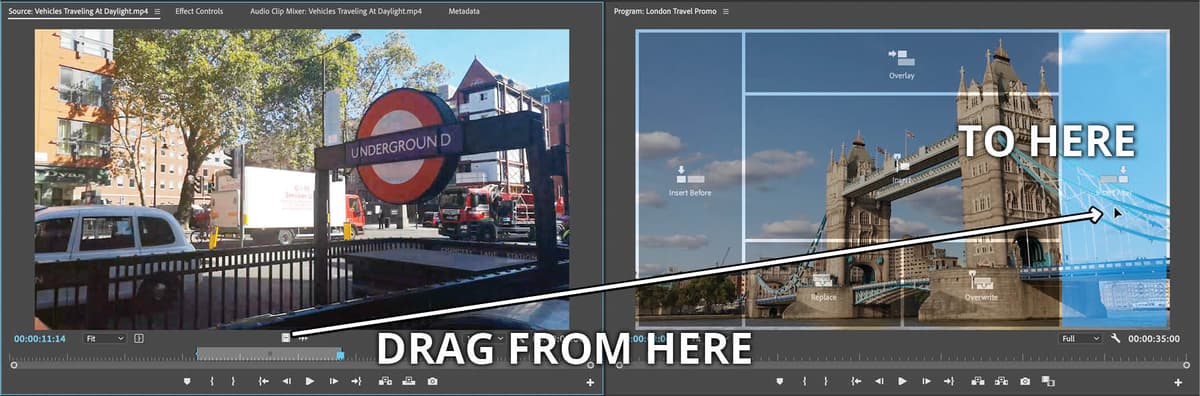
This placed the video portion of the clip onto the timeline (after the clip the playhead was currently above). The new clip should be on Video 1 (after the Tower Bridge clip) if you set the Source patching correctly.
It also moved the playhead at the end of the new clip (which is important for the next several steps).
In the Project panel, double–click on A Busy Day In The Street In Central London.mp4 to load it into the Source panel.
In the Source panel, click on the timecode, type in 400 and hit Return (Mac) or Enter (Windows).
- This moves the playhead to 4;00
- Press I on your keyboard to set the In Point of this clip.
Still in the Source panel, click on the timecode, type in 829 and hit Return (Mac) or Enter (Windows).
- This moves the playhead to 8;29
- Press O on your keyboard to set the Out Point of this clip.
- This again results in a clip with an In/Out duration of 5 seconds.
- Make sure your playhead in the Timeline panel still placed above the second clip of your sequence (at the end of it is fine).
Drag the Drag Video Only icon
into the Program panel on the right and drop it onto Insert After (the farthest right overlay).In the Project panel, double–click on A Woman Dancing Expressively.mp4 to load it into the Source panel.
In the Source panel, move the playhead to 1;10
- Press I to set the In Point of this clip.
In the Source panel, move the playhead to 06;09
- Press O to set the Out Point of this clip.
- Drag the Drag Video Only icon into the Program panel and drop it onto Insert After.
In the Project panel, double–click on River Thames.mp4 to load it into the Source panel.
In the Source panel, move the playhead to 27;20
- Press I to set the In Point.
Still in the Source panel, move the playhead to 37;19
- Press O to set the Out Point.
- Drag the Drag Video Only icon into the Program panel and drop it onto Insert After.
- This results in a clip with an In/Out duration of 10 seconds.
- Click on the Timeline panel to make it active.
- To move the playhead to the beginning of the Timeline panel press the Home key (if you have one). If you don’t have a Home key, drag the playhead back to the beginning of the Timeline or hold the fn (function) key and press Left Arrow.
In the Project panel, double–click on Animation—London Zoom.mp4 to load it into the Source panel.
In the Source panel, move the playhead to 5;00
- Press I to set the In Point.
- For this last clip we are going to use everything from 5 seconds until the end of the clip, so we don’t need to set a new Out point.
We’ve been inserting clips after the current clip. But we want to put this clip before the current clip in the Timeline, so we’re going to use a different insert command.
Drag the Drag Video Only button
into the Program panel and drop it onto Insert Before (the leftmost overlay).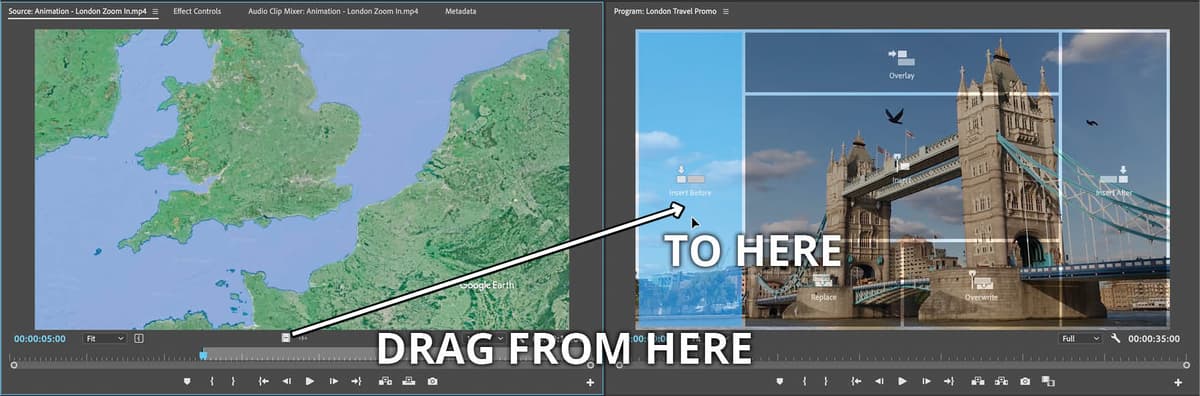
This places the new clip before the clip your playhead is currently above in the Timeline.
- Move the playhead to beginning of the Timeline.
Press the Spacebar to preview the Timeline and notice:
The music is a bit loud so you may want to adjust the volume on your speakers or headphones.
We’ve added the video to the Timeline, but it doesn’t line up with the beat of the music and it even extends past the audio. You’ll fix that in the next exercise.
Choose File > Save or hit Cmd–S (Mac) or CTRL–S (Windows).
Keep the project open because you’ll use it in the next exercise.