Using Video in Animated GIFs
What This Tutorial Covers
Import Video Frames
Photoshop converts video to layers for animation.
Trim & Adjust
Set in/out points and adjust frame rate.
Optimize for File Size
Reduce colors, frames, and dimensions for smaller GIFs.
Noble Desktop's Graphic Design Certificate covers Photoshop alongside Illustrator and InDesign.
Learn the steps to create a GIF within an HTML email, starting with video footage and converting it to a frame animation using Photoshop in this comprehensive tutorial.
Exercise Preview
Video courtesy of istockphoto, © pailoolom, Video #000016852234
Turning Video into Animation
In Photoshop, go to File > Import > Video Frames to Layers.
Navigate into Desktop > Class Files > Animated GIFs Class > Clean Air and double–click the file iStock_000016852234HD720.mov.
The video is too long for our purposes. In the window that opens, choose Selected Range Only.
Check on Limit To Every and set it to 2 Frames.
We can create this animation with the full original video quality, but that will take up unnecessary file size. This way, it will only create a frame for every other image in the video, which means half the number of frames.
Check on Make Frame Animation.
Video Frames to Layers takes every still image that makes up a video and creates a separate layer for each one. If we check Make Frame Animation it will also take each of those layers and turn them into separate frames. That’s pretty much doing the work for us.
On the right, you’ll see a video preview where you can choose where the video starts and stops. Adjust the end/out point (at the bottom below the video preview) to decide where to crop the video. It should look something like this:
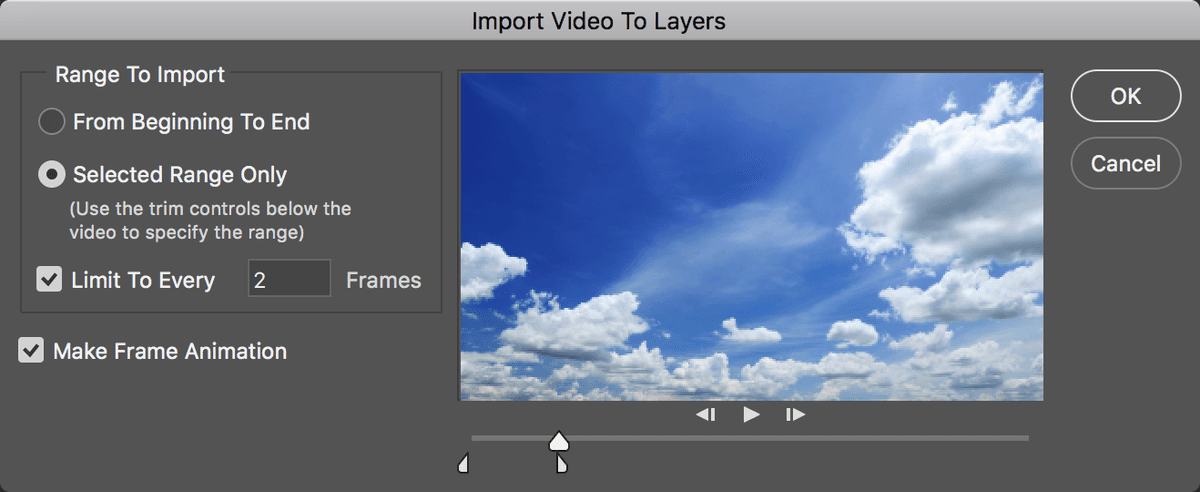
Click OK.
Adjusting the Length & Size
This is still probably a little longer than we need it to be.
Let’s delete all the frames after frame 30. In the Timeline panel, select frame 31 and Shift–click on the last frame in the sequence.
At the bottom of the Timeline panel, click the trash icon
 .
.In the dialog that appears, click Yes.
We have to do the same thing in the Layers panel. Select layer 31 and Shift–click on the very top layer.
At the bottom of the Layers panel, click the trash icon
.In the dialog that appears, click Yes.
30 layers is still a lot of layers. To keep things more organized, let’s group the layers together. Select all of the layers by clicking the top layer and Shift–clicking the bottom layer.
Go to Layer > Group Layers or press Cmd–G (Mac) or CTRL–G (Windows).
In the Layers panel, double–click the Group 1 folder name. Rename the group clouds so we remember what it is.
Notice that the frame delay time has been set to 0.04 seconds for all our frames. This would be correct if we imported every frame in the video. Because we only imported half the frames, we need to double the delay time.
Select all 30 frames.
Click 0.04 at the bottom of any of the selected frames, and from the menu that appears, choose Other.
Set the Delay to 0.08 seconds.
Click OK.
NOTE: You can also do some math to figure out this number if you’re unsure. The original video was 24 frames per second. When we imported half the frames, it became 12 frames per second. That means each frame should last 1⁄12 of a second, or about 0.08 seconds.
The animation looks good, but Photoshop imported everything with the original video dimensions, which are too large. To change them, go to Image > Image Size and set the following:
Width: 600 Pixels Resolution: 72 Pixels/Inch Resample: Check it on Click OK.
The width is correct, but the height is still too tall. We’ll have to crop it down. Luckily, Image Size and Canvas Size both apply to the animation as a whole, so resizing isn’t too tricky.
- Go to Image > Canvas Size and set:
- Height: 300 Pixels
- Choose the top middle Anchor (click the top middle arrow next to Anchor), so that the canvas is cropped from the bottom.
- Click OK.
- If you get a warning about clipping, click Proceed.
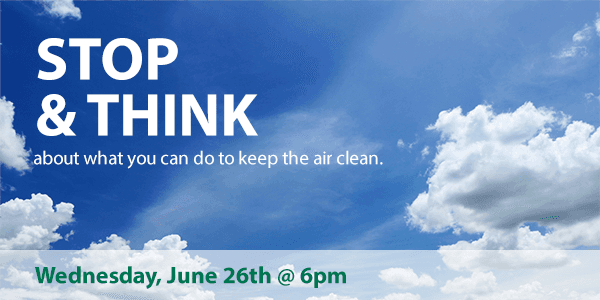
Adding the Text
After the clouds roll by once, we want to add the message.
Select frame 30 and click the Duplicates selected frames button
 .
.With frame 31 selected, choose the Type tool
 .
.- In the Options bar, set the text to:
- Myriad Pro Bold
- Font Size: 61 pt
- Left align text

- Text Color: white
In the Character panel (Window > Character) set the leading
 to 56 pt.
Click towards the top left corner of the canvas and type:
STOP & THINK
Use the Move tool
 to move the text into a good position in the top left corner.
With the Type tool
, click somewhere below the existing type.In the Options bar, set the text to Myriad Pro Regular, 19 pt.
Type the following:
about what you can do to keep the air clean.
Use the Move tool
if you need to move it into a good position below STOP & THINK, making sure it does not get lost in the clouds.We also need to add some text at the bottom. With the Type tool
, click somewhere near the bottom of the canvas.In the Options bar, set the text to Myriad Pro Bold, 24 pt.
Click the color box and set the Color of the text to #00754F.
Type the following:
Wednesday, June 26th @ 6pm
Use the Move tool
to move it into at the bottom left of the file. Don’t worry if it’s hard to read—we are going to place a shape behind it next.Choose the Rectangle tool
 from the Tools panel.
In the Options bar, set the Fill color to white.
- Draw a rectangle along the bottom of the canvas that stretches all the way from the left to the right, and from the bottom to just above the words Wednesday, June 26th. It’s OK if it goes over the edge of the canvas.
- In the Layers panel, drag the Rectangle layer below the Wednesday layer.
In the Layers panel, set the Opacity of the Rectangle layer to 60%.
If you need to adjust the size of the rectangle, go to Edit > Free Transform and make your adjustments. When done, press Return (Mac) or Enter (Windows).
Animating the Text
The layout on frame 31 should look good with all of our information. But look at the rest of our frames. Oops! When we created new layers, they were added to every single frame, not just the frame we selected. Luckily this is easy to fix.
Select frames 1 through 31.
In the Layers panel, hide the three text layers and the Rectangle layer.
Now the text shouldn’t be visible in any of the frames. Much better. Now we can bring in the text with animation. We’ll have some of it fade in, some of it move in, and some of it will just appear.
Select frame 31 and click Duplicates selected frames
.With frame 32 selected, show the STOP & THINK layer by clicking the empty box to the left of it.
Let’s fade in the text. Select frames 31 and 32.
At the bottom of the Timeline, click the Tweens animation frames button
 .
.In the Tween dialog, set:
- Frames to Add: 4
- Parameters: Keep everything checked.
Click OK.
Select frame 36 and click Duplicates selected frames
.Select frame 37 and show the about what you can do… text layer by clicking the empty box to the left of it.
With frame 37 selected, click Duplicates selected frames
.With frame 38 selected, show both the Rectangle and Wednesday, June 26th layers.
With frame 38 selected, click Duplicates selected frames
.We want this last bit of text and its rectangle to move in from the bottom, so we’re going to go back a frame and have it start off-screen.
Select frame 38.
Select both the Rectangle and Wednesday, June 26th layers in the Layers panel.
Select the Move tool
.Hold Shift and drag both layers down so that they are just off the edge of the canvas. (You can also use the Arrow keys on the keyboard to nudge them.)
To animate the text moving in, select frames 38 and 39.
At the bottom of the Timeline panel, click the Tweens animation frames button
.In the Tween dialog, set:
- Frames to Add: 4
- Parameters: Keep everything checked.
Click OK.