April 1, 2026Dan Rodney/8 min read

Using Adjustment Layers as Clipping Masks

Master Advanced Photoshop Adjustment Layer Techniques

Prerequisites

This tutorial assumes you have basic knowledge of Photoshop layers, selection tools, and the Properties panel. Make sure you have the provided exercise files downloaded before starting.

Topics Covered in This Photoshop Tutorial:

Master advanced image compositing techniques by adjusting color, brightness, and contrast of specific image areas using the precision of adjustment layers combined with clipping masks

Core Techniques You'll Master

Clipping Masks

Learn to apply adjustment layers to specific parts of your image using clipping masks for precise control.

Layer Management

Master proper layer organization and naming conventions for complex compositions with multiple elements.

Non-Destructive Editing

Use adjustment layers to make color and brightness changes without permanently altering your original images.

Exercise Preview

preview clipping masks for adjustment layers

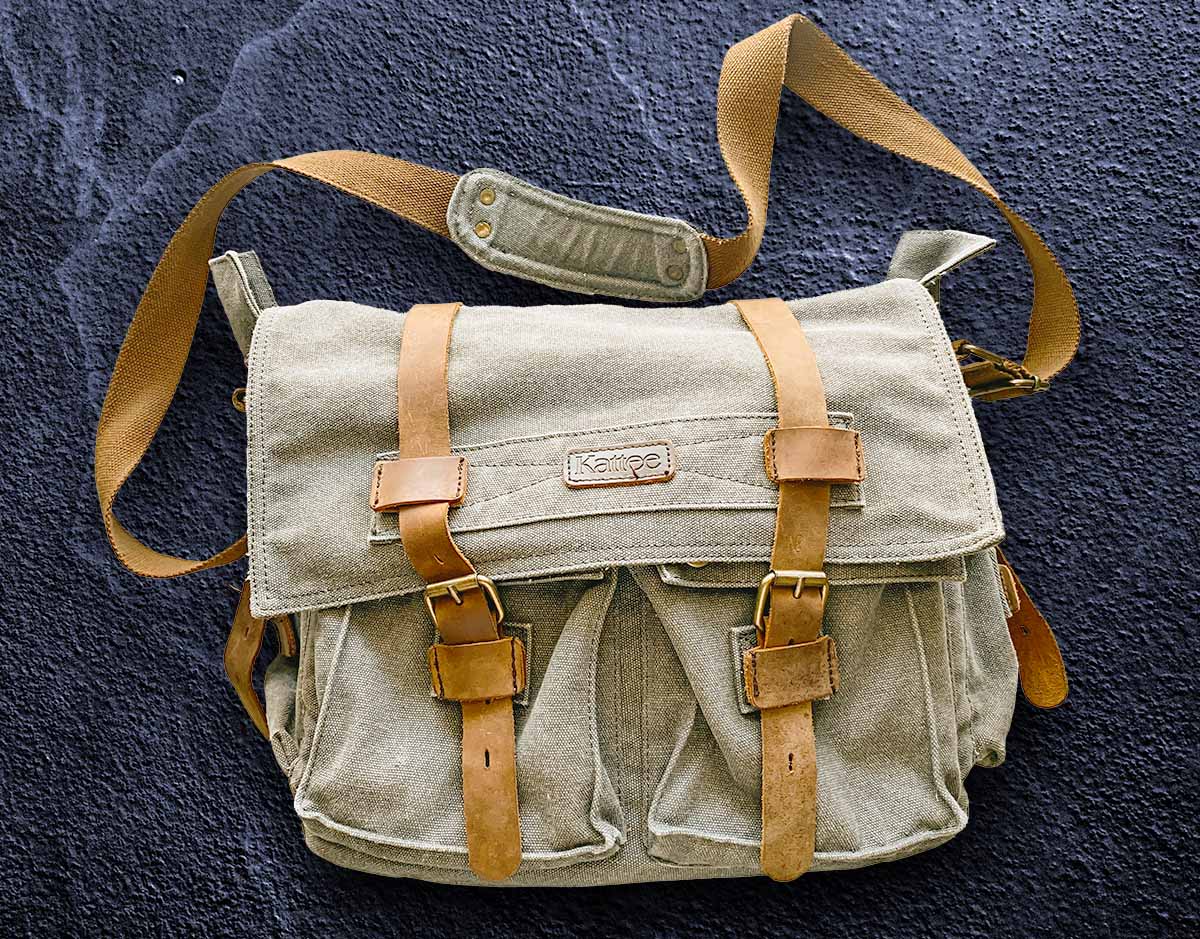
Bag photo by Derick McKinney and Background photo by František G. on Unsplash

Exercise Overview

In this comprehensive exercise, you'll master one of the most powerful techniques in professional image compositing: using clipping masks with adjustment layers to make targeted color and brightness adjustments. This non-destructive workflow is essential for creating believable composite images and is used extensively in commercial photography, advertising, and digital art. You'll learn to seamlessly blend multiple images while maintaining complete control over individual elements.

Workflow Overview

1

Image Preparation

Open source images and prepare the workspace with proper layer naming and organization

2

Background Composite

Place and transform the background image with proper lighting direction consideration

3

Subject Isolation

Use Select and Mask to create precise selections with proper masking techniques

4

Targeted Adjustments

Apply clipped adjustment layers for selective color and brightness modifications

Placing a Photo onto a New Background

The foundation of any successful composite lies in understanding light direction and establishing a believable relationship between all elements. Let's begin by preparing our primary subject.

  1. From the Photoshop Class folder, open 5C Bag.jpg.

    Observe the lighting carefully—notice how the light falls on the bag from above, creating natural shadows and highlights. This lighting analysis is crucial for creating convincing composites, as mismatched lighting instantly reveals digital manipulation to viewers.

  2. In the Layers panel, rename the Background layer to bag. This organizational step becomes invaluable as your layer stack grows more complex.
  3. Go to File > Place Embedded. This method maintains the highest image quality while giving you immediate transform controls.
  4. Navigate to the Photoshop Class folder and double-click on 5C Background.jpg.

    Before accepting the placement, analyze the background's lighting direction, which currently comes from the side. To create a convincing composite, the lighting must be consistent across all elements. We'll rotate the background to match our subject:

    • Position the cursor outside the background image to access the rotation handles.
    • Hold Shift (to constrain rotation to 15° increments for precision) and drag clockwise until the lighter areas align with the top of the composition.
    • Hold Option (Mac) or ALT (Windows) to resize from the center point, then drag any corner handle outward until the image completely covers the canvas with no gaps.
    • Double-click within the photo to confirm the size and position.
  5. In the Layers panel, organize your workspace:

    • Rename 5C Background to background
    • Drag the bag layer above the background layer to establish the proper stacking order.
    • Select the bag layer to prepare it for masking.
  6. Choose Select > Select and Mask to access Photoshop's advanced selection workspace, which provides superior edge refinement tools compared to traditional selection methods.
  7. In the Properties panel, configure the optimal viewing environment:

    • Click the View thumbnail and choose Overlay for clear visual feedback
    • Set Opacity to 50% to balance visibility of both the selection and underlying image
    • Set the Indicates menu to Selected Areas so red overlay clearly shows your current selection

    This visual setup allows you to work with precision while maintaining context of the overall composition.

  8. In the Options bar, leverage AI-powered selection:

    • Click the dropdown arrow next to Select Subject and choose Cloud (Detailed results) for the most accurate AI processing.
    • Click the Select Subject button to let Photoshop's cloud-based AI analyze and select the bag automatically.
  9. Select the Brush tool brush tool in select and mask from the Tools panel to refine the AI-generated selection.
  10. Professional selection refinement requires attention to detail and systematic approach. Clean up the selection using these techniques:

    • Zoom to 100% or higher for pixel-level accuracy in edge refinement.
    • Toggle between Add to selection add to selection select and mask and Subtract from selection subtract from selection select and mask in the Options bar as you work around the edges.
    • Dynamically adjust brush size using [ and ] keys—use smaller brushes for detailed areas, larger ones for broad corrections.
    • Control edge softness by holding Shift while pressing [ or ] keys, or click the Brush thumbnail in the Options bar for precise hardness control.
    • Paint methodically around problematic edges, remembering that red indicates selected areas.
    • Switch to On Layers view periodically to evaluate how the selection performs against the actual background.
    • Fine-tune global edge quality using Feather for softness and Shift Edge to contract or expand the entire selection boundary.
  11. Finalize your selection with professional output settings:

    • Scroll to the bottom of the Properties panel and expand Output Settings. Set Output To: Layer Mask to maintain non-destructive editing capabilities.

    • Click OK to apply the refined selection as a layer mask.

Light Direction Matching

Always analyze the light direction in both images before combining them. Matching light sources is crucial for creating believable composite images. In this exercise, we rotate the background so the light comes from above to match the bag's lighting.

Background Placement Checklist

0/4

Adding a Drop Shadow

Realistic shadows are essential for grounding objects in their environment and selling the illusion that elements belong together naturally.

  1. Click the Add a layer style button adjustment layer fx at the bottom of the Layers panel, then select Drop Shadow from the contextual menu.
  2. Configure the shadow to match the established lighting scenario:

    • Opacity: 100% for a strong, defined shadow that anchors the object
    • Angle: 90° to simulate overhead lighting
    • Distance: 150px to separate the object from its shadow naturally
    • Size: 250px for a soft, realistic shadow edge that mimics natural light diffusion

    Click OK to apply the effect. Layer styles remain fully editable, allowing you to adjust shadow properties at any time.

Drop Shadow Settings

100%
Opacity Percentage
90°
Light Angle Degrees
150px
Shadow Distance
250px
Shadow Blur Size

Changing the Color of the Background

Now we'll use clipping masks to make targeted adjustments that affect only specific elements of our composition. This technique is fundamental to professional retouching workflows.

  1. Select the background layer in the Layers panel. This positioning ensures our adjustment layer will be created in the correct location within the layer stack.
  2. Click the Create new fill or adjustment layer button adjustment layer button and choose Hue/Saturation for maximum color control flexibility.
  3. In the Properties panel, transform the background color:

    • Enable Colorize to apply a uniform color treatment across the entire tonal range.
    • Set Hue to +225 to achieve a complementary blue tone that will make warm subject colors appear more vibrant.
    • Set Saturation to +23 for rich color without oversaturation.
  4. Rename Hue/Saturation 1 to bg color for clear layer organization—this practice becomes essential in complex projects with dozens of adjustment layers.

Hue/Saturation Colorize Mode

The Colorize option in Hue/Saturation converts the image to a single hue while maintaining the original brightness values. This creates a monochromatic effect perfect for background color changes.

Adjusting the Bag

With the background established, we'll now focus on optimizing the bag's appearance using clipping masks to ensure our adjustments affect only the intended element.

  1. Select the bag layer in the Layers panel to establish the target for our clipped adjustments.
  2. Click the Create new fill or adjustment layer button adjustment layer button and choose Curves—the most powerful and flexible tool for tonal adjustments.
  3. Create a subtle contrast enhancement by modifying the curve:

    curves bag

    Add control points to create a gentle S-curve that brightens shadows while darkening highlights, increasing overall contrast and visual impact.

  4. Create a clipping mask to restrict this adjustment to the bag only:

    Hold Option (Mac) or ALT (Windows) and position your cursor on the dividing line between the Curves 1 and bag layers. When the cursor changes to the clipping mask icon clipping mask icon, click once to establish the clipping relationship.

    clipping group bag

    The Curves adjustment now affects only the bag layer, as indicated by the indented layer thumbnail and arrow icon. This non-destructive approach allows unlimited adjustment without permanently altering the original image.

  5. Enhance color separation by warming the bag's tone:

    Ensure the layer thumbnail (not the mask) is selected for the Curves 1 layer to access color channel controls.

  6. Access individual color channels for precise color correction:

    In the Properties panel, click the RGB dropdown and select Blue. Add a control point to the center of the blue channel curve and drag downward to reduce blue values, effectively adding yellow warmth to the bag.

    curves bag blue channel

    This color temperature shift creates visual separation between the warm bag and cool blue background, a classic complementary color strategy used in professional imaging.

  7. Rename Curves 1 to brightness and color to clearly identify its function within your workflow.

Creating Clipping Masks

1

Select Target Layer

Choose the layer you want the adjustment to affect (the bag layer in this case)

2

Add Adjustment Layer

Create your adjustment layer above the target layer using the adjustment layer button

3

Create Clipping Mask

Hold Option/Alt and click between the adjustment and target layers to create the clipping relationship

Curves Color Adjustment

When adjusting individual color channels in Curves, dragging down removes that color while dragging up adds more. Moving the blue curve down makes the image warmer by reducing blue and increasing yellow.

Color Saturation

The final adjustment will enhance color richness while maintaining natural appearance—a hallmark of professional image enhancement.

  1. Select the topmost layer to ensure proper stacking order for the new adjustment layer.
  2. Create a pre-clipped adjustment layer using Photoshop's efficient workflow shortcut:

    Hold Option (Mac) or ALT (Windows), then click the Create new fill or adjustment layer button adjustment layer button and choose Vibrance.

    Critical: The modifier key must be held before clicking the button to access the advanced layer options dialog.

  3. Configure the automatic clipping mask:

    • Check Use Previous Layer to Create Clipping Mask to automatically clip this adjustment to the layer below.
    • Click OK to create the pre-configured adjustment layer.
  4. Apply selective color enhancement by setting Saturation to +35 in the Properties panel.

    Vibrance intelligently enhances color intensity while protecting skin tones and preventing oversaturation—making it ideal for product photography and commercial work.

  5. Preserve your work with proper file management: Execute File > Save As and save as a Photoshop document named yourname-bag.psd.

    The PSD format maintains all layers, adjustment layers, and clipping masks, allowing future modifications and serving as a master file for derivative outputs.

Saturation vs Vibrance

FeatureSaturationVibrance
Effect on skin tonesAffects all colors equallyProtects skin tones
Color intensityLinear increaseSmart selective boost
Best forGlobal color boostNatural-looking enhancement
Recommended: Use Vibrance for more natural color enhancement with better skin tone protection.
Automatic Clipping Mask Creation

Holding Option/Alt before clicking the adjustment layer button opens a dialog that allows you to automatically create a clipping mask, saving time in your workflow.

Key Takeaways

1Clipping masks allow adjustment layers to affect only the layer directly beneath them, enabling precise selective adjustments without affecting the entire image
2Matching light direction between composite elements is essential for creating believable and professional-looking image combinations
3The Select and Mask workspace provides advanced selection tools with real-time preview options like Overlay view for accurate edge refinement
4Proper layer naming and organization is crucial for managing complex Photoshop documents with multiple adjustment layers and effects
5Adjustment layers provide non-destructive editing capabilities, allowing you to modify color, brightness, and contrast without permanently altering original image data
6The Colorize option in Hue/Saturation creates monochromatic effects while preserving original luminance values for background color changes
7Individual color channel adjustments in Curves allow for precise color temperature modifications, such as warming images by reducing blue channel values
8Using modifier keys like Option/Alt and Shift during layer creation and transformations provides enhanced control and automatic constraint options

RELATED ARTICLES