Modifying Light & Shadows
Modifying Light & Shadows
Curves Set to Color Blend Mode
Adds warmth without shifting brightness — also produces hand-tinted look on B&W photos.
Select Luminance via Channels
Cmd-Option-2 (Mac) / Ctrl-Alt-2 (Windows) selects the brightest 50% of tones.
Subtract Sky from Selection
Cmd-Option-click the sky group's mask to exclude it from the highlights selection.
Save as Alpha Channel
Select → Save Selection → name it 'sunlight' so you can refine it in the Channels panel.
Noble Desktop's Photoshop Bootcamp covers retouching, compositing, color correction, and pro editing.
Gain insights into advanced Photoshop techniques such as adding warmth to a photograph, selecting highlight areas of an image, and making more selections using Channels in this comprehensive tutorial.
Exercise Preview

Cleaning up the Selection
This channel looks like a black and white negative. Don’t think of this as an image. Think of it as the basis for a selection. Specifically, we want black wherever the sun is striking an object and white where there is shade so we can effectively modify the color of the sunlight. The shaded areas, like the back of the two figures, are not completely white and therefore partially selected.
We can push these light gray areas to pure white by cranking up the contrast on this alpha channel. Choose Image > Adjustments > Levels (or hit Cmd–L (Mac) or CTRL–L (Windows)) to do a Levels adjustment.
- Don’t click OK till we say.
- Darken the blacks by dragging the black point slider to the right.
- Lighten the whites by dragging the white point slider to the left.
- Move the gray point slider to the right to make more areas black and therefore more selected.
Remember that the goal is to select enough of the sunlit areas and deselect enough of the shaded areas to end up with a “good enough” selection. It doesn’t have to be perfect, but should look something like this:

Click OK when satisfied.
You can tweak the alpha channel further with a brush if you like.
Altering the Color
Let’s use the alpha channel to warm up the sunlit areas.
Press Cmd–2 (Mac) or CTRL–2 (Windows) to make RGB the active channel.
Cmd–click (Mac) or CTRL–click (Windows) on the sunlight alpha channel to load it as the current selection.
In the Layers panel, select the skies group layer.
Choose Layer > New Adjustment Layer > Curves.
Name it warm up sunlight and change the Mode to Color to avoid changing tonality. Click OK.
If needed, drag the new layer so it is above the skies group layer.
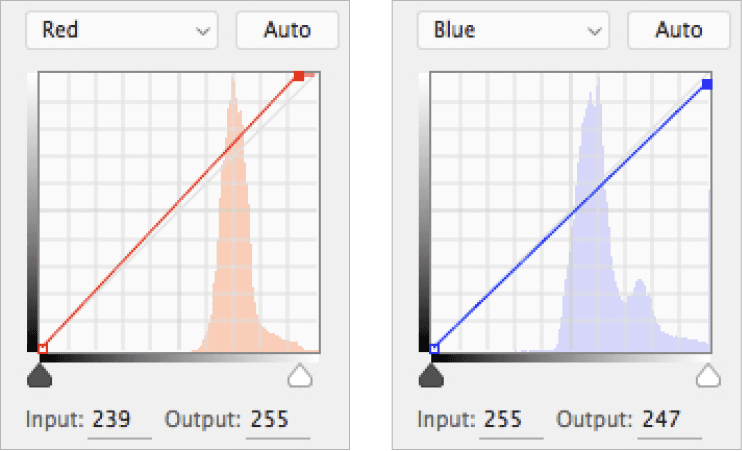
To look realistic, you’ll need to match the color of the sunlight to the season and time of day suggested by the clothing and the shadows on the ground—pretty close to midday, probably between late spring and early fall. Sunlight gets much warmer (redder) at the beginning and end of the day.
Below are some curve suggestions of what to do if you need them. (While it’s not much, notice the adjustment to both of the top right points.)
If you wanted to go further, you could use the same approach to select the shadow areas and set their color. This technique is especially useful to add interest to pictures made on days with flat, partially overcast skies or to create a hand-tinted look to black-and-white images.
When you’re finished, save and close the file.