Exporting Assets from a 1x Design
What This Tutorial Covers
1x Resolution
Standard-DPI output sized for traditional displays.
Export Workflow
Save for Web vs. Generator vs. Quick Export.
When 2x Is Required
Retina-ready exports require additional sizes.
Noble Desktop's Graphic Design Certificate covers Photoshop alongside Illustrator and InDesign.
Explore the extensive tutorial for optimizing web design with Photoshop, covering Adobe Generator's image export, correct file creation, and understanding low-res JPEG exports, as well as how to export graphics and change JPEG quality.
Topics Covered in This Photoshop for Web Design Tutorial:
Using Adobe Generator to Export Optimized Images, Creating PNG, GIF, & JPEG Files from a Design, Exporting PNG-8 with Partial Transparency, the Proper Way to Export 1x & 2x Graphics, Why Photoshop Sometimes Exports Low-res JPEGs & How to Fix It
Exercise Preview
Exercise Overview
Photoshop has multiple ways to export graphics for use in a website or user interface. In previous exercises you used Save for Web and Export As, but now you’ll learn about Adobe Generator. This offers an easier way to export graphics out of a larger design.
Naming Layers for Export
Let’s open the NYC page we’ve been working with earlier in this book. In Photoshop, go to File > Open or hit Cmd–O (Mac) or CTRL–O (Windows).
Navigate to Class Files > yourname-Photoshop for Web Class > Export Image Assets and double–click nyc-desktop.psd.
If guides are showing, hit Cmd–; (Mac) or CTRL–; (Windows) to hide them.
Let’s begin with the large photo of the taxicab. This Photoshop file was designed at 1x, so we’ll start by exporting the photo as a 1x JPEG.
There’s no interface to the feature we’re going to use. It’s all based on layer names. In the Layers panel, rename the cab layer to cab.jpg
The name alone tells Photoshop we want this layer to become a JPEG file named cab.jpg!
In the Layers panel, expand the photos folder (toward the bottom of the layers).
Inside it rename the skyline layer to skyline.jpg
Web filenames should be lowercase, not contain spaces, and only use alphanumeric characters. Rename the Central Park layer to central-park.jpg
TIP: When editing a layer name, press Tab to jump to the next layer name, or hit Shift–Tab to jump to the previous layer name.
Lastly, rename the bridge layer to bridge.jpg
Exporting the Assets
To export the assets, we must enable Adobe Generator. Go to File > Generate > Image Assets to check it on.
NOTE: Adobe Generator is the name of this technology, but you never see that name in Photoshop. This menu item is how you enable it.
Let’s see what Photoshop created behind the scenes. Switch to the Desktop (hide or minimize Photoshop).
Navigate to Class Files > yourname-Photoshop for Web Class > Export Image Assets.
Adobe Generator automatically created a nyc-desktop-assets folder (the folder has the same name as the Photoshop file). Go into that folder and see what files are inside.
- Each layer was exported based on our layer names. To take a quick look at a file:
- Mac: Press the Spacebar to open/close files in Quick Look.
- Windows: Double–click on a file to open it in Photoshop or your default image program. Close them when done.
Note that the file size of cab.jpg is around 600 KB, which is a bit large.
Keep this folder open on the desktop and switch back to Photoshop.
Changing JPEG Quality
By default Photoshop exports the JPEGs at 90% quality which is so high we rarely use it. In the Layers panel, rename the cab.jpg layer to cab.jpg-65%
Switch back to the nyc-desktop-assets folder you should still have open on the Desktop.
Notice the size is now around 300 KB, much better than the original 600 KB!
To take a quick look at a file, do the following (and pay attention to the quality, which should still look good):
- Mac: Press the Spacebar to open/close the file in Quick Look.
- Windows: Double–click on the file to open it in Photoshop or your default image program. Close the file when done.
Keep this folder open on the desktop and switch back to Photoshop.
Exporting a PNG-8 with Partial Transparency
In the Layers panel, expand the nav folder (near the top).
Let’s export the NYC logo. For a website this should be exported as SVG, but it’s a vector smart object so we’d have to use Illustrator to create the SVG. You learned about that in a previous exercise, so let’s see how to make a PNG (which can be useful for HTML emails, apps, etc.) using Adobe Generator.
Go into the nav folder and rename the NYC Logo layer to nyc-logo.png-8
NOTE: This logo doesn’t have many colors, so we want PNG-8. Adding .png would tell Photoshop to use default png-32 (which is a PNG-24 plus transparency). You can also use .png-24 when you want millions of colors but no transparency.
Switch back to the nyc-desktop-assets folder you should still have open on the Desktop.
There should now be a new file named nyc-logo.png!
To take a quick look at it, do the following:
- Mac: Press the Spacebar to open/close the file in Quick Look.
- Windows: Double–click on the file to open it in Photoshop or your default image program. Close the file when done.
Notice that the PNG-8 supports partial transparency. Generate Image Assets and Export As both use the same optimization engine behind the scenes!
NOTE: Export As and Generate Image Assets cannot specify the number of colors in a PNG-8 or GIF. This means all PNG-8 files exported will have the full palette of 256 colors. If you need to specify fewer colors, you should optimize the image individually using Save for Web or slice it (which we’ll cover in a later exercise).
Switch back to Photoshop.
Do a File > Save to save the new layer names.
Updating Graphics
The client decided we should change the NYC logo to a colored version instead. In the Layers panel, make sure the nyc-logo.png-8 layer is still selected (it’s in the nav folder).
Go to Layer > Smart Objects > Replace Contents.
In the dialog that appears, go to Class Files > yourname-Photoshop for Web Class > NYC and double–click NYC Logo.ai.
In the preview window, click OK to apply the change.
At the top of the file, notice that the NYC logo should now be the colorful version.
Without even saving the file or doing anything else, Photoshop has updated the exported asset. To see it, go back to the nyc-desktop-assets folder on the Desktop.
Take a look at the nyc-logo image by hitting Spacebar (Mac) or opening the file in Photoshop and closing it when done (Windows).
Notice that the logo has been automatically updated. Adobe Generator works in the background, immediately exporting all changes!
Exporting 2x Assets
This Photoshop file is a 1x file. We need both 1x and 2x versions of our graphics though. Let’s see how Adobe Generator can also export 2x versions from the same layers!
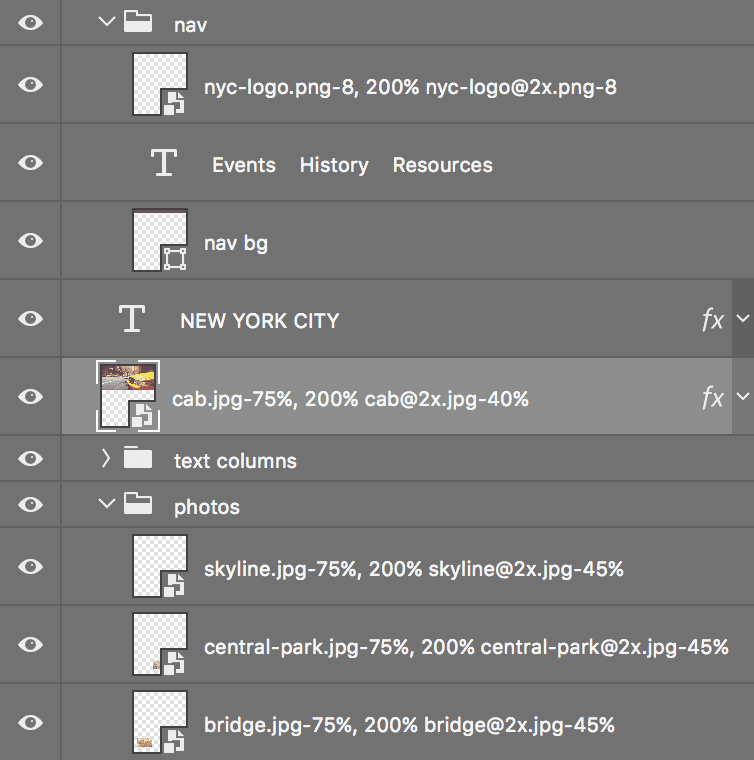
Let’s start with the logo. The 2x version is twice as large as the 1x, so we must tell Photoshop to scale it 200%, as well as give it a new filename (with @2x to indicate it’s the 2x file). Add the following bold text to the nyc-logo.png-8 layer name, so you end up with the following layer name. Be sure to include the comma!
- Nyc-logo.png-8, 200% nyc-logo@2x.png-8
NOTE: To see the entire layer name you may want to resize the Layers panel by clicking and dragging its left edge.
Let’s do the same thing to the cab.jpg layer. When making a 2x JPEG don’t forget to compress it more (as you learned about in an earlier exercise). Rename the layer to:
- Cab.jpg-65%, 200% cab@2x.jpg-35%
Repeat this process for the three layers in the photos folder, adding -65%, 200% filename@2x.jpg-35% so you end up with these names:
- Skyline.jpg-65%, 200% skyline@2x.jpg-35%
- Central-park.jpg-65%, 200% central-park@2x.jpg-35%
- Bridge.jpg-65%, 200% bridge@2x.jpg-35%
Let’s see what we have so far. Go to File > Open.
Navigate to Desktop > Class Files > yourname-Photoshop for Web Class > Export Image Assets > nyc-desktop-assets.
Let’s open the 1x and 2x files for the bridge photo. Click once on bridge.jpg, then Shift–click on bridge@2x.jpg.
Click Open.
Compare bridge.jpg and bridge@2x.jpg by switching between the files. It will probably be easiest to judge quality at 100% zoom for both files.
Both files should look good and sharp at their respective sizes.
Close bridge.jpg and bridge@2x.jpg.
Let’s check out one more photo. Go to File > Open.
Click once on central-park.jpg, then Shift–click on central-park@2x.jpg.
Click Open.
Compare the 1x and 2x central-park files, noticing the 2x version is unacceptably blurry. Why is this photo different?
Why Photoshop Sometimes Exports Low-Res JPEGs & How to Fix It
If a photo was originally placed as a JPEG, Adobe Generator will export poor quality 2x enlargements. The Smart Object contains enough resolution, so this “should not” happen. For example it does not happen to Smart Objects that were originally placed as Photoshop files (.psd), so this is clearly a bug (which has been around for years). The fix is to convert the Smart Object into a PSD and re-import it.
Close both of the central-park files.
In Photoshop you should be back in nyc-desktop.psd.
In the Layers panel, in the photos folder, find the central-park… layer and double–click its layer thumbnail.
The original JPEG should open in a new window in Photoshop. Go to File > Save As and:
Navigate to Desktop > Class Files > yourname-Photoshop for Web Class > Export Image Assets.
Set Format (Mac) or Save as type (Windows) to Photoshop and click Save.
NOTE: In the future, before doing a File > Place Embedded (or Linked) we recommend you re-save pixel-based graphics as a PSD. This is not only a workaround to prevent the bug, but also maintains layers when editing Smart Objects (you’d have to flatten files if they were JPEG).
Close the file. You should be back in nyc-desktop.psd.
We need to tell Photoshop to use the new PSD file instead of the original JPEG. In the Layers panel, make sure the central-park… layer is still selected.
Go to Layer > Smart Objects > Replace Contents.
In the dialog that appears, go to Class Files > yourname-Photoshop for Web Class > Export Image Assets and double–click Central Park.psd.
NOTE: The layer name will still end with.jpg because that’s the file type we want to export.
Let’s make sure the fix worked. Go to File > Open.
If you’re not already in the nyc-desktop-assets folder, navigate to yourname-Photoshop for Web Class > Export Image Assets > nyc-desktop-assets.
Click once on central-park.jpg, then Shift–click on central-park@2x.jpg.
Click Open.
Compare the 1x and 2x central-park files, noticing they have been automatically updated to be nice and sharp!
NOTE: The skyline image is also affected by this bug because it too was placed as a JPEG. You could fix it as well if you want more practice. The bridge layer was originally a Photoshop file (PSD), so that’s why it was fine.
Close the two central-park files.
Save and close nyc-desktop.psd.
Layer Naming Conventions for Adobe Generator
- photo.jpg = JPEG at 90% quality
- photo.jpg4 = JPEG at 40% quality
- photo.jpg-45% = JPEG at 45% quality (hyphen is optional)
- logo.png = PNG-32: millions of colors, transparency
- logo.png-24 = PNG-24: millions of colors, no transparency (hyphen is optional)
- logo.png-8 = PNG-8: 256 colors, transparency
- logo.png, 200% logo@2x.png = 1x and 2x files from the same layer (assuming you’re in a 1x Photoshop file)
- logo@2x.png, 50% logo.png = 1x and 2x files from the same layer (assuming you’re in a 2x Photoshop file)
- 250x250 logo.png = PNG that is 250 X 250 pixels
- logo.svg = SVG (only works properly on native Photoshop vector layers)