Dealing with Color Profiles
What This Tutorial Covers
Color Workspace
Set RGB and CMYK working color spaces.
Embedded Profiles
Files carry their color profile through workflows.
Conversion Strategies
Convert profiles for print vs. web outputs.
Noble Desktop's Graphic Design Certificate covers Photoshop alongside Illustrator and InDesign.
Learn how to manage colors professionally in Photoshop with this comprehensive tutorial, including how to work with color profiles, correct common problems, and handle images with missing or incorrect profiles.
Exercise Preview
A Typical Workflow: Converting Device Profile to Working Space
From the Photoshop Adv Class folder, open East River.psd.
The following message will be displayed:

The current embedded profile (EPSON Expression 10000XL) is a device profile for an Epson scanner. That is how this image was digitized. We want to edit in a device-independent workspace, not the scanner’s workspace. So choose the second option, Convert document’s colors to the working space, which in our case is Adobe RGB.
Click OK. The image is now ready for editing.
NOTE: This will probably be a typical workflow. You’ll open an image that has an embedded profile for the scanner/digital camera you started with. Then you convert to the working space and edit the image!
We won’t be editing the image now, so close the file.
Technique #1: the Fast Way
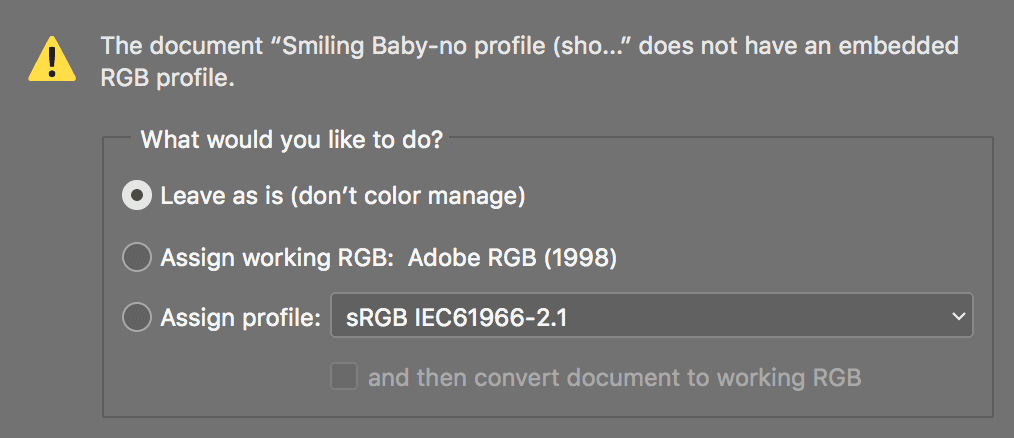
Open Photoshop Adv Class > Smiling Baby-no profile (should be sRGB).tif.
The following message will be displayed. As shown below, assign it the sRGB profile and check convert document to working RGB.

When done, click OK.
Explanation: This image had no embedded profile. It was shot on a digital camera that uses sRGB. If we don’t assign it the right profile before converting to the workspace, we may be starting off with the wrong colors.
We won’t be editing the image now, so close the file.
Technique #2: Previewing the Change
Open Photoshop Adv Class > Smiling Baby-no profile (should be sRGB).tif.
As shown below, choose Leave as is and click OK.
Explanation: Leaving the image as it is (not color managing the image) means no profile is assigned. Photoshop therefore displays the image using the current workspace (in our case Adobe RGB).
Assigning the Proper Profile so Photoshop Displays the Image Correctly
Let’s drop some color samplers down so we can see exactly how the colors in the image are being affected as we change profiles. Choose the Color Sampler tool
 . If it is hidden under the Eyedropper tool
  , hit Shift–I until it is selected.
Click anywhere on the image to place a color sampler.
The Info panel should automatically open so you can see the value of the color sampler you just placed. (Color sampler values will appear here.)
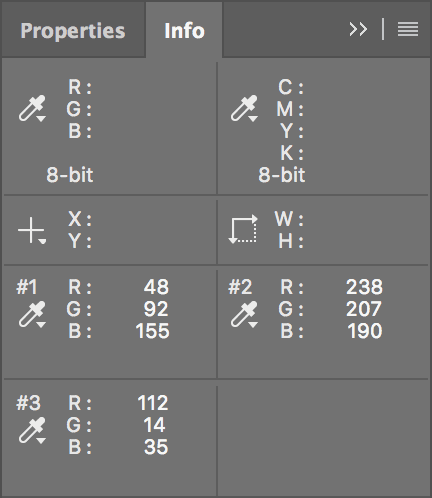
Place one or two more on different colors and note their values in the Info panel.
Go to Edit > Assign Profile.
This image was shot on a digital camera and, like many digital cameras, the camera shoots in sRGB. As shown below, from the Profile menu, choose sRGB but do NOT hit OK until we say!
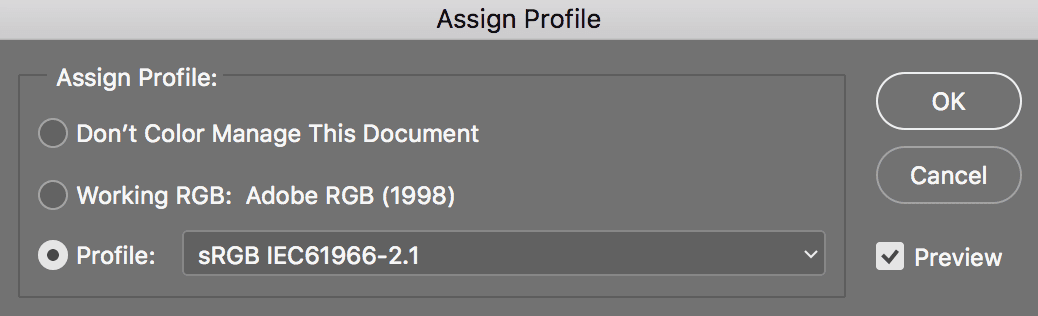
Check the Preview box on and off. Wow, that makes quite a change in how the colors look. Now they look more realistic. The skin tones are less red and more natural. While the color may not be perfect, Photoshop is now trying to accurately display how the camera saw the color.
Make sure Preview is checked and look at the Info panel.
Notice how there are two sets of numbers, like 63/63. The first number is the current value. The second number is what the value is being changed to. Notice that none of the numbers are changing. That’s because assigning a profile does NOT change the color numbers in the image. It just tells Photoshop what those numbers mean, and thus how it should make any on-the-fly adjustments to accurately display the image on your monitor.
Try assigning different profiles and see how radically the color sometimes changes. This illustrates how differently various devices see color. That is why Photoshop must know what device created it and how it saw the color, so Photoshop can display the image the way it was meant to be.
When done trying different profiles, reselect the proper sRGB and click OK.
Converting into a Device-Independent Workspace for Image Editing
This image was shot on a digital camera that we know uses sRGB. But this RGB colorspace, while suited nicely for web design, is small and is not good to work in for print. We’ll convert to a better colorspace for editing so we aren’t limited to the capabilities of the input device (in this case, the camera).
Go to Edit > Convert to Profile.
Don’t click OK till we say! Try selecting different profiles to convert the image to. Toggle the Preview checkbox on/off and notice the color sample values in the Info panel change. This is because converting to a profile changes the color values in your image permanently.
Set the following to convert the image to a colorspace with a wider gamut:
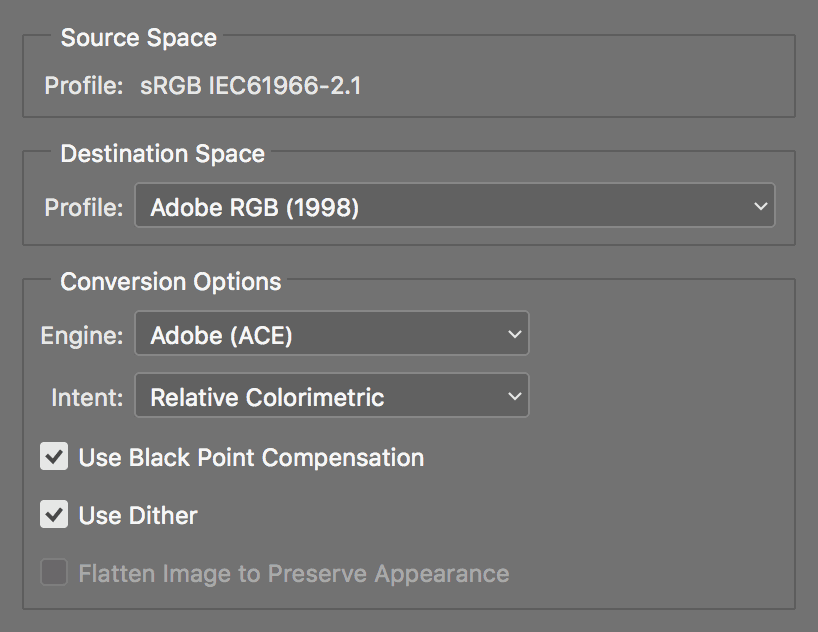
NOTE: While Adobe RGB is a good workspace, we do not want to say that everyone should use it for all their work. You will need to find the RGB workspace that is best for your workflow.
Click OK.
Now that you are in a good device-independent workspace, you can do your work, color adjustments, etc.
We won’t be editing it now, so close the file and do not save changes.
Workflow for Images with an Incorrect Profile Embedded
Hopefully in your work you won’t ever encounter images that have incorrect profiles embedded. If it does happen though, we want you to know how to deal with it.
Open DKNY-wrong profile (should be sRGB).tif.
The following message will be displayed:
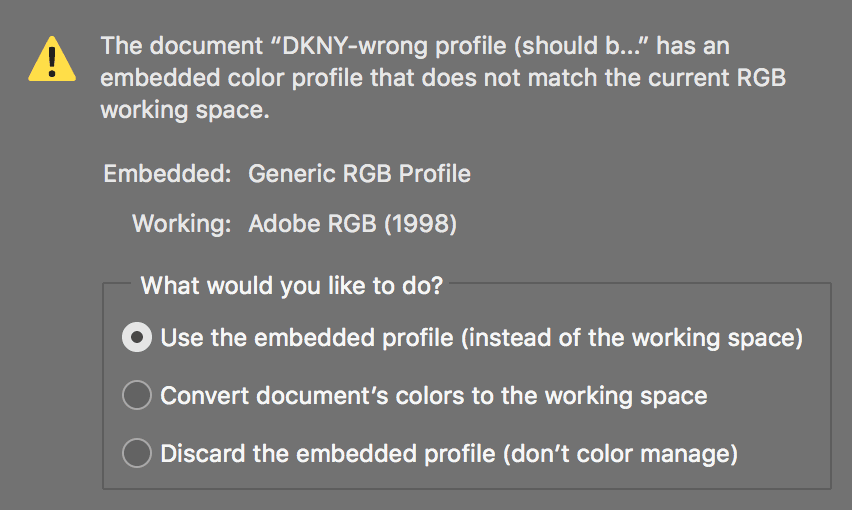
Make sure Use the embedded profile is chosen and click OK.
Explanation: We know this image was originally shot on a digital camera. Yet the software used to download the image incorrectly assigned it a different profile, Generic RGB Profile. This makes Photoshop display the image differently. Once we assign the correct profile that better describes the digital camera used to capture the image, Photoshop will be able to display the image correctly.
In the above dialog it really doesn’t matter whether you choose Use the embedded profile or Discard the embedded profile. Right now it doesn’t matter whether the image has a wrong profile or no profile at all, because the next step is to assign the correct profile!
Assigning the Proper Profile so Photoshop Displays the Image Properly
Go to Edit > Assign Profile.
Like many digital cameras, the camera that took this image shoots in sRGB. As shown below, from the Profile menu, choose sRGB but do NOT hit OK until we say!
Photoshop is trying to accurately display how the camera saw this image, which was shot at dusk. You can see by the lights on buildings and cars that it was getting dark outside. It started out a bit too light, but now it is darker. Uncheck and check Preview to see the difference. It is now closer to the image the digital camera took!
Click OK.
Converting into a Device-Independent Workspace for Image Editing
This image was shot on a digital camera that we know uses sRGB. But this RGB colorspace, while suited nicely for web design, is small and is not so good to work in for print. We’ll convert to a better colorspace for editing so we aren’t limited to the capabilities of the input device (in this case the camera).
Go to Edit > Convert to Profile and set the following:
Click OK.
Now that you are in a good device-independent workspace, you can do your work, color adjustments, etc.
We won’t be editing it now, so close the file and don’t save changes.