Cropping, Resizing, & Blending
What This Tutorial Covers
Crop Tool
Trim and recompose images with overlays and ratios.
Image Size
Resize while preserving quality with resampling.
Blend Modes
Layer images with multiply, screen, and overlay effects.
Noble Desktop's Graphic Design Certificate covers Photoshop alongside Illustrator and InDesign.
Delve into our comprehensive Photoshop tutorial which covers the Gradient tool, pattern practice, and blending modes, and provides detailed instructions for a hands-on exercise on creating custom patterns and manipulating image background.
Exercise Preview
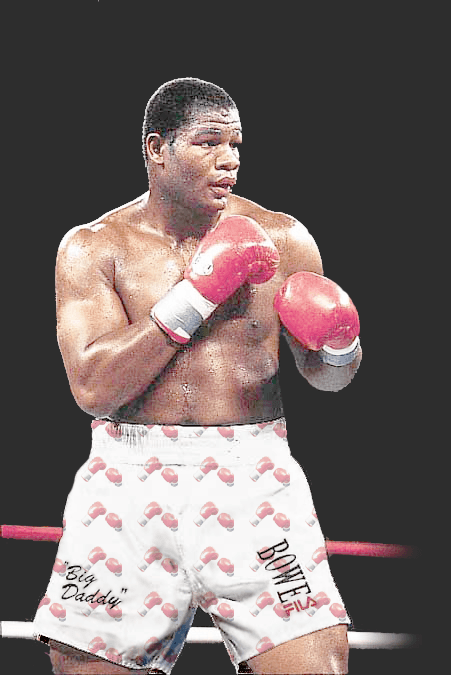
Cleaning up the Background
- From the Photoshop Class folder, open Riddick Bowe.tif.
- Select the Crop tool
 .
. - In the Options bar at the top of the screen, make sure Delete Cropped Pixels is checked on.
- Notice how the whole image is selected, with handles in all four corners and on all four sides. Drag the handle on the right to crop off the BUDW sign.
When the crop is finished, do any one of the following:
- Hit Return (Mac) or Enter (Windows).
- Double–click inside the cropped area.
- Towards the right in the Options bar, click the checkbox
 .
.
The background varies slightly. Let’s make it a solid black (so it will match the extra area we’ll be adding on the right). Select the Magic Wand tool
 .
.In the Options bar, set Tolerance to 28.
Click on the dark background around Riddick.
- Hold Shift and click on any areas of dark background that are not selected (to add them to your selection). Don’t forget to click between the ropes!
- In the Tools panel, choose the Lasso tool
 .
. - Some of the selection cuts into Riddick’s body. Subtract it by holding Option (Mac) or ALT (Windows) and dragging a selection around the area you want to deselect.
For any remaining areas you want to add or remove from the selection:
- Holding Shift and drag a selection around an area to add it from the selection.
- Holding Option (Mac) or ALT (Windows) and drag a selection around an area to subtract it from the selection.
When your selection is complete, select the Eyedropper tool
 .
.Near Riddick’s head, click on the dark background to sample the color.
To fill the selected area with the sampled (foreground) color, go into Edit > Fill and:
- Set Contents to Foreground Color.
- Click OK.
TIP: The keyboard shortcut to fill with the foreground color is Option–Delete (Mac) or ALT–Delete (Windows). To fill with the background color hit Cmd–Delete (Mac) or CTRL–Delete (Windows).
To deselect, press Cmd–D (Mac) or CTRL–D (Windows).
Adding Blank Area to the Right Side
Go to Image > Canvas Size and set the following:
Width: Set the menu on the right to Percent, then enter 200 Height: Leave as is Canvas extension color: Foreground Anchor: Click the left-middle arrow as shown below.
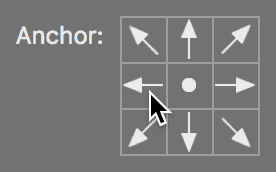
Click OK.
Making the Ropes Fade Out
We want to fade the ropes to the right of Riddick’s left leg to black. We’ll do this with a gradient,
- First we need to create a new layer for the gradient. At the bottom of the Layers panel, click the Create a new layer button
 .
. - Double–click on the new layer’s name and type in rope fade.
- In the Tools panel, choose the Gradient tool
 .
. As shown below, in the Options bar, click the arrow to the right of the gradient:
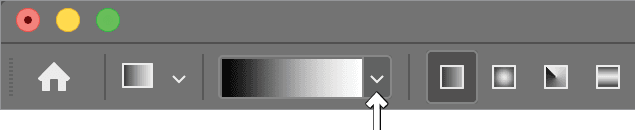
Open the Basics folder and double–click the second thumbnail, which is the Foreground to Transparent gradient. (If you pause a moment over the thumbnail, the name will appear.)
Also in the Options bar, choose Linear Gradient
 .
.Drag from the right edge of the ropes to the left edge (stop before you reach Riddick’s shorts), along the angle of the ropes.
Creating a Custom Pattern for His Shorts
Now let’s make a pattern to place on Riddick’s shorts.
In the Layers panel click on the Background layer to select it.
Use the Rectangular Marquee tool
 to draw a marquee around both gloves.
Copy the gloves (Cmd–C (Mac) or CTRL–C (Windows)).
Go to File > New and:
- Set Background Contents to Transparent.
- Click Create.
Paste the selection (Cmd–V (Mac) or CTRL–V (Windows)).
In the Tools panel, click and hold on the Magic Wand tool
and then select the Quick Selection tool  .
.In the Options bar at the top of the screen, pick a 10 px hard-edged brush.
The Quick Selection tool will work like the Magic Wand but allows you to paint a selection by dragging. To select the glove, click in the center of the right glove and drag over the rest of the glove until the entire glove is selected.
If you’ve accidentally selected anything additional, hold Option (Mac) or ALT (Windows) and drag over the parts you want to deselect.
Hold Shift (to add to the selection) and drag inside the left glove to select it too.
Go to Select > Inverse.
Press Delete (Mac) or Backspace (Windows).
Press Cmd–D (Mac) or CTRL–D (Windows) to deselect.
Go to Edit > Free Transform.
The Scale options now appear in the Options bar at the top of the screen. In the Scale area, between the Width and Height values, click the Maintain aspect ratio button
 to prevent it from distorting the image.
- In the Options bar, for W (Width), enter a value of 20%.
Press Return (Mac) or Enter (Windows) twice to apply the scale.
With the Rectangular Marquee tool
, draw a box around the gloves that is a little bigger than the gloves.Go to Edit > Define Pattern.
Name it yourname-gloves and click OK.
We’ll leave this file open just in case we need it later, but now switch back to the Riddick Bowe file. If you can’t see it, go into the Window menu and at the bottom, choose Riddick Bowe.
Filling the Shorts with a Pattern
Riddick’s shorts are a little boring, so let’s add that boxing glove pattern.
- Press Cmd–D (Mac) or CTRL–D (Windows) to deselect.
In the Layers panel, make sure the Background layer is still selected.
In the Tools panel, choose the Quick Selection tool
.- Drag over all the parts of the white shorts to select the entire shorts.
It will probably select some of the white ropes behind him, so hold Opt (Mac) or ALT (Windows) and drag over any unwanted parts to deselect them.
In the Layers panel, click the New fill or adjustment layer button
 and choose Pattern.
If it doesn’t use the pattern you just created, click on the pattern preview on the left of the Pattern Fill dialog and choose your pattern (at the end of the list).
Click OK.
The shorts look very flat right now, but blending modes can change the way in which the pattern blends with the shorts. At the top of the Layers panel, change the mode from Normal to Multiply.
With the Multiply blending mode, this layer can only darken the image behind it, so the dark areas of the shorts on the background layer show through. Feel free to experiment with other blending modes to compare the results.
The gloves are still a bit intense. At the top of the Layers panel, set Opacity to 60%.
If you’d like to reposition the pattern within the shorts, in the Layers panel double–click the layer’s thumbnail
 .
.- With the Pattern Fill dialog box open, drag on the image to move the pattern.
- Click OK when you’re done.
Congratulations—Riddick would be proud! If you want, you can save it as a Photoshop document.