April 1, 2026Dan Rodney/5 min read

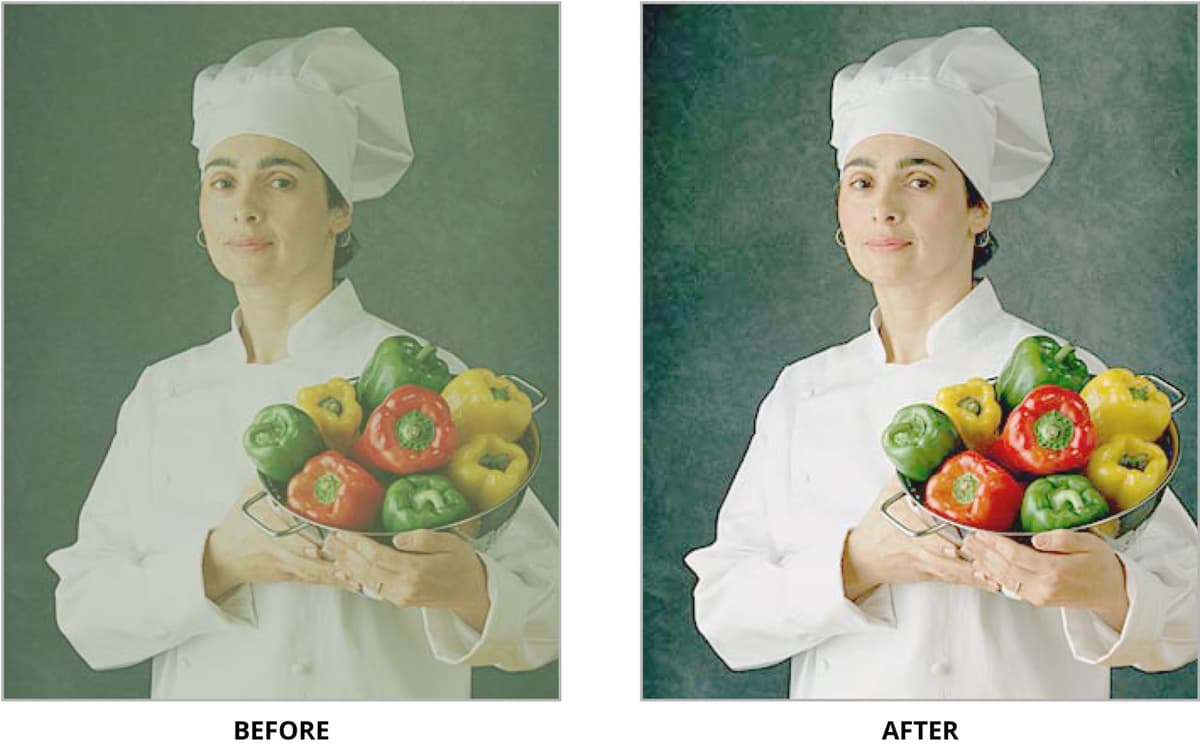
Color Correction Using Levels

Master Professional Photo Enhancement with Precision Levels

Tutorial Prerequisites

This tutorial assumes you have Photoshop installed and access to the Photoshop Class folder containing the Chef.jpg practice file.

Topics Covered in This Photoshop Tutorial:

Master color correction fundamentals using Levels adjustment layers, including precision techniques for setting white, black, and gray points to achieve professional-grade image enhancement.

Core Learning Objectives

Levels Adjustment Layer

Learn to create and work with non-destructive Levels adjustment layers for professional color correction workflows.

Point Setting Techniques

Master the use of White, Black, and Gray Point tools to establish proper tonal range and color balance in images.

Histogram Analysis

Understand how to read histograms and use slider controls for precise shadow, midtone, and highlight adjustments.

Exercise Preview

chef before&after

Exercise Overview

While automated corrections can handle basic adjustments, professional image editing demands precision control. The Levels adjustment layer provides significantly more nuanced control than Brightness/Contrast or Color Balance tools, allowing you to target specific tonal ranges with surgical precision. This exercise demonstrates how to use Levels to correct color casts and optimize contrast using industry-standard techniques that form the foundation of professional photo retouching workflows.

Levels vs Other Adjustment Tools

FeatureLevelsBrightness/Contrast & Color Balance
Control PrecisionFine-tuned controlBasic adjustments
Histogram FeedbackVisual histogram displayNo histogram reference
Channel ControlIndividual RGB channelsLimited channel options
Point Setting ToolsWhite/Black/Gray eyedroppersNot available
Recommended: Use Levels for professional color correction requiring precise control and histogram analysis.

Adjusting Levels with White, Black, & Gray Points

The eyedropper method represents the fastest way to establish proper white and black points while correcting color casts in a single step. This technique leverages Photoshop's ability to analyze pixel values and automatically adjust the entire tonal range based on your selections.

  1. From the Photoshop Class folder, open Chef.jpg.

  2. At the bottom of the Layers panel, click the Create new fill or adjustment layer button adjustment layer button and from the pop-up menu, choose Levels.

    Using an adjustment layer rather than applying Levels directly preserves your original image data and maintains editability—a non-destructive workflow essential for professional work.

  3. Levels will open in the Properties panel on the right. You'll see a histogram—a graphical representation showing the distribution of shadows (left), midtones (middle), and highlights (right) throughout your image. Gaps or spikes in this histogram reveal valuable information about your image's tonal structure and potential issues.

  4. Click the Set White Point button set white point to the left of the histogram.

  5. In the image, click on an area that should be white. Try the lightest area of the chef's clothing, avoiding any specular highlights or blown-out areas.

    The image will lighten as Photoshop remaps the tonal values. If the adjustment appears too aggressive, simply click elsewhere in the image to establish a different white point. Look for areas with detail rather than pure highlights—fabric texture or paper whites work better than reflective surfaces.

  6. Click the Set Black Point button set black point to the left of the histogram.

  7. In the image, click on an area that should be black. Target the darkest area with retained detail—perhaps the chef's hair, eyes, or deep shadows in the peppers, but avoid pure black areas where detail has been lost.

    The image will increase in contrast as the black point is established. If the shadows become too heavy, click a slightly lighter area to set a more conservative black point. The goal is maximum contrast while preserving shadow detail.

  8. Click the Set Gray Point button set gray point to the left of the histogram.

  9. In the image, click on an area that should be perfectly neutral gray. The chef's clothing or backdrop work well for this purpose. Experiment with different areas—each click will shift the color balance as Photoshop neutralizes color casts.

    Professional Note: While most images contain areas that should be pure white and pure black, true neutral gray is less common. Many images benefit from slight color biases that enhance mood or complement the subject. Use the Set Gray Point tool judiciously—sometimes a subtle color cast enhances rather than detracts from the image.

Point Setting Workflow

1

Open and Prepare

Open Chef.jpg from the Photoshop Class folder and create a new Levels adjustment layer from the Layers panel.

2

Set White Point

Click the Set White Point button and click on the lightest area of the chef's clothing to establish proper highlights.

3

Set Black Point

Click the Set Black Point button and click on the darkest area like the chef's hair or shadows to establish proper shadows.

4

Set Gray Point

Click the Set Gray Point button and click on neutral gray areas like clothing or backdrop to correct color casts.

Gray Point Usage Guidelines

While most images have true white and black points, they do not always contain neutral gray areas. The Set Gray Point tool is used less frequently than White and Black Point tools for this reason.

Advanced Experimentation with Histogram Sliders

For precision work where exact control is paramount, the histogram sliders offer granular adjustment capabilities. This manual approach allows you to fine-tune your corrections while observing real-time feedback in the histogram display. Professional colorists often combine both methods—using eyedroppers for initial corrections, then sliders for refinement.

  1. Find the White Point slider whitepoint slider on the right side beneath the histogram. Drag it to the left.

    Watch as the image brightens—you're essentially telling Photoshop to treat progressively darker tones as pure white. This expands the highlight range but can lead to blown highlights if pushed too far. Monitor the histogram to ensure you're not clipping important detail.

  2. Move the slider back to the right and observe how the image darkens as the white point becomes more conservative.

  3. Find the Black Point slider blackpoint slider on the left side beneath the histogram. Drag it to the right.

    The image gains contrast as lighter tones are remapped to pure black. This technique can dramatically improve flat, low-contrast images, but excessive adjustment will crush shadow detail. Professional practice involves finding the optimal balance between impact and detail retention.

  4. Move the slider back to the left and notice how the shadows open up, revealing more detail but potentially reducing overall contrast.

  5. Locate the Gray Point (gamma) slider graypoint slider in the center beneath the histogram.

    • Drag it to the right—the midtones darken while preserving your established white and black points, creating a moodier, more dramatic look.

    • Drag it to the left—the midtones brighten, opening up the image and creating a lighter, more optimistic feeling. This gamma adjustment is particularly powerful for correcting exposure issues in the midtone range.

  6. To address color balance issues with surgical precision, change the channel dropdown from RGB to Red at the top of the Levels dialog.

  7. Adjust the sliders to fine-tune color balance in the red channel specifically. Moving sliders right removes red (adding cyan), while moving them left adds red. This channel-specific approach allows you to target color casts in specific tonal ranges—shadows, midtones, or highlights independently.

    Switch between Red, Green, and Blue channels to address complex color issues. This level of control makes Levels particularly valuable for correcting images shot under mixed lighting conditions or with challenging color casts that global adjustments cannot resolve effectively.

Histogram Slider Functions

White Point Slider

Moving left lightens the image by converting more light areas to pure white. Moving right darkens by reducing white point expansion.

Black Point Slider

Moving right darkens the image by converting more dark areas to pure black. Moving left lightens by reducing black point expansion.

Gray Point Gamma Slider

Moving right darkens overall image brightness. Moving left lightens overall image brightness without affecting endpoints.

Channel-Based Color Correction

1

Switch to Red Channel

Change the channel dropdown from RGB to Red at the top of the Levels dialog box for targeted color adjustment.

2

Remove Red Cast

Move sliders to the right to darken the image by removing red color cast from the selected areas.

3

Add Red Warmth

Move sliders to the left to lighten the image by adding red color warmth to the selected areas.

Quick Correction Method

Remember that the black, white, and gray point eyedroppers provide an easy and effective way to use Levels for improving contrast and fixing color casts in most images.

Key Takeaways

1Levels adjustment layers provide more precise control than basic Brightness/Contrast and Color Balance tools for professional photo correction
2Histograms visually display the distribution of shadows, midtones, and highlights, enabling data-driven adjustment decisions
3White Point and Black Point tools establish proper tonal range by setting the lightest and darkest areas in an image
4Gray Point tool corrects color casts by establishing neutral gray reference points, though not all images contain true neutral grays
5Histogram sliders offer manual control over white point, black point, and gamma adjustments for precise tonal corrections
6Individual RGB channel adjustments allow targeted color correction by adding or removing specific color casts
7The eyedropper point-setting method provides a quick and effective workflow for most color correction scenarios
8Non-destructive adjustment layers preserve original image data while allowing unlimited editing flexibility

RELATED ARTICLES