Introduction to jQuery: Showing & Hiding Content
What This Tutorial Covers
show() and hide()
Toggle visibility with jQuery methods.
Animations
fadeIn, fadeOut, slideDown for smooth reveals.
Click Handlers
Wire up buttons to trigger visibility changes.
Noble Desktop's JavaScript Development Certificate teaches modern JavaScript and React.
Deepen your understanding of JavaScript and jQuery with this comprehensive tutorial. Learn how to use the jQuery library, handle click events, and run code when the document is ready.
Topics Covered in This JavaScript & JQuery Tutorial:
Getting Started with JQuery, Running Code When the Document is Ready, Click Events, Using JQuery’s SlideToggle() Method
Exercise Preview
Exercise Overview
jQuery is an industry-standard JavaScript library. They call it “The Write Less, Do More” library, which is 100% accurate. Other developers wrote many JavaScript code for you, and you just call their code instead of writing your own from scratch. It can be a huge time saver! In this exercise, you’ll get started using jQuery by learning how to show and hide some content using a few different animations.
Getting Started
- Open your code editor if it isn’t already open.
- Close any files you may have open.
- For this exercise we’ll be working with the Show-Hide-Basic folder located in Desktop > Class Files > yourname-JavaScript jQuery Class. You may want to open that folder in your code editor if it allows you to (like Visual Studio Code does).
- Open index.html from the Show-Hide-Basic folder.
- Preview index.html in a browser.
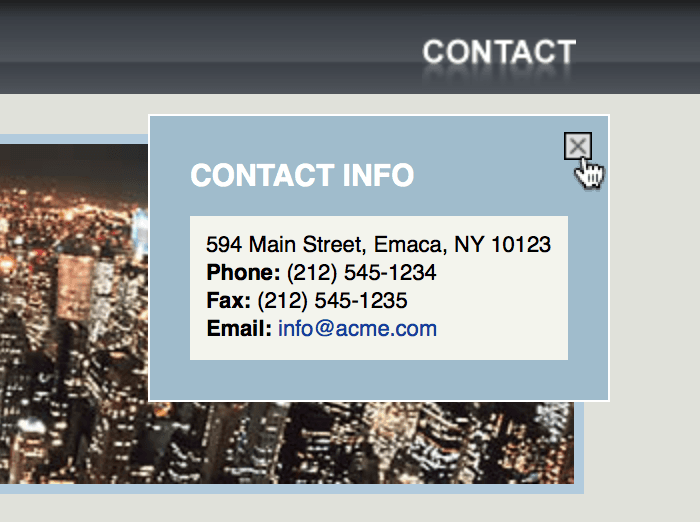
Notice the Contact button in the top right.
Something you can’t see right now, is a contact div that contains the contact info (we’ve hidden it with CSS). When someone clicks the Contact button, we want to reveal the contact div using jQuery.
- Leave the page open in the browser so we can come back to it later.
- Return to index.html in your code editor.
Before we use jQuery, we must link to its JavaScript file. Find the closing
</body>tag around line 70. Add the following bold code:</div> <script src="js/jquery-2.1.0.min.js"></script> </body>NOTE: Feel free to visit jQuery.com to learn more about jQuery. Throughout these exercises we’ll be linking our HTML to a downloaded version of jQuery we’ve provided for you. It’s also possible to link to a version of jQuery stored online, an efficient way which you may choose to use in your own projects.
Minified Vs. Regular Version
We linked to the minified version of jQuery. This compressed file is not human-readable, but it downloads faster. To see the difference, you can compare jQuery-2.1.0.min.js and jQuery-2.1.0.js.
This script file we just added gives us access to the jQuery library. Any jQuery we write will depend on this code and will have to be written below this
<script>tag. Add the following bold code:<script src="js/jquery-2.1.0.min.js"></script> <script> </script> </body>
Using the JQuery Library
Query means to question. jQuery queries (searches) the DOM (Document Object Model) to find an element and then you can do something with it. You’ve seen how to use getElementById() to find an element with an ID, but what about classes, tags, etc.? JavaScript also has a querySelectorAll() that can find elements using CSS selectors. jQuery is nearly the same: you pass the appropriate CSS selector to jQuery(). For example:
jQuery('#wrapper'); // select the element with an ID of 'wrapper'
jQuery('p');        // select all paragraphs on the page
jQuery('ul li');    // select list items inside unordered lists
jQuery('.special'); // select all elements with a class of 'special'
It would become pretty tiresome to type out jQuery over and over again. Since this is the “write less, do more” library, jQuery provides an alias for us to use: the dollar sign ($). The $ in the code we’ll use going forward is just a shorter, more convenient name for the jQuery function.
Running Code When the Document is Ready
You always want the jQuery code to work as soon as possible. We’ve seen before that if JavaScript runs before the objects are ready, the code won’t work. jQuery has dealt with this by creating a ready event that ensures nothing happens until the DOM is ready.
JavaScript has a similar event handler called window.onload, however jQuery’s ready event, is speedier. While onload waits for all content to be loaded (for instance, images as well), jQuery’s ready runs as soon as the objects are ready—the earliest time it can safely be run. This allows a user to start interacting with the script faster.
Add the following bold code:
<script>
   $(document).ready(function() {

   });
</script>
Save the file.
Click Events
On line 13, locate
<a href="#" id="navContact">.When the user clicks this button we want to show the contact info. We’ll use jQuery to access this element, and make it clickable.
To select the element, add the following bold code:
$(document).ready(function() {
   $('#navContact')
});
jQuery uses the same selectors as CSS, so here we’re selecting the element with the ID navContact.
In previous exercises we’ve seen how to write event handlers in JavaScript. jQuery also has event handlers. We want to track when the user clicks, so add the following bold code:
$(document).ready(function() {
   $('#navContact').click();
});
Now let’s give it something to do. Inside the click() method’s parentheses add the following bold code:
$(document).ready(function() {
   $('#navContact').click(function() {});
});
NOTE: jQuery will run the enclosed function whenever an element with the ID navContact is clicked. The function() is required by jQuery and surrounds the code so that it will only be executed on click.
Put the cursor inside the function’s curly braces
{}and hit Return (Mac) or Enter (Windows) to add an empty line, as show below:$(document).ready(function() { $('#navContact').click(function() { }); });NOTE: When you’re working with jQuery and you see the series of characters
});at the bottom of your function, you know you’re on the right track.Now we can add the code we want to execute when the Contact button is clicked. Add the following bold code:
$(document).ready(function() {
   $('#navContact').click(function() {
      alert('You clicked');
   });
});
NOTE: You can mix regular JavaScript with jQuery. Here we’re using an alert(), just like we did earlier with plain JavaScript.
- Save the file and reload index.html in Chrome.
- Click on the Contact button to see the alert pop up that says You clicked.
- Click OK to close the alert.
Switch back to your code editor.
Showing & Hiding the Contact Info
Instead of the alert, let’s make it reveal the contact info div (which we gave an ID of contact). Replace the alert() line with the following bold code:
$(document).ready(function() {
   $('#navContact').click(function() {
      $('#contact').show();
   });
});
Here we’re using jQuery’s show() method. There are hundreds of jQuery methods which you can browse at api.jQuery.com
- Save the file and reload index.html in Chrome.
Click on Contact. The Contact Info box should pop up. Looking good!
This a nice start, but we need to be able to close the contact info when we’re done with it.
- Switch back to your code editor.
- Around line 21, find the img tag with the ID closeBox.
When the user clicks this button let’s close the contact info (the #contact div). Add the following bold code:
$(document).ready(function() { $('#navContact').click(function() { $('#contact').show(); }); $('#closeBox').click(function() { $('#contact').hide(); }); });- Save the file and reload index.html in Chrome.
- Click on the Contact button. The Contact Info should appear.
- Click on the close button (X) at the top right and the Contact Info should disappear. Nice!
- Return to your code editor.
Let’s try some other jQuery methods. Replace show() and hide() with the toggle() method, as shown in bold below:
$(document).ready(function() { $('#navContact').click(function() { $('#contact').toggle(); }); $('#closeBox').click(function() { $('#contact').toggle(); }); });- Save the file and reload index.html in Chrome.
- Click on the Contact button and notice the Contact Info still opens.
Click on Contact again. The Contact Info should disappear!
The functionality is very similar, but now you can click the Contact button to both show and hide the Contact Info.
- Switch back to your code editor.
Both the Contact and close buttons do the exact same thing now, so we can combine them together to simplify the code. Delete the #closeBox click() method shown below:
$('#closeBox').click(function() {
   $('#contact').toggle();
});
jQuery selectors can be written exactly the same as CSS selectors (with commas between each ID), so add the following bold code. Don’t miss the comma!
$(document).ready(function() { $('#navContact, #closeBox').click(function() { $('#contact').toggle(); }); });- Save the file.
- Switch to the browser, reload index.html, and test it out. The Contact and close buttons should still work to open and close the Contact Info.
- Return to your code editor.
Let’s try out one more jQuery method. Replace toggle() with the following bold code (and don’t miss the capital T in Toggle):
$(document).ready(function() { $('#navContact, #closeBox').click(function() { $('#contact').slideToggle(); }); });- Save the file and reload index.html in Chrome.
Click on the Contact and close buttons to see the Contact Info now opens and closes with an animation. It’s a nice effect that would have taken a lot more code if we’d written it in regular JavaScript.
NOTE: If you want to refer to our final code example, go to Desktop > Class Files > yourname-JavaScript jQuery Class > Done-Files > Show-Hide-Basic.