Masking with Type
Illustrator Vector Workflow
Set Up Document
Pixels for digital, points/inches for print. Add bleed if printing.
Build Shapes
Combine basic shapes with Pathfinder before reaching for the Pen tool.
Apply Color & Effects
Swatches panel for repeatable color; Effects for shadows, glows.
Export
SVG for web, PDF for print, PNG for raster handoff.
Noble Desktop's Illustrator Bootcamp teaches the Pen tool, vector drawing, and pro illustration.
Gain valuable Illustrator skills with this comprehensive tutorial that covers topics such as the Type tool, Clipping masks, Filling text with a photo, and Placing linked images, with clear explanations and step-by-step instructions.
Exercise Preview
Setting the Type
Go to File > New to create a new document.
At the top of the dialog that opens, click on the Print tab.
Double–click the Letter preset.
Select the Type tool
 .
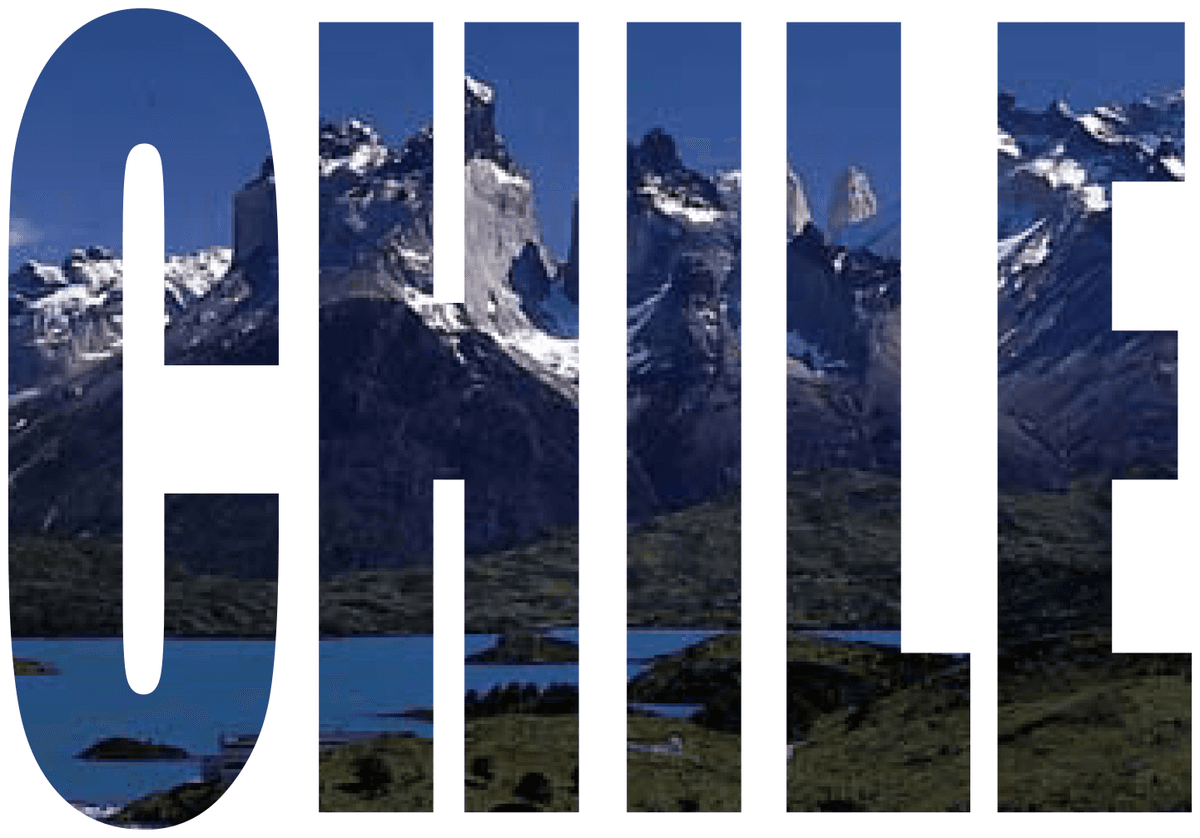
.In the middle of your page, click once and type the word CHILE in all caps, replacing the placeholder Lorem ipsum text.
To center the text, click the Align Center button
 (in either the Control panel at the top of the screen or the Properties panel’s Paragraph section (near the bottom)).
TIP: If you can’t find the button or prefer using keyboard shortcuts, press Cmd–Shift–C (Mac) or CTRL–Shift–C (Windows).
Double–click the word CHILE so we can style the text.
At the bottom right of the Properties panel’s Character section, click the More Options button
 to display all the available options.
In that section, set the following:
Font: Impact Size  :
:160 pt Vertical Scale  :
:180%
Importing the Picture & Making the Mask
Go into File > Place.
Select the chile.psd file BUT make sure the Link option at the bottom of the window is checked before you click Place (Mac users may need to click the Options button).
Click once in the center of the artboard to place the file at its actual size. (Do NOT click and drag, which will resize the file you’re placing.)
You’ll get a large picture of Chilean mountains on your page. To see your type, send the picture to the back (Object > Arrange > Send to Back).
Select the type with the Selection tool
 and move it so that it is centered in front of the picture.
Select both the picture and the type.
Go into Object > Clipping Mask > Make.
Deselect everything. Now you can see the image through the type.
To move only the type around, you can select it with the Group Selection tool
 . (If you don’t see it, click and hold on the Direct Selection tool
  .)
.)Drag the type around or use the Arrow keys to nudge it until it’s in the right place.
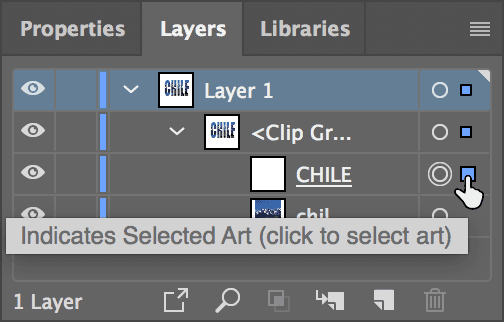
NOTE: You can also select things by using the Layers panel:- Expand Layer 1 by clicking the triangle to its left.
- Expand the
<Clip Group>the same way. - Then you can see the CHILE type and chile image. Click in the area to the right of the target button (as shown below) to select either object you want.
If you want to change CHILE to a different word (or to change the styling), use the Type tool
to edit the text.Save the file as yourname-Mask With Type.ai.
In the dialog that appears, leave the default options checked and click OK.