Box-Shadow, Text-Shadow, & Z-Index
What This Tutorial Covers
Box Shadow
Drop shadows and inset shadows on any element.
Text Shadow
Glow, drop shadow, and outline effects on text.
z-index Stacking
Control which elements appear in front of others.
Noble Desktop's Front-End Web Development Certificate teaches HTML, CSS, and JavaScript — the complete front-end foundation.
Learn how to add depth to your web designs with this comprehensive tutorial on using the CSS box-shadow and text-shadow properties, adjusting an element’s stack order with relative position and the z-index property, and creating multiple text-shadows for dynamic outline effects.
Topics Covered in This HTML & CSS Tutorial:
Using the CSS Box-shadow Property, Changing an Element’s Default Stack Order with Position and Z-index, Inset Shadows, Adding Drop Shadows to Text with CSS Text-shadow, Layering Multiple Text-shadows for a Detached Outline Effect
Exercise Preview
Exercise Overview
In this exercise, you’ll use box-shadow and text-shadow to add visual depth. You will also learn how to adjust an element’s front to back stacking order using relative position and the z-index property.
Getting Started
- We’ll be switching to a new folder of prepared files for this exercise. In your code editor, close all open files to avoid confusion.
- For this exercise we’ll be working with the Box-Shadow and Text-Shadow folder located in Desktop > Class Files > Advanced HTML CSS Class. Open that folder in your code editor if it allows you to (like Visual Studio Code does).
- Open index.html from the Box-Shadow and Text-Shadow folder.
Preview index.html in Chrome (we’ll be using its DevTools).
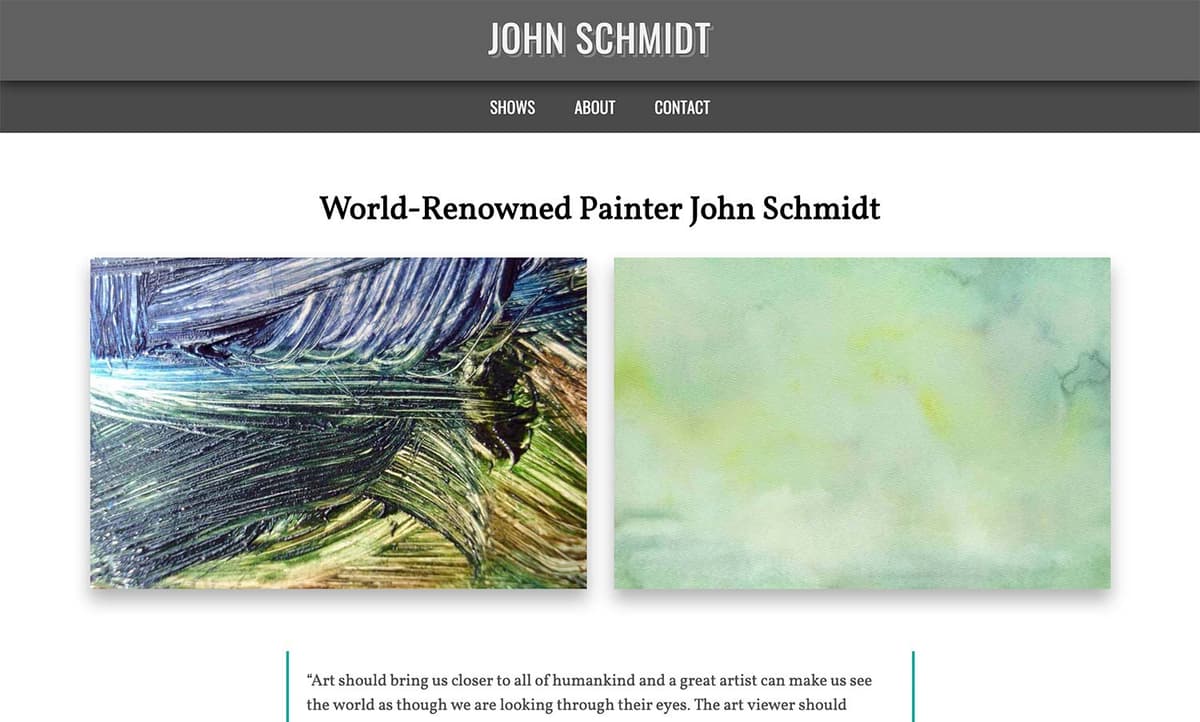
Behold the mostly finished portfolio website of world-famous artist John Schmidt. Our only task is to add drop shadows.
- The first thing we want to do is add a box-shadow to the four large featured art images on the page to make them stand out more. Hover over them to see the pointer (hand) cursor. This tells us that each image is wrapped in a link. (Each link is also wrapped in a div tag with a class of category.)
Leave the page open in Chrome so we can come back to it later.
Using the CSS Box-Shadow Property
The CSS3 property box-shadow adds a drop shadow behind an element with a single line of code.
- Return to your code editor.
- Open main.css from the css folder (in the Box-Shadow and Text-Shadow folder).
In the .category a rule, add the bold code below.
.category a { box-shadow: 2px 6px 4px,000; margin: 30px 0; display: block; text-decoration: none; }- Take a moment to review the code you wrote. The first value sets the horizontal (X) offset, the second sets the vertical (y) offset, the third value sets the blur radius, and the fourth sets the color.
- Save the file, then reload the page in Chrome. Wow, that shadow is very prominent.
- Let’s open the DevTools so we can tweak it. CTRL–click (Mac) or Right–click (Windows) on any of the large featured art images and select Inspect.
- An
<img>tag should be selected. In the Elements panel of the DevTools, click the line above the selected image:<a href="#">. In the Styles panel:
- There may be two rules for .category a so find the one with the box-shadow.
- Click on the box-shadow’s first px value (horizontal offset) and change it to -2px.
- While we’re at it, change the second value (vertical offset) to -6px.
The shadow is now going in the opposite direction! Positive values place the shadow off the bottom right of an element. Negative values place the shadow off the top left of an element.
We can move the shadow slightly to the bottom (no horizontal offset) and create a larger softer shadow. Change to these bold values:
box-shadow: 0 2px 20px,000;To make the shadow much harder and smaller, change the blur as shown in bold:
box-shadow: 0 2px 2px,000;Let’s experiment with the color. Change the color as shown:
box-shadow: 0 2px #f00;Wow that’s red! While we could change the color to a subtle hexadecimal gray, hex colors are opaque. It would look more realistic if we had a partially transparent shadow. Let’s use RGBA.
- Switch back to main.css in your code editor.
Modify the box-shadow values as shown below in bold:
.category a {
   box-shadow: 0 12px 18px rgba(0,0,0,.3);
   margin: 30px 0;
   display: block;
   text-decoration: none;
}
Remember that the alpha transparency takes a value between 0 (fully opaque) and 1 (fully transparent). This code gives us a 30% transparent black.
- Save the file, then reload the page in Chrome. Nice, we have a soft, subtle shadow that works well on top of a white background! RGBA shadows look natural over any color background due to the partial transparency.
- Still in Chrome, notice the gray band that contains John Schmidt at the top of the page. We want to add box-shadow to this section to make it look like it is casting a shadow on top of the darker gray navigation directly below it. This top section (above the nav) is a div with a class of logo-wrapper.
- Leave the page open in the browser and switch to main.css in your code editor.
Add a box-shadow to the existing .logo-wrapper rule, as follows:
.logo-wrapper {
   background: #444;
   box-shadow: 0 2px 15px rgba(0,0,0,.8);
Code Omitted To Save Space
}TIP: If your code editor has Emmet installed (like Visual Studio Code does), you can type bxsh and hit Tab. You will see: box-shadow: inset hoff voff blur color;. Make sure to delete inset, because we don’t want an inset shadow here. Then tab into each of the placeholders and add the desired values.
Because we want the drop shadow to go straight down, we input a horizontal offset of 0. Our shadow is 80% gray so it will be visible over the dark gray nav.
Save the file, then reload the page in Chrome. Oh no! We expected to see a very dark shadow to be cast onto the navbar, but it’s nowhere to be seen because it’s hidden behind the navbar!
Changing an Element’s Default Stack Order
HTML elements have a default stacking order that determines which objects are in front of others. This is an object’s position along the z-axis, which represents back to front depth.
- To see the structure of the markup, switch to index.html in your code editor.
Locate the header tag to see that the
<div class="logo-wrapper">and<nav>are siblings within their parent header tag.We can change the kind of positioning to change the stacking order.
- Switch to main.css.
Give the .logo-wrapper a relative position as shown below in bold:
.logo-wrapper {
   background: #444;
   box-shadow: 0 2px 15px rgba(0,0,0,.8);
   position: relative;
Code Omitted To Save Space
}NOTE: We don’t want to use fixed positioning because we want this content to scroll with the document. Absolute positioning won’t work either because we want to keep it in the normal document flow.
Save the file, then reload the page in Chrome. Yes, our shadow is showing!
But why is it working? Relative position acts differently than the default static position. One of the ways it differs is how things stack!
NOTE: If we have multiple elements that we needed to manage (and assuming they all have a position other than static), we could use z-index to further control their front to back order. You’ll see an example of z-index next.
Inset Shadows & Z-Index
- Still in Chrome, CTRL–click (Mac) or Right–click (Windows) on any of the large featured art images and select Inspect.
- An
<img>tag should be selected. In the Elements panel of the DevTools, click the line above the selected image:<a href="#">. In the Styles panel:
- In the .category a rule, click on the box-shadow’s value.
- Add inset at the beginning so you end up with inset 0 12px 18px rgba(0,0,0,.3)
- Don’t be surprised when the shadow disappears!
Why did the shadow disappear? Because the image inside the link is covering over it! Let’s send the image backward in the stacking order.
- In the Elements panel of the DevTools, click on the img tag inside the selected link
<a href="#">. - In the Styles panel there should be an img rule.
- Click in the empty space to the right of the vertical-align: bottom; property to create a new blank line so we can type in a new property.
- Type
z-index: -1;which should complete that property and put you on another line, ready to type another property. We still don’t see the shadow because z-index can’t work with the default static position. Type out position: relative; and the inner shadow should appear!
- Positive numbers pull an element front. The higher the number, the farther front it moves. So
z-index: 20;would be in front ofz-index: 10; - Negative numbers push an element back.
- Positive numbers pull an element front. The higher the number, the farther front it moves. So
This was just a test so we’re not going to change the code in our code editor.
Adding Drop Shadows to Text with CSS Text-Shadow
CSS lets us add text shadows as well. Let’s give the John Schmidt text at the top of the page more pizazz by adding text-shadow.
- Switch back to main.css in your code editor.
The text we want to style is the anchor tag inside the .logo-wrapper. In the existing .logo-wrapper a rule, add the following bold code:
.logo-wrapper a { display: inline-block; text-shadow: 4px 4px,000; }- Save the file, then reload the page in Chrome.
- The text should now have a black shadow. CTRL–click (Mac) or Right–click (Windows) on John Schmidt text and choose Inspect.
- On the page (not in the DevTools), click on any blank area to deselect the text.
Let’s try out a super sharp shadow. In the Styles panel, in the .logo-wrapper a rule, change both the blur value to 0 as shown in bold:
text-shadow: 4px 0,000;
Layering Text-Shadows for a Detached Outline Effect
The sharp shadow looks pretty cool, but we want to make it look like a stylized outline that is detached from the text by a few pixels.
To get this result, we’ll need to layer two text-shadow effects on top of each other. We want to create a shadow like the one we just created in the DevTools, but we want it to be partially covered by a shadow that is indistinguishable from the logo-wrapper’s background. For this to work properly, we must stack the effects in the correct order.
- Switch back to main.css in your code editor.
- In order for our overlay to look convincingly invisible, we need to set its color to the logo-wrapper’s background color. In the rule for .logo-wrapper, notice the background property is #444 so that’s what we’ll use.
In the .logo-wrapper a rule, set the blur to 0 and the color to a gray (because we thought black was too dark):
.logo-wrapper a {
   display: inline-block;
   text-shadow: 4px 0 #666;
}
NOTE: Make sure you didn’t miss setting the blur to 0!
Shadow effects also have a stacking order. The first shadow is layered atop the second one, which overlays the third, and so on. Because we want a masking effect, we need to add the shadow that’s the same color as the heading’s background before the one we already have. Add the following bold code to the text-shadow property and do not miss the comma!
.logo-wrapper a {
   display: inline-block;
   text-shadow: 2px 0 #444,  4px 0 #666;
}
The first shadow is smaller than the second one. This will create the illusion of 2 pixels of space between the text and the shadow that looks like a floating outline.
- Save the file, then reload the page in Chrome. Neat-o!
- Hover over John Schmidt text. It would be interesting if we made the shadow shift position on hover.
- Switch back to main.css in your code editor.
- Copy the entire .logo-wrapper a rule.
Paste the code directly below and add the following bold edits to specify negative values for the horizontal offset on hover. Be sure to delete the display property from the hover rule.
.logo-wrapper a { display: inline-block; text-shadow: 2px 0 #444,4px 0 #666; }.logo-wrapper a:hover { text-shadow: -2px 2px 0 #444, -4px 4px 0 #666; }- Save the file, then reload the page in Chrome.
Hover over the text to see the shadow shift. Artsy!
CSS Box Shadow
Box-shadow can have up to 6 values: inset hoff voff blur color spread
Inset (optional): Inset provides an inner shadow to the element rather than placing it outside the box. Inset can be declared first or last. All other values must be in the order listed above.
Horizontal offset (required): A positive value means the shadow will be on the right. A negative value will put the shadow on the left.
Vertical offset (required): A positive value means the shadow will be below the box. A negative value means the shadow will be above.
Blur radius (optional): The higher the number value, the more blurred the shadow will be. A value of 0 will give you a hard edge.
Color (required): The value can be expressed as hexadecimal, RGB, RGBA, HSL, or HSLA.
Spread radius (optional): Spread can be added between the blur and color values. Positive values will increase the size of the shadow. Negative values will decrease the size of the shadow. The default spread value is 0, so the shadow is the same size as the blur.
CSS Text Shadow
Each shadow value must specify a shadow offset and, optionally, a blur radius and color.
The offset is specified using two length values: the first value represents the horizontal distance to the right of the text (if it’s positive), or to the left of the text (if the value is negative); the second value represents the vertical distance below the text (if it’s positive) or above the text (if it’s negative).
The blur radius is specified after the offset values; it’s a length value that represents the size of the blur effect. If no radius is specified, the shadow will not be blurred.
The color can be specified before or after the offset and blur radius values.