Vacation Stripes: Title Sequence with Custom Eases
What This Tutorial Covers
Custom Easing
Bezier curves that match the project's energy.
Sequenced Animation
Stagger element timing for cohesive movement.
Title Polish
Type, color, and spacing that make titles feel intentional.
Noble Desktop's Video Editing & Motion Graphics Certificate teaches After Effects alongside Premiere Pro, Cinema 4D, and DaVinci Resolve.
Learn how to create and animate a vacation-themed title sequence using Adobe After Effects, including editing audio length and volume, customizing keyframe velocity, and using alpha mattes.
Exercise Preview

Editing Audio Length & Volume
The final movie will have an audio track. Let’s add it first. In the Project panel on the top left, expand the Assets folder by clicking the arrow
 to its left.
Drag Pumping-Irie.mp3 from the Assets to the Timeline at the bottom of the screen.
The audio track is too long for our composition, so we’ll need to cut it. To get a good idea where to set new in and out points, it’s helpful to look at the Waveform, which shows how loud the audio is at any given timecode. With the [Pumping-Irie.mp3] layer selected, press LL (two L s in quick succession) to bring it up.
Notice there’s a huge valley near the beginning, which means the audio is quiet here:

Let’s remove the quiet part of the audio to make for a more engaging video. In the Timeline, double–click [Pumping-Irie.mp3] to open it in the Layer panel (in the top middle of the screen, where the Composition panel normally is).
At the bottom of the Layer panel, in the mini timeline with a playhead and timecodes for the In point
 , Out point
  , and Duration
  , do the following:
- Holding down the Cmd (Mac) or CTRL (Windows) key, drag the playhead to 3;01, a few frames before a peak and at the beginning of a riff. If you have problems getting it exact, go to the very bottom of the Layer panel, click into the Preview Time menu
 , type 301 and press Return (Mac) or Enter (Windows).
 - This is a nice, logical in point, so click the Set IN point to current time icon .
- Holding down the Cmd (Mac) or CTRL (Windows) key, drag the playhead to 3;01, a few frames before a peak and at the beginning of a riff. If you have problems getting it exact, go to the very bottom of the Layer panel, click into the Preview Time menu
At the bottom of the Layer panel, click into the Preview Time menu
, type 3529 and press Return (Mac) or Enter (Windows) to get to 35;29.Still at the bottom of the Layer panel, click the Set OUT point to current time icon
to set a new out point here in one of the audio’s valleys.Go to the beginning of your Timeline.
As we preview we want to pay attention to the Audio panel on the top right (next to the Info panel). If you don’t see it, go to Window > Audio.
Keeping an eye on the Audio panel’s colored vertical stripe, press CTRL–Period (Mac) or the Period key on the numeric keypad (Windows) to preview just the audio.
The audio levels sometimes spike up to the very top of the colored vertical stripe which reads 0. The audio loudness scale uses negative values, so that’s way too loud!
Let’s globally reduce our audio levels in the Audio panel. As shown below, drag the middle slider
 downward to about –8 dB (–19 on the colored vertical stripe):
Your goal is to have the levels dancing around –9dB. Keeping your eye on the Audio panel, press CTRL–Period (Mac) or the Period key on the numeric keypad (Windows) to see that we’ve reached our goal. Much better!
In the Timeline, select the [Pumping-Irie.mp3] layer and press Return (Mac) or Enter (Windows). Type audio and press Return (Mac) or Enter (Windows) once more.
To the left of the audio layer name, locate the Lock column
 . Click in the empty space, locking the layer so we don’t make any accidental changes.
Swivel the audio layer closed. (Leaving the waveform open can cause After Effects to perform more slowly.)
Animating the Vertical Line’s Position
The title card that contains the line and other elements you’ll animate in this exercise is located in an After Effects project we imported for you. In the Project panel on the top left, use the arrows
to expand into Imported AEPs > Text Cards.aep.Drag 01-title-PC from Text Cards.aep to the Timeline, below the audio layer.
In the Timeline, double–click the [01-title-PC] layer to open it in the Composition panel and in a new Timeline tab.
In the 01-title-PC tab that opens, notice the pre-made text and shape layers. Make sure BG is still hidden (has its eye
 turned off).
In the Timeline, click on the Vertical Line layer and Shift–click on the in island paradise layer. Layers 1–4 should now be selected.
We only want to animate the line up and down, and we only want the three text layers to animate sideways. To make this easier, separate their dimensions as follows:
- Press the P key on the keyboard to view the layers’ Position properties.
- Cmd–click (Mac) or CTRL–click (Windows) on each of the four layers’ Position property, to select this property within each layer.
- In any selected layer, CTRL–click (Mac) or Right–click (Windows) on the word Position and select Separate Dimensions to split up the X and Y Position values.
Deselect the newly separated properties by clicking in an empty area of the Timeline.
Use the arrows
 to collapse all the layers except Vertical Line.
The line is already in its final position, so in this case it’ll be easier to animate backwards (from the last frame of the transition). Move the playhead to 0;20.
Next to the Vertical Line layer’s Y Position (which should be 414), click the stopwatch
 to add a keyframe
  .
.We want the transition to start at the beginning, so move the playhead to 0;00.
Change the Y Position to –52, to position the line fully above the comp’s frame. This will add another diamond-shaped keyframe
 .
.To the right of the video, in the Preview panel, find the Play From menu near the bottom. If you don’t see it, click on the bottom of the panel and drag it down.
Before proceeding, make sure the following options are set:
- Shortcut should be set to Spacebar.
- Next to Include, make sure both the Video
 and Audio
  icons are blue (which means they’ll both be included in the preview).
 - Show overlays and layer controls should be off
 .
. - Uncheck Cache Before Playback if it isn’t already.
- Range should be set to Work Area.
- Play From should be set to Start Of Range.
- Skip should be set to 0 so it doesn’t skip any frames on playback.
- Resolution should be set to Auto so it previews using the resolution you set when creating the composition (which should be Full).
Still in the Preview panel, click the Play button
 to see that the movement is very robotic because the line moves at a constant speed throughout the animation.
TIP: You can press the Spacebar or click the Stop button
 to stop playback.
Customizing an Ease Using the Graph Editor & Keyframe Velocity
A major convenience of After Effects is the ability to create keyframes at key moments in an animation sequence with no need to worry about setting the values in between those keyframes. But how does After Effects know which values to choose for the frames in between the first and last  keyframe?
Actually, those diamond shapes say a lot about how After Effects chose to fill in the blanks. They signify linear motion, in which the object moves at a constant speed throughout its animation. Most objects in real life don’t move like that, so After Effects gives us the option to add easing, defining where in the sequence the animation should slow down. Let’s add some to make the motion more interesting.
With the Vertical Line layer selected in the Timeline, press the U key until you can only see the animated Y Position property. You may need to press it twice.
On the right-hand side of the Timeline, select both keyframes by drawing a selection box
 around them.
Go to Animation > Keyframe Assistant > Easy Ease or use the shortcut F9.
To see how After Effects changed the speed of the animation, let’s open the Graph Editor. To do that, go to the top middle of the Timeline and click its icon
 :
:
At the bottom of the graph, click the following buttons (listed from left to right):
- Click the eye menu
 and make sure Show Selected Properties is selected.
 - Click the Choose graph type and options menu
 . The Value Graph is easier to use than the Speed Graph, so make sure Edit Value Graph is selected.
 - If the Transform Box icon
 is selected (blue), click it to turn the option off.
 - Click the Auto-zoom graph height icon
 .
. - Click the “double noodle” Fit all graphs to view button
 .
.
Temporal Vs. Spatial Properties in the Graph Editor
Some properties such as Opacity, Rotation, and Scale only change temporally (in time). Other properties such as Position are more complicated because they change both temporally and spatially (in space).
With temporal properties, you can use either graph. If you want to customize a Position ease and are only animating in one direction, be sure to separate dimensions first: otherwise the harder to use Speed Graph is your only choice for spatial properties!
- Click the eye menu
If you don’t see a yellow handle protruding from the left green square (first keyframe), click on it.
In the Value Graph, notice the curve is very shallow at the beginning and end. This indicates where the animation is the slowest. Because we applied easing to the keyframes, the animation is slowest around them. You can also see that both yellow handles extend 1⁄3 of the way across the graph.
In the finished clip, the line shyly comes on-screen and starts slowly inching its way down. As the line falls further, its animation picks up speed. To make our animation dynamic in this way, let’s customize the easing.
Click and hold on the dot at the end of the first yellow handle and press Shift to constrain it to a straight horizontal line. Drag it rightward to add more easing, stopping when it gets around the 12f (12 frame) mark, as shown below:

Click on the right square (second keyframe) so we can remove some of its easing.
Shift–drag the yellow handle rightward so it starts around 17f.
At the top middle of the Timeline, click the Graph Editor button
again, to get back to the normal Timeline.When we fit the graph to view, we made it so only 20 frames are showing in the Timeline at a time! To see the entire length of the layer bars, go to the bottom of the Timeline and drag the zoom slider
 all the way to the left.
If you have a hard time getting your head around adjusting graph shapes, perhaps the Keyframe Velocity dialog is more your jig. CTRL–click (Mac) or Right–click (Windows) on the first keyframe
 and go to Keyframe Velocity.
Under Outgoing Velocity, the Influence should be about 60%. This is a numerical representation of how wide the yellow graph handle is (which shows how much this keyframe influences the slowdown). Adjust it if needed, then click OK.
NOTE: Because this is the first keyframe in the sequence, it’s only going “out” to the next keyframe. So the Incoming Velocity should still be 33.33%. When applying an Easy Ease, both the Outgoing and Incoming Velocity get set to this amount, which is why the yellow handle was originally 1⁄3 of the way across the graph.
CTRL–click (Mac) or Right–click (Windows) on the second keyframe
 and choose Keyframe Velocity.
Since we are coming “in” to this second keyframe, we need to control the Incoming Velocity. Under Incoming Velocity, the Influence should be about 15%. Adjust it if needed, then click OK.
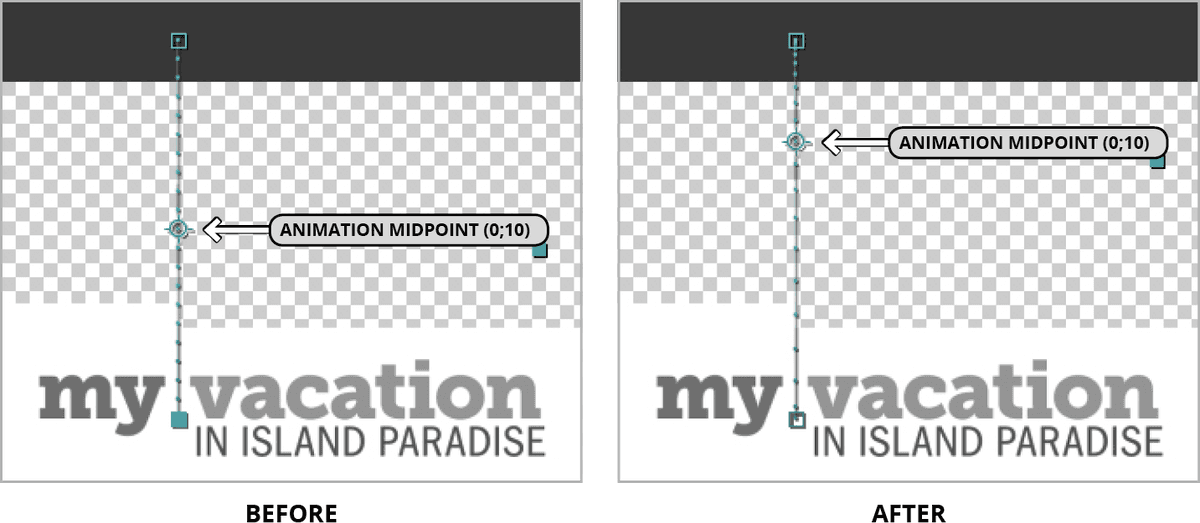
In the Composition panel in the center of the screen, take a look at the line’s vertical motion path that shows its movement from frame to frame. The before and after image below depicts the line’s anchor point at 0;10, halfway through the sequence. As you can see, the dots used to be evenly spaced (representing linear motion), but now they’re closer together at the top, and further apart near the bottom:
NOTE: The Position property’s motion path indicates the property is spatial (which means it cannot be adjusted in the easier to use Value Graph unless you separate dimensions)!
Hit Spacebar to play back. You’ll see that the line starts falling slowly and ends fast. A nice, dynamic ease!
Using Alpha Mattes to Hide/Show Text As It Animates
We want the “my” text to slide out from behind the vertical line from right to left. To give it the illusion that the line is birthing the word into form, we’ll need to hide it whenever it’s positioned to the right of the line. An alpha matte can look through one layer’s opacity (alpha) info to show the layer below it, so we’ll use one here.
To get the “my” layer to look through the Left side Matte layer we created ahead of time for this purpose, drag the Left side Matte layer directly above the my layer.
In the Timeline to the right of the my layer’s name, look for the TrkMat menu. If instead you see many switches
 , go to the bottom of the Timeline and click the Toggle Switches / Modes button.
In the my layer, change the TrkMat (Track Matte) menu from None to Alpha Matte “Left side Matte”.
The text will now only show through the opaque areas of the matte layer sitting above it. You can now see that the text is semi-transparent.
We want the text animation to start immediately after the line settles into place at 0;20, but it will be easier to animate backwards. Move the playhead to 0;26.
Select the my layer and press the P key to reveal its separated Position properties.
We want to animate it horizontally, so next to X Position, click the stopwatch
to add a keyframe.Move the playhead to 0;20, the start of our quick text animation.
Change X Position to 1265. Because that positions the “my” text fully outside the bounds of the matte layer to the right, you will no longer be able to see it on-screen.
CTRL–click (Mac) or Right–click (Windows) on the second keyframe
and select Keyframe Assistant > Easy Ease In.CTRL–click (Mac) or Right–click (Windows) on the second keyframe
 again and choose Keyframe Velocity.
Because we set it to Easy Ease In, After Effects only added easing to the Incoming Velocity, which is the side of the keyframe that we want to modify. Under Incoming Velocity, change the Influence to 70% and click OK.
Slide through with the playhead to get a quick look at the animation so far.
Animating the Rest of the Text
We like the feel of the “my” text animation that starts off quickly and robotically and slows down as it approaches the end. Let’s animate the rest of the text similarly.
In the Timeline, drag the Right side Matte layer directly above the vacation layer so we can use it as the vacation text’s alpha matte.
In the vacation layer, change the TrkMat (Track Matte) menu from None to Alpha Matte “Right side Matte”.
So far there’s something moving on-screen throughout the title sequence. Let’s keep up that exciting pace! This means it’s a good idea to start animating the “vacation” text right before the “my” text stops animating. Because it’s easier to set the final keyframe for the Position property first, move the playhead to 1;10.
Select the vacation layer and press the P key.
Next to X Position, click the stopwatch
to add a keyframe.Move the playhead to 0;25, one frame before the “my” text settles into its final position.
Change the X Position to 830 to move the text to the left. Because the alpha matte’s left edge is positioned where the line is, you can’t see the text anymore.
CTRL–click (Mac) or Right–click (Windows) on the second keyframe
and select Keyframe Assistant > Easy Ease In.CTRL–click (Mac) or Right–click (Windows) on the second keyframe
again and choose Keyframe Velocity.Under Incoming Velocity, change the Influence to 70% and click OK.
NOTE: This is the same value we used for the “my” text, so it adds consistency to the animation sequence.
A layer that is used as an alpha matte can only matte the layer directly below it. Because we also want the “IN ISLAND PARADISE” text to appear to emanate from the line, we are going to need another matte. No problem—just do the following:
- In the Timeline, select Right side Matte and go to Edit > Duplicate or press Cmd–D (Mac) or CTRL–D (Windows).
- Drag Right side Matte 2 directly above the in island paradise layer so it becomes Layer 6.
- In the in island paradise layer, change the TrkMat (Track Matte) menu from None to Alpha Matte “Right side Matte 2”.
We want the title sequence to end a bit before the two second mark, so move the playhead to 1;20.
Select the in island paradise layer and press the P key.
Next to X Position, click the stopwatch
to add a keyframe.Move the playhead to 1;05, two frames before the “vacation” text clears the bounds of the vertical line. This is a nice, interesting place to introduce new text.
Change the X Position to 830. To keep our animation consistent, this is the same value we used for the “vacation” text’s first keyframe.
CTRL–click (Mac) or Right–click (Windows) on the second keyframe
and select Keyframe Assistant > Easy Ease In.CTRL–click (Mac) or Right–click (Windows) on the second keyframe
again and choose Keyframe Velocity.Under Incoming Velocity, change the Influence to 70% (to match the other two text animations) and click OK.
On the left side of the Timeline and to the left of the BG layer name, locate the eye column
. Click in the empty space to make this layer visible.Hit Spacebar to preview the animated text. Nice and exciting—we’re done!
Do a File > Save and leave this project open. We’ll continue working on it in the next exercise.