Vacation Stripes: Drawing Simple Masks in After Effects
What This Tutorial Covers
Mask Tools
Pen, ellipse, and rectangle tools for shape masks.
Mask Modes
Add, subtract, intersect — combining masks for complex reveals.
Mask Animation
Animate mask paths for reveal and shape morphing.
Noble Desktop's Video Editing & Motion Graphics Certificate teaches After Effects alongside Premiere Pro, Cinema 4D, and DaVinci Resolve.
Discover how to create masks from scratch in After Effects, customize eases, and handle the intricacies of timing animation sequences in this comprehensive tutorial.
Exercise Preview
Transitioning to the 12 Noon Scene
Switch to After Effects, where yourname-Island Vacation.aep is open.
In the Timeline, make sure you are in the Vacation-MAIN tab.
We want the three black and white stripes to start moving on-screen about a second before the motorboat clip ends. Move the playhead to 5;15.
Insert couple-BW.jpg (our next black and white freeze frame) into the Vacation-MAIN tab at exactly 5;15 by doing the following steps:
- From the Project panel’s Assets > Stills folder, drag couple-BW.jpg over to the right side of the Timeline (the area with the colored layer bars). Don’t release yet.
- Mouse over the area between the audio and [01-Trans to Motorboat-PC] layers so you can see a blue line between layers. Notice that a new playhead pops up.
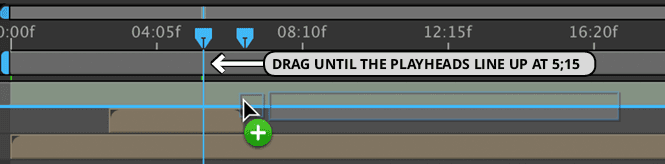
- Drag couple-BW.jpg and when the new playhead is close to 5;15 (you can see this on the left side of the Timeline), hold Shift and it should snap there.
- Release the mouse when done.
Repeat the process listed in the step above to go into the Project panel’s Imported AEPs > Text Cards.aep folder and drag 02-12noon-PC to the Timeline below the audio layer, starting at 5;15.
If the New Layers Don’t Start at 5;15
If you couldn’t align the double playheads, you can try again or just use the In column. Select the layer(s) you had trouble with, click on the In timecode, change it to 5;15, and click OK.
Select the two new layers by clicking on the [couple-BW.jpg] layer and Shift–clicking on [02-12noon-PC].
To keep ourselves organized, let’s choose a different layer color. Click on the colored square to the left of one of the layer numbers and from the menu, choose Blue.
Go to Edit > Deselect All or press Cmd–Shift–A (Mac) or CTRL–Shift–A (Windows).
Double–click the [02-12noon-PC] layer to open this pre-comp in a new Timeline tab.
Because we want to animate the three white rectangle layers, we want them to be in our main composition instead. To set them up properly:
- Click on white rectangle 1 and Shift–click on white rectangle 3.
- Copy the layers (Cmd–C (Mac) or CTRL–C (Windows)).
- To the left of the selected layer names, click any eye
 to turn off their visibility. We don’t want to see them here because we’re going to animate them in the main comp.
At the top left of the Timeline, click on the Vacation-MAIN tab to return to our master composition.
In the master composition’s Timeline, select the [couple-BW.jpg] layer so the layers will be pasted above it.
Press Cmd–V (Mac) or CTRL–V (Windows) to paste the three rectangle shape layers.
With the three layers still selected, click on the In column timecode.
In the Layer In Time dialog that pops up, set it to 515 and click OK.
Press Cmd–Shift–A (Mac) or CTRL–Shift–A (Windows) to deselect everything.
To get the text in the 12noon pre-comp to animate along with the middle white rectangle it’s inside of, we need to parent the pre-comp to the rectangle. In the [02-12noon-PC] layer, go to the Parent & Link dropdown menu on the right and change None to 4. white rectangle 2.
Drawing Masks Using After Effects’ Vector Shape Tools
While preparing your masks in Adobe Illustrator gives you the most control, After Effects also has some vector shape tools that work just fine for drawing simple masks. This will work fine for our needs, so this time we’ll draw our own mask shapes for the black and white freeze-frame stripes. We want them to align with the white rectangle stripes, so we’ll use those shape layers as a guide.
From the Tools panel at the top, select the Rectangle tool
 .
.IMPORTANT: Vector shape tools like the Rectangle tool can be used to draw either a new mask or a new shape layer (like the pre-made white rectangles). To draw a mask, we need to select the layer we want to mask. If no layers are selected, you will create a new shape layer.
We draw a new mask, go to the Timeline and select the [couple-BW.jpg] layer.
To give ourselves more room to work, let’s expand the Composition viewing panel to fill up the entire screen. Position your mouse anywhere inside that panel, and press the tilde (
~) key (below the Esc key).Drag out a rectangle over the top section of the image aligning the bottom of the rectangle with the bottom of white rectangle 1.
Zoom in as you see fit and use the Arrow keys to align the rectangle.
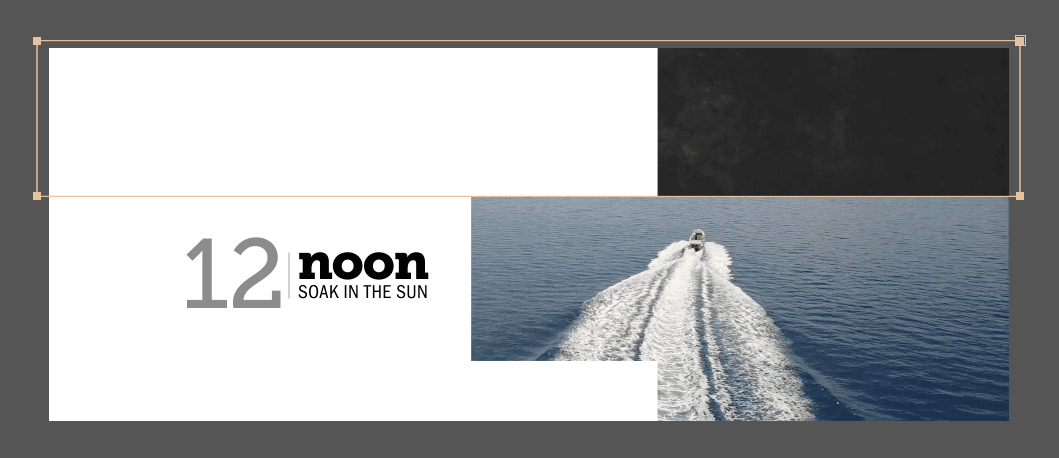
On the same layer, draw a second rectangle aligning it with the second white rectangle (white rectangle 2). As shown below, the top should slightly overlap with the first rectangle you just drew.
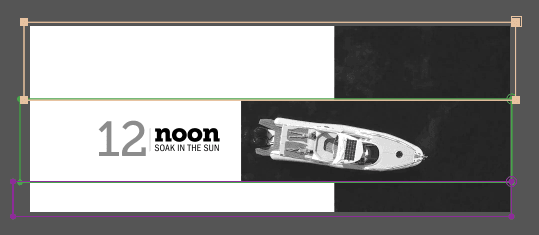
Draw a third rectangle aligned to the bottom white rectangle, making sure it overlaps the one you drew above it.
Press the tilde (
~) key again to toggle back to normal view.Switch back to the Selection tool
 in the Toolbox.
Animating the Freeze-Frame Stripes
We want each mask to be on a different layer. Select the [couple-BW.jpg] layer and press Return (Mac) or Enter (Windows) to start renaming.
Type couple1 and press Return (Mac) or Enter (Windows) to commit the name.
We want to separate the masks onto different layers. With couple1 selected, go to Edit > Duplicate twice. (You should end up with three couple layers.)
Select the couple1 layer, Shift–click on couple3, and press the M key.
We want each layer to only have one mask on it. Go into each layer, Shift–click all the Mask properties, then Cmd–click (Mac) or CTRL–click (Windows) on the mask you want to keep, and delete the two numbered masks that do not correspond to the number in the layer name. Only the masks listed below should remain:
couple1: Delete everything except Mask 1 couple2: Leave Mask 2 couple3: Leave Mask 3 Collapse the “couple” layers when done.
When animating the Position property, it’s usually easiest to animate backwards. We want the stripes to animate for a full second, so move the playhead to 6;15.
In the final movie, the top stripe arrives first, so select the couple1 layer.
Press P to bring up the couple1 layer’s Position property.
CTRL–click (Mac) or Right–click (Windows) on the word Position and select Separate Dimensions.
Click in an empty area of the Timeline to deselect both the separated properties.
Next to X Position, click the stopwatch
 to add a keyframe.
Press I to move the playhead to 5;15, when we want the transition to start.
Change the X Position to –,000, placing the stripe fully off-screen at the left.
CTRL–click (Mac) or Right–click (Windows) on the second keyframe
 to choose Keyframe Assistant > Easy Ease In.
CTRL–click (Mac) or Right–click (Windows) the second keyframe
 once more and select Keyframe Velocity.
Under Incoming Velocity, change the Influence to 70% and click OK.
We’re about to preview, but we only want to check out the work we just did. Slide the playhead to around 5;00—a little before the stripe starts animating.
Solo
 the layer we just animated, couple1.
On the gray bar located just below the seconds in the Timeline, click on the left blue tab (Work Area Start). As shown below, hold Shift and drag it to the playhead:
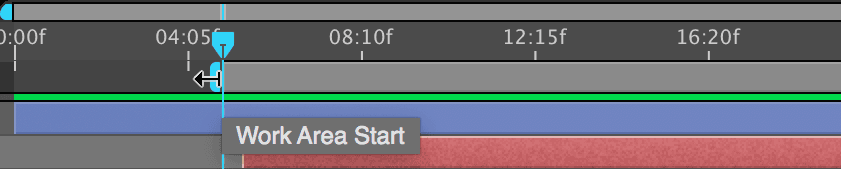
Hit Spacebar to preview. Looking good!
Un-solo the couple1 layer by clicking in its Solo column
.Under couple1, click on the word X Position to select both the keyframes.
Do an Edit > Copy or press Cmd–C (Mac) or CTRL–C (Windows).
Paste (Cmd–V (Mac) or CTRL–V (Windows)) the keyframes at the following timecodes onto the following layers:
5;17: Paste onto the couple2 layer, then press U to show the keyframes. 5;21: Paste onto the couple3 layer, then press U to show the keyframes. Notice that we’ve deliberately set the couple3 keyframes later in time than the other two layers. This slowdown signals to the viewer who the transition is ending.
Finishing the Entrance Sequence: the White Rectangles
The top black and white freeze frame stripe animated in first, so let’s do the same with the top white rectangle. Select white rectangle 1 and press the P key.
CTRL–click (Mac) or Right–click (Windows) on the word Position and select Separate Dimensions.
Click in an empty area of the Timeline to deselect both the separated properties.
Move the playhead to 7;00, the end of our 1-second transition. (This also matches the timing of the freeze frame animation.)
Next to X Position, click the stopwatch
to add a keyframe.We want this transition to start halfway through the freeze frame animation that starts at 5;15, so move the playhead to 6;00.
Change the X Position to –280, placing the rectangle fully off-screen at the left (which also matches the freeze frame animation).
CTRL–click (Mac) or Right–click (Windows) on the second keyframe
and choose Keyframe Assistant > Easy Ease In.CTRL–click (Mac) or Right–click (Windows) the second keyframe
once more and select Keyframe Velocity.Under Incoming Velocity, change the Influence to 70% (the same value we used for the freeze frame stripes) and click OK.
Occasionally when two identical keyframes are next to each other the first one will do a “jog” to the next one. We may run into this quirk because we’re going to animate the stripes to move off-screen as well. Go to Animation > Toggle Hold Keyframe so the value stays put before the next part of the animation.
Notice the new hold keyframe
 shape looks like an Easy Ease
  on the left and the normal hold keyframe
  box shape on the right.
The shape indicates it’s transitioning from a keyframe that has easing, which means After Effects will still generate “in-between” values from the previous keyframe until it reaches this one, which is a hold keyframe (as indicated on the right side of the shape). It will then keep this current value until it hits a keyframe of a different value.
Click on the word X Position to select both the keyframes, and do an Edit > Copy.
To match the timing of the freeze frame animation, paste (Cmd–V (Mac) or CTRL–V (Windows)) the keyframes at the following timecodes onto the following layers:
6;02: Paste onto the white rectangle 2 layer. 6;06: Paste onto the white rectangle 3 layer. Select all three white rectangle layers and press the U key to show their keyframes.
Animating the White Rectangles Off-Screen
In the finished clip, the footage turns to color and starts moving while the white rectangles are on-screen. After a second, the rectangles start moving off-screen.
We want the color video to start at 8;04, so move the playhead there.
From the Project panel’s Assets > Clips folder, drag 02-activities.mov to the right side of the Timeline, below couple1 so you see another playhead. Don’t release yet!
Drag 02-activities.mov and when the second playhead is close to 8;04, hold Shift to snap it there. Then you can release the mouse.
To the left of [02-activities.mov], click on the colored square and choose Blue.
Let’s shorten the freeze frame stripes so that they end before the color footage begins. Press Cmd-Left Arrow (Mac) or Page Up (Windows) or Fn–Up Arrow, to move one frame back to 8;03. (Remember that when shortening layers in After Effects, it includes an extra frame.)
Select the couple1 layer and Shift–click on couple3.
Press Opt–] (Mac) or ALT–] (Windows) to shorten the layers.
We’ll now animate the white stripes to move off-screen. Move the playhead to 9;04.
We want the lowest rectangle to animate off first, so select white rectangle 3.
- To the left of X Position, click the diamond-shaped dip
 (the empty diamond) to add a keyframe.
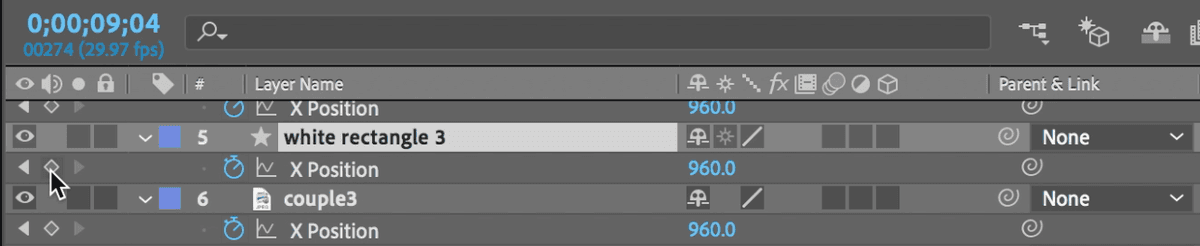
The keyframe we just added is appearing as a square-shaped hold keyframe
but we want one that will animate out. Cmd–click (Mac) or CTRL–click (Windows) on it to change it to a regular diamond-shaped linear keyframe  .
.We want this animation to happen in half a second, so move the playhead to 9;19.
Change the X Position to 2950—fully off-screen to the right.
On the right-hand side of the Timeline, select the two new keyframes (at 9;04 and 9;19) by drawing a selection box
 around them.
Go to Animation > Keyframe Assistant > Easy Ease or use the shortcut F9.
Click in an empty area of the Timeline to deselect the two keyframes.
Select the first keyframe
 and go to Animation > Keyframe Velocity.
Under Outgoing Velocity, set the Influence to 70% (so it starts slow) and click OK.
Select the second keyframe
and go to Animation > Keyframe Velocity.Under Incoming Velocity, set the Influence to 17% (so it ends fast) and click OK.
Press Spacebar to see our zippy, slow-to-fast move out.
Drag a selection around the two new keyframes again and do an Edit > Copy.
Paste (Cmd–V (Mac) or CTRL–V (Windows)) the keyframes where indicated below (they will be sequenced further apart than the stripes in the entrance animation):
9;08: Paste onto the white rectangle 1 layer 9;15: Paste onto the white rectangle 2 layer (this rectangle is positioned under the text—we want it to move out last so viewers can read it) Move the playhead to 9;29, one frame before the final keyframe at 10;00.
In the Timeline, select [02-12noon-PC] and Shift–click on white rectangle 3.
Press Opt–] (Mac) or ALT–] (Windows) to shorten the layers.
Back in the Timeline, Shift–click on [02-activities.mov] to select all the Blue layers.
Go Layer > Pre-compose and make sure the following options are set:
- Name it 02-Trans to Activities-PC (to remind us it’s a P re-C omp).
- Make sure Adjust composition duration to the time span of the selected layers is checked on and Open New Composition is checked off.
Click OK.
In the Project panel, drag 02-Trans to Activities-PC into the Pre-comps folder.
Importing the Rest of the Footage
In the Project panel, click on the Imported AEPs folder so the projects we’re about to import automatically get put there.
Go to File > Import > File or press Cmd–I (Mac) or CTRL–I (Windows).
Navigate into After Effects Level 2 Class > Vacation Stripes > AE Projects to Import.
Click on shot3-Trans to Scenery.aep and Shift–click on shot4-Trans to Sunset.aep.
Click Open (Mac) or Import (Windows) to import both projects.
To add the third scene to our main composition (Vacation-MAIN), do the following:
- In the Project panel, expand
 into the shot3-Trans to Scenery.aep folder.
 - Drag 03-Trans to Scenery-PC down to the Timeline just below the audio layer.
- In its In column, click on the timecode. Change it to 1614 and click OK.
- In the Project panel, expand
Like the previous step, add 04-Trans to Sunset-PC (in the shot4-Trans to Sunset.aep folder) to the main comp, below the audio layer. Change its In timecode to 2427.
Do a File > Save.
Creating Audio & Video Fades at the End of the Video
For web-distributed and social media videos, it is OK to edit audio in After Effects. But for videos that will be shown on TV or in a theater, it’s best to edit audio in Premiere Pro, and send it to a professional sound mix.
To the left of the audio layer name, click the lock
 to unlock it.
Select the audio layer and go to Effect > Audio > Stereo Mixer. This is the best way to add an audio fade in After Effects.
Let’s build a fade. Move the playhead to 30;05.
In the Effect Controls panel, turn on the stopwatches
next to both Left Level and Right Level.We want the music to end two seconds later, so move the playhead to 32;05.
Go back to the Effect Controls panel and set both Left Level and Right Level to 0%.
Last but not least, let’s fade out the video to black, matching the fading audio. Unlike in other editing software, we do this by adding a solid black layer. In the Timeline, select the [04-Trans to Sunset-PC] layer so the video layer we’re about to add will stay below the audio layer. (This is simply to keep ourselves organized.)
Go to Layer > New > Solid.
In the dialog that appears, click the Make Comp Size button.
Click the Color swatch at the bottom. Type in 0 (to get the hex code for black).
Click OK twice to exit both dialogs.
In the [Black Solid 1] layer’s In column, click on the timecode.
Set the Layer In Time to 3105 (halfway through the audio fade) and click OK.
Press the I key to get to the layer’s new in point at 31;05.
We want to keyframe the Opacity property at this time, so press the T key.
Click the stopwatch
to enable keyframing, then change the value to 0%.We want the screen to be fully black when the final scene ends. In the Timeline, select [04-Trans to Sunset-PC] and press the O key to get to its out point (at 32;05).
Reselect [Black Solid 1] and set its Opacity to 100% to complete our fade to black.
Move the Work Area Start back to 0;00 if it isn’t already.
Do a File > Save. You’re ready to render!
Rendering the Video and Creating a Preset in Adobe Media Encoder
Let’s export our video and save it for publishing! Make sure you are in the Timeline tab for the main composition (named Vacation-MAIN).
Go to Composition menu > Add to Render Queue.
In the Render Queue panel that appears at the bottom, next to Output To, click on the file name or Not yet specified.
Navigate to Class Files > After Effects Level 2 Class > Vacation Stripes > Renders, name it Island-Vacation.mov and click Save.
At the top right of the Render Queue panel, click the Queue in AME button.
This should launch Adobe Media Encoder—an application specifically designed to encode and process content for your desired output.
On the right you should see that Vacation-MAIN has been added to your Queue.
Below the Format column, click the small arrow
 and choose H.264 if it isn’t already.
Below the Preset column, click the small arrow
and choose Match Source-High Bitrate from the menu.Click the words Match Source-High Bitrate to customize these settings.
In the Export Settings window that opens up, a little further down, make sure you’re viewing the Video tab.
Click the Match Source button to make sure our export is the same dimensions as our sequence settings.
Scroll down in the Video section and check on Render at Maximum Depth so that our video exports at a high quality.
Below that, find the Bitrate Settings.
Set Bitrate Encoding to VBR, 2 pass. This refers to a Variable Bit Rate and number of encoding passes.
Further down in the Video section, under Advanced Settings, check on Key Frame Distance and set it to 30 to match it to our project’s frame rate.
At the bottom of the Export Settings window, check on Use Maximum Render Quality.
Look up at the top of the Export Settings window. The Preset column should now say Custom because we customized it. Let’s save these changes to a new preset. Click the
 button to the right of Preset.
Name it H264-yourInitials.
Click OK to create the new template. This will save us some time in future exercises!
At the bottom of the window, click OK to exit out of the Export Settings.
Below the Output File column you’ll see the filename and location where it’s going to save your file should already be set to your Renders folder. If it isn’t already, click the blue filepath text, and set it to After Effects Level 2 Class > Vacation Stripes > Renders.
To start the rendering/exporting process, in the top right of the Queue window, click on the green Start Queue button
 .
.When the progress bar below the Queue panel is completely blue, the rendering is complete! Once it’s done, you can click the blue filepath below the Output File column, to go to the folder where the file is located.
Open the Island-Vacation movie and watch your new masterpiece!
For most of the rest of the exercises in this book, you’ll be able to use the preset you just made! The next time you’re in the After Effects Render Queue window and click the “Queue in AME” button, you’ll find this new preset in the main Adobe Media Encoder window.
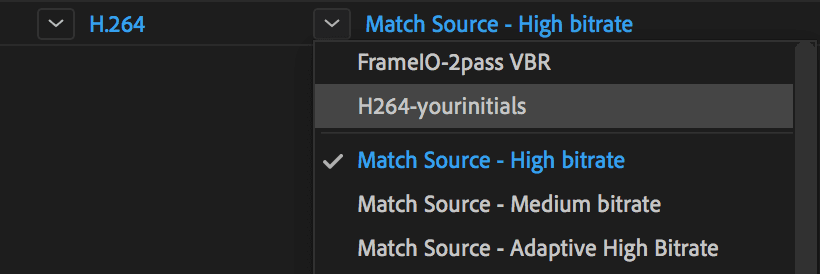
Below the Preset column, click the small arrow
and you’ll choose H264-yourInitials, which will be located above Match Source-High Bitrate in the dropdown menu, as shown below.