Superman: Simple Character Animation Using Masks
What This Tutorial Covers
Mask Reveal
Reveal and hide character parts via mask paths.
Layer Stacking
Order layers to support body part animation.
Timing
Stagger keyframes for natural character movement.
Noble Desktop's Video Editing & Motion Graphics Certificate teaches After Effects alongside Premiere Pro, Cinema 4D, and DaVinci Resolve.
Learn how to animate a cartoon superhero using After Effects, with techniques such as converting an expression to keyframes for realistic hair animation, using the Pen tool for custom-shaped masks, and pre-composing to animate multiple layers.
Exercise Preview

Getting Started
To save time, we did the initial setup for you. In After Effects, go to File > Open Project. (If another project is open, click Save to get the Open dialog to show up.)
Navigate into Desktop > Class Files > After Effects Level 2 Class > Superman, and double–click on Cartoon Hero Started.aep to open it.
Go to File > Save As > Save As.
Navigate into Class Files > After Effects Level 2 Class > Superman if you aren’t already there. Name the project yourname-Cartoon Hero.aep and click Save.
If the cartoonHero comp isn’t already open in the Timeline at the bottom of the screen, go to the Project panel and double–click it to open a Timeline tab.
All the layers are vector graphics from finalLockup.ai (located in the Superman > Assets folder). The file has that name because it’ll be the final scene in a longer sequence we’ll create soon. We imported it as Composition – Retain Layer Sizes.
For more info about the import options for Illustrator files and when it’s appropriate to choose something other than Composition – Retain Layer Sizes, go to tinyurl.com/prep-ai-for-ae
At the bottom middle of the Composition panel, click the Toggle Transparency Grid button
 to make it blue. You should see that the composition actually has a transparent background.
Converting an Expression to Keyframes for Realistic Hair Animation
Go to the bottom left of the Composition panel and from the Magnification ratio popup menu with a zoom percentage, choose 400%.
We’ll animate the individual hair spikes first, so press the Spacebar (to temporarily get the Hand tool
 ) and drag the image so the hair is visible.
In the Timeline, select the first layer, hair4.
Solo
 the hair4 layer to view it in isolation.
By default, the anchor point is in the center of the layer’s bounding box. Let’s move it to the bottom center of the hair so it’ll rotate around that point when animating. Go to the Tools panel at the top and select the Pan Behind (Anchor Point) tool
 .
.As shown below, move the anchor point
 to the base of the hair:
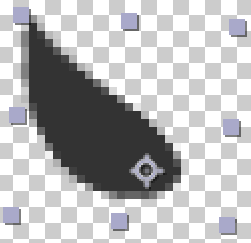
One at a time, repeat the process for the three other hair layers. You’ll need to select a layer, Solo
it, then move the anchor point .When ready to move on, make sure to toggle the Solo switch off for all the layers.
Select the hair4 layer and press R to bring up the Rotation property we’ll animate.
- Make sure you’re at 0;00, then Opt–click (Mac) or ALT–click (Windows) the stopwatch
 next to Rotation to add an expression to this property.
Expressions: Code-Based Animation
Expressions are a way to add animation to a layer without using keyframes. Expressions really shine when you either want to add a complex animation that would be too tedious to keyframe, or want to dynamically link two or more properties so they influence each other in some way. Expressions sound intimidating, but After Effects helps you create them.
On the right-hand side of the Timeline, select the expression text that has appeared if it isn’t already selected. Replace it by typing wiggle(3,20) instead.
This means we want the hair to wiggle (move randomly) 3 times per second with a maximum wiggle of 20° either to the right (a positive value) or left (negative value).
Click in any gray area of the Timeline to set the expression.
Press Spacebar to preview from the beginning. The hair is moving randomly as if the wind is blowing!
Wiggle expressions are all about randomness, which means if we were to copy our expression and paste it onto the other hair layers, After Effects would randomly choose different values for each layer. Not how hair moves! Alternatively, if we parented all of the other hair layer rotations to the hair4 layer, they would all rotate together based on the anchor point of hair4, which also wouldn’t look natural.
Different parts of hair usually move with a delay, so we want to offset keyframes to create this effect. First let’s create actual keyframes by doing the following:
- In the Timeline under hair4, click on the word Rotation to select it.
- Go to Animation > Keyframe Assistant > Convert Expression to Keyframes to disable the expression, translating it into physical keyframes
 .
.
NOTE: After Effects gave us one circular keyframe per frame (it looks like one long bar). The circle shape means it will maintain a smooth transition between keyframes.
To copy all of the keyframes that After Effects added in the expression’s place, click on the word Rotation again and press Cmd–C (Mac) or CTRL–C (Windows).
We want the leftmost hair to start moving first, followed by each of the other hairs, with a slight delay.
At the top left of the Timeline, click on the timecode. Type in –2 and press Return (Mac) or Enter (Windows) to get to –0;02. This puts the playhead 2 frames before the Timeline begins, which is why you won’t see anything in the Composition viewing panel.
Select hair3 and press Cmd–V (Mac) or CTRL–V (Windows) to paste.
To confirm that the keyframes got pasted, press the U key. Sweet!
For the remaining layers, paste the keyframes at the timecodes indicated (you can go back two frames at a time by pressing Cmd-Left Arrow (Mac) or Page Up (Windows) (or Fn–Up Arrow) twice):
hair2: –0;04 hair1: –0;06 At the bottom left of the Composition panel, click into the menu with a zoom percentage and choose Fit.
Press Spacebar to play back the animation. The leftmost hair (hair1) moves first, then the rest of them follow with a slight delay. Nice and natural!
Using the Pen Tool to Create Custom-Shaped Masks
We want the superhero’s cape to billow in the wind along with his hair, but we don’t want the top part that’s connected to his jumpsuit to move. (We’re not animating the body, and a fully animated cape could look a bit jarring to the viewer.) To get this result, we’ll draw two overlapping masks.
On the cape layer, turn off its Continuously Rasterize switch
 . If it’s on, you won’t be able to open it in the Layer panel, as we’re about to do.
Double–click on the cape layer.
The individual layer will open in the Layer panel in the middle of the screen.
We want to draw masks that roughly match the shape of the cape. In the Layer panel, look at the cape to see that there are parts that are straight, as well as parts that are curved.
This means that unlike the masks in a previous exercise, we won’t be able to use the Rectangle tool (or other vector shape tools like the Ellipse tool). We’re going to need a tool that can draw the straight lines and curved lines that will comprise the custom shape we need. Luckily After Effects has that covered.
From the Tools panel at the top, select the Pen tool
 .
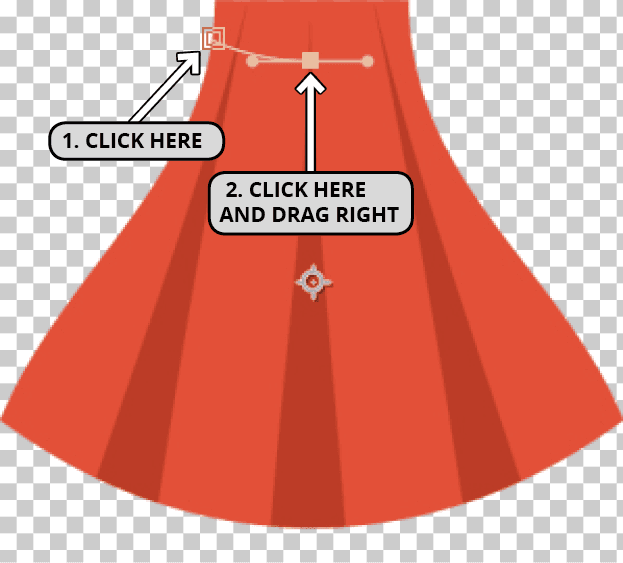
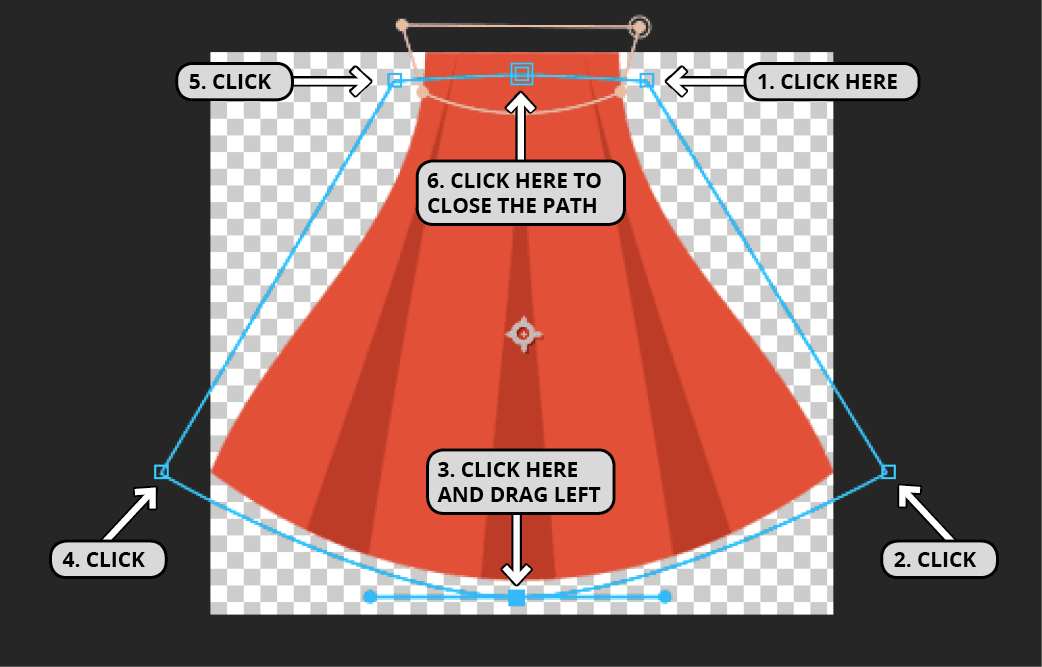
.We want to create a path (a group of points that make up a shape). Each point in the path is called a vertex. Using the image and instructions below as a guide, create the first two vertices:
- On the left-hand side of the cape near the top, around the area where the cape starts to get wider, click on the red edge of the cape to place the first vertex.
- We want the second vertex to make a curve, which is done in ONE click and drag motion. A little lower than the first point, press down (without releasing) on the cape’s center stripe and hold while dragging to the right. When the curve looks similar to the screenshot, you can release the mouse.
- If you mess up, go to Edit > Undo as many times as you need, then try again.
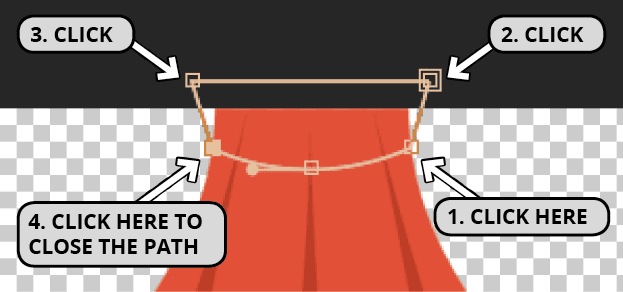
We want the rest of the lines in our mask to be straight, which means all you need to do to add the rest of the vertices is to click around where the points are in the image below (the mask path doesn’t need to be perfect—this section of the cape is obscured by the kid’s torso). Do the following to finish drawing the first mask:
- On the right-hand side of the cape roughly in line with the first point near the top, click on the cape’s red edge to place the third vertex.
- Continue to click points on the top right and top left.
- Click on the first point to close the path (a small circle
 will appear signifying the end of the path).
Repositioning Vertices & Adjusting Curves
You can click on a vertex with the Pen tool
and the cursor will turn into the selection cursor  , indicating you can move the vertex. If you want to select multiple vertices after clicking the first one, Shift–click any additional points. You can then drag or use the Arrow keys to reposition.
If you click on the bottommost vertex, you can adjust its curve by dragging one of the curve handlebars (dots).
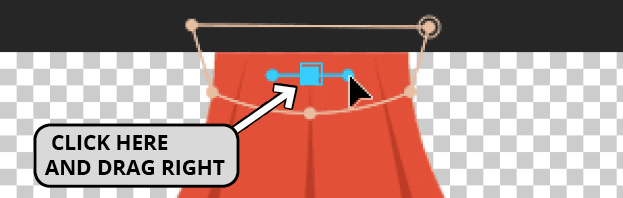
Look at the cape in the Layer panel. If the bottom of the cape is hiding and you only see the mask, go to the bottom right of the Layer panel and uncheck Render. (If you don’t see this, you may need to extend the Layer panel to the right.)
We want the first vertex in our second mask to make a curved line. In ONE click and drag motion, click and hold in the center of the first mask and drag the curve handlebars to the right until it looks roughly like the image below:
Continue to click vertices to make a mask of the bottom section of the cape using the screenshot as a guide. For the third vertex labeled below, you’ll need to click and drag (in ONE motion) to make this segment curved. There’s no need to be too exact, as long as the mask includes the whole bottom section of the cape.
If you want to adjust any vertices, use the Pen tool
to do so now. If you need a refresher, reread the sidebar listed earlier in the exercise, a few steps before this one.Go to the top of the Layer panel and close its tab by clicking the small X to the left of the layer name. You should now see the Composition panel.
We want the two overlapping masks to be on two separate layers. In the Timeline, select the cape layer.
Duplicate the layer by pressing Cmd–D (Mac) or CTRL–D (Windows).
Select both cape layers by clicking on cape 2 and Shift–clicking on the cape layer.
Press the M key on your keyboard to show the Mask properties for both layers.
In the top cape layer (cape 2), do the following:
- In the Timeline, select the layer (you may need to deselect the cape layer first). Then press Return (Mac) or Enter (Windows) to start renaming.
- Rename it to top cape and press Return/Enter to end renaming.
- We only want the top mask. Select the bottom mask (Mask 2) and press Delete.
In the Timeline, select the bottom cape layer (cape), and do the following:
- Pressing Return/Enter to start and end renaming, change its name to bottom cape.
- Select the top mask, Mask 1 and press Delete.
Warping the Bottom Part of the Cape Using an Effect
We’ll apply an effect to bottom cape to make it wave. Select this Timeline layer.
Go to Effect > Distort > Wave Warp.
In the Effect Controls panel that appears on the left, change only the following settings:
Wave Width: 100 (this will get you longer, more realistic waves) Direction: 0x+177° Pinning: Top Edge (this sets which edge will not move) Antialiasing: High
NOTE: If you Solo both cape layers, you may see a seam between the waving bottom portion and the motionless top part. Don’t worry, the torso hides this seam.
With all layers visible, press Spacebar to preview.
The cape is waving! However, if you take a closer look, you will notice that the cape’s bottom left and bottom right edges occasionally get cut off, as shown below:

To fix this, select the bottom cape layer and turn on its Continuously Rasterize Switch
.
Rotating the Head by Animating a Nested Pre-Comp
Our cartoon hero is not only a fierce defender of truth and justice, but also a cute, lovable kid. To convey that in his animation, let’s tilt the kid’s head sideways as a friendly gesture to the audience.
To easily rotate all the parts of his head (such as the hair, eyes, etc.) at once, we’ll pre-compose them. In the Timeline, collapse all your layers.
Select the hair4 layer (Layer 1) and Shift–click on head (Layer 6).
Press Cmd–Shift–C (Mac) or CTRL–Shift–C (Windows) to pre-compose the layers.
Name it head-PC, uncheck Open New Composition, and click OK.
In the Timeline, select the [head-PC] layer and toggle its Solo switch
on.So you can more easily see the anchor point
, click on the colored square to the left of the layer number and from the Label Color menu that appears, choose Red.In the Composition panel, zoom in (using the zoom percentage menu or by pressing the period (
.) on the keyboard) to see the hero’s head clearly.In the Tools panel at the top, choose the Pan Behind (Anchor Point) tool
.Move the anchor point
to the base of the chin. This will be a good spot for the head to rotate from.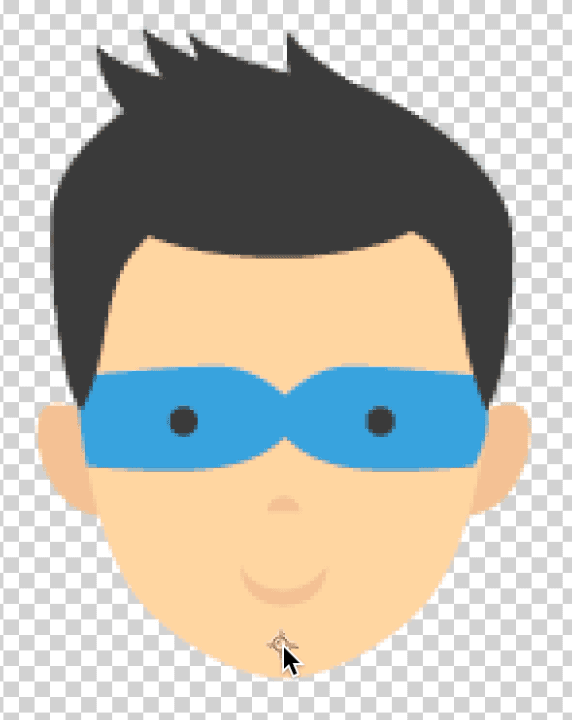
Let’s move his head after the viewers have a bit of time to get acquainted with the character. Move the playhead to 1;27.
With the [head-PC] layer selected, press the R key to view the Rotation property.
Next to Rotation, click the stopwatch
to set a keyframe.Press Shift-Cmd-Right Arrow (Mac), Shift–Page Down (Windows), or Shift–Fn–Down Arrow on a Mac laptop, to move forward 10 frames to 2;07.
In the Timeline, increase Rotation to 0x+5° to set another keyframe.
With the keyframe selected, go to Animation > Keyframe Assistant > Easy Ease In.
We’re done animating the [head-PC] layer, so click its Solo switch
to show the rest of the layers.
Making His Eyes Blink Using Hold Keyframes
Double–click the [head-PC] layer to open it in a new Timeline tab.
Select the eyesBlink layer and use the eye switch
 to toggle visibility on and off.
With the eye switch toggled on, Solo
the eyesBlink layer to view it on its own. We’re going to animate this layer, so when ready to move on, make sure the layer is visible (and our hero’s eyes are closed) and you have Un-soloed it.The blinking eyes are positioned above the open eyes (which are part of the head layer below). They are wider than the open eyes, so using linear keyframes for the blinking animation would look awkward. Luckily the flat, cartoony style is perfectly suited for using hold keyframes that do not transition between values.
With the layer still selected, press the T key to bring up its Opacity property.
Press the Home key on your keyboard (or Fn–Left Arrow) to get to 0;00.
Click on the stopwatch
to enable animation on this property.Change the value to 0%. Now his eyes are open!
In this simple animation, we want this keyframe to hold its value until it reaches the keyframe we’ll add next. (Then it’ll immediately change to that keyframe’s value.) Go to Animation > Toggle Hold Keyframe. The keyframe shape should change to
 .
.Move the playhead to 0;05.
In the Timeline, change the Opacity value to 100% to bring back the closed eyes.
This will set another hold keyframe
 . Once you toggle a linear (diamond-shaped) keyframe into a hold keyframe, any subsequent keyframes will also hold their value.
Move the playhead three frames forward to 0;08, when we want him to open his eyes again.
Change the Opacity back to 0%.
Go back to 0;00 and slide through with the playhead to see our hero blinking!
We can copy and paste these keyframes to add more blinks. Draw a selection box around the two “blink” keyframes
at 0;05 and 0;08. (Do not select the first one at 0;00!)TIP: If it’s hard to select both of them, go to the bottom of the Timeline and drag the zoom slider
 to the right to show fewer frames in the Timeline and thus widen the distance between keyframes.
Press Cmd–C (Mac) or CTRL–C (Windows) to copy the two selected keyframes.
Move the playhead to 1;27.
Press Cmd–V (Mac) or CTRL–V (Windows) to paste a set of “blink” keyframes.
Continue pasting keyframes at these timecodes:
- 4;06
- 6;20
Switch back to the master composition by going to the top of the Timeline and clicking on the cartoonHero tab.
Press Spacebar to preview your fully animated superhero.
If you’re satisfied with the result, you’re done! Feel free to go back to the head-PC tab and add more blink keyframes if needed, then do a File > Save.
In a later exercise, we’ll place our cartoon hero into a longer composition. Because we’re done working in this comp, go to File > Close Project.