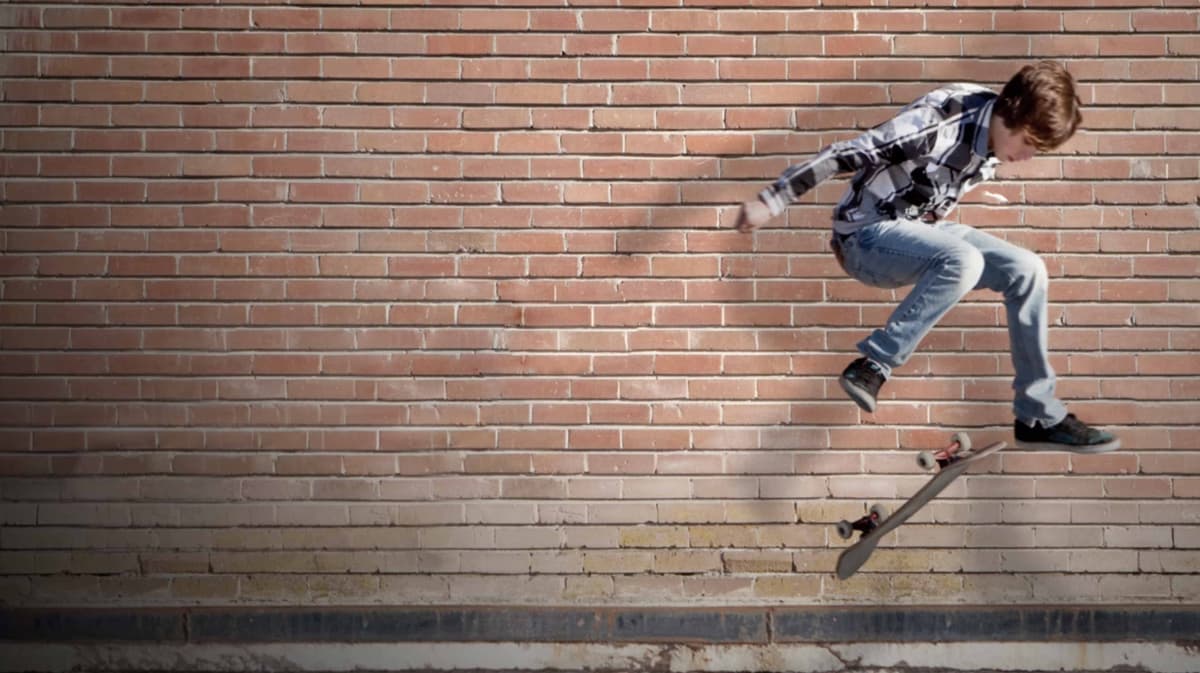
Particle Skateboards: 3D Rotation, Lighting, & Motion Blur
What This Tutorial Covers
3D Rotation
Rotate layers along X, Y, and Z axes.
Lighting
3D lights that interact with rotated surfaces.
Motion Blur
Per-frame blur that adds realism to fast motion.
Noble Desktop's Video Editing & Motion Graphics Certificate teaches After Effects alongside Premiere Pro, Cinema 4D, and DaVinci Resolve.
Learn how to create a dynamic composition and short animation using various 3D techniques in Adobe After Effects through this comprehensive tutorial.
Exercise Preview
Getting Started
In After Effects, go to File > New > New Project.
Let’s create a dummy comp to get the settings we need. Go to Composition > New Composition.
Go into the Preset menu and set it to HDV/HDTV 720 29.97.
Next to Frame Rate, click the arrow
 and from the menu, change the frames per second to 30.
Set the Duration to 10 seconds and 0 frames by typing ,000 and clicking OK.
We only created it to get the duration and frame rate we want, so go to the Project panel, click on the new composition, and press the Delete key.
Press Cmd–I (Mac) or CTRL–I (Windows) to do a File > Import > File.
Navigate to Desktop > Class Files > After Effects Class > Particle Skateboards > Assets and double–click skateboarder_rev.psd.
Set Import Kind to Composition – Retain Layer Sizes.
Under Layer Options, select Merge Layer Styles into Footage.
Click OK.
Double–click on the skateboarder_rev composition (NOT the folder).
- Go to File > Save As > Save As.
Navigate into Desktop > Class Files > After Effects Class > Particle Skateboards.
Name the project yourname-Particle Skateboards.aep and click Save.
3D Rotation and Position Practice
In this section, we’ll import our PSD while retaining layer sizes, as we have done in previous exercises, to learn how 3D layers work in After Effects.
In the Timeline, with the skateboarder_rev tab open, select all of the layers: click on the skateboarder and Shift–Click the wall layer.
Turning a 2D layer into a 3D layer is as simple as a mouse click! Click either layer’s rightmost switch, the 3D Layer switch
 . If you don’t see it, go to the bottom of the Timeline and click the Toggle Switches / Modes button now.
Deselect all by clicking a blank area of the Timeline, then expand into skateboarder > Transform.
There are a lot more properties here than what we’re used to with 2D layers. Notice that the Anchor Point, Position, and Scale properties now have a third value. This is the z coordinate that controls an object’s depth (distance from the “camera”).
There are also three more Rotation properties. 2D layers only have Z Rotation, referred to simply as “Rotation.” 3D layers have Orientation, X Rotation, Y Rotation, and Z Rotation. X Rotation spins a layer like a doggy door. Y Rotation spins like a top. And Z Rotation spins like a clock’s hands.
NOTE: When working in 3D, layer order in the Timeline doesn’t matter when it comes to what layers are on top. Instead, the layer that’s closest to camera (or with no camera, with the smallest Z Position), is the one that appears to be “on top, ” regardless of its layer number in the Timeline.
In the Timeline, select the skateboarder layer. Make sure the layer’s Transform properties are still expanded.
At the bottom right of the Composition panel, change the Select view layout menu from 1 View to 2 Views – Horizontal.
In the Composition panel, select the Top view on the left by clicking into it. Notice the triangles at each corner that show which view is selected, and info at the bottom of the Composition panel indicates its Zoom and Resolution settings.
TIP: If needed, you can zoom in using the period (.) key or zoom out using the comma (, ) key, in any view.
In the Tools panel choose the Selection tool
 , or press the V key to choose it.
Click on the Composition Panel’s Active Camera view, and hover over the Red Arrow. Drag left and right to see the X-value (horizontal) of the Position value changing. Undo when you’re done playing with it.
Try hovering over the Green arrow and dragging up and down to see the Y value change. Undo when you’re done.
Finally, in the Top View to your left, hover over the Blue arrow and drag down and up while watching your Active Camera View on your right. Notice how “down” in Top View results in the layer getting closer to the default camera!
Now check out your skateboarder layer’s Position property in the Timeline, while dragging that same Blue arrow in the Top View. Observe how negative Z position values mean that your layer is closer to camera. Undo when you’re done playing with Z position.
In the Tools panel choose the Rotation tool
 or press W to choose it.
Go to the Composition panel and near the anchor point
 , hover over the green hexagon. The cursor should disappear and the tooltip will indicate that you’re hovering over the Y-axis. Drag it leftward and rightward to see the skateboarder rotate around like a revolving door or a spinning top. You’ll see that if we were to set the Y Rotation property now, the skateboarder layer would intersect with the brick wall background. Don’t worry about this just yet, as we’ll fix this shortly. Undo when you’re done playing with it.
While looking in the Composition panel, click and hold on the green y-axis again.
Keep holding the mouse down. If you already released it, press Cmd–Z (Mac) or CTRL–Z (Windows) to undo.
Look in the Timeline and continue to drag the mouse. Notice the Orientation property change.
Notice that no matter how many times you rotate it, the Orientation property never displays any full revolutions (such as 1x). The max value is 359.9°, which means this property can only set an object’s tilt!
Release the mouse and press Cmd–Z (Mac) or CTRL–Z (Windows) to undo.
The Orientation Property for 3D Layers
The Orientation property is how we set up the initial rotation of a 3D layer, before we animate with the X, Y, and Z Rotation properties. Think of it like college orientation—it happens before we start spinning around! Orientation values are not ideal for animation, because unlike Rotation values, they don’t include Revolutions (such as 0x+0.0°).
In the middle of the Tools panel, notice that it says Set Orientation for 3D layers. Go into the menu that says Orientation and change it to Rotation.
We animate using the X, Y, and Z Rotation properties. We just saw how a 3D object revolves around its y-axis, so let’s test the X! Do the following:
- Hover over the red X-axis and drag upward and downward to see it rotate front and back, just like a doggy door. Keep on holding the mouse.
- Pick a direction, either up or down. While looking in the Timeline, drag in that direction until you see that the number of revolutions (the 0x) never changes!
- Release the mouse and press Cmd–Z (Mac) or CTRL–Z (Windows) to undo.
The Rotation tool can only set the tilt for an element. This is why we recommend setting Rotation in the Timeline. Press V to choose the Selection tool
.In the skateboarder layer next to Z Rotation, hover over the tilt value (0.0°) and drag the hand slider
 left or right to see that good ol’ familiar clocklike spin that you should remember from our 2D rotations.
Release the mouse and press Cmd–Z (Mac) or CTRL–Z (Windows) to undo.
In the skateboarder layer, to the right of Y Rotation, mouse over the value 0.0° and drag to the right to watch the skateboarder rotate left.
Re-Import & Setup 3D Layout
There is a better way to work with 3 dimensions. Instead of importing as Composition—Retain Layer Sizes, we will import as simply Composition, which means that each layer’s handles will be the same dimensions as our entire document (sometimes this is called “Composition—Document Size”). This way we can easily and precisely re-align our 3D setup with our original 2D layout.
First, go to the Project window, Cmd-A (Mac) or CTRL A (Windows) to select all, and delete all the files and compositions there.
Press Cmd–I (Mac) or CTRL–I (Windows) to do a File > Import > File.
Navigate to Desktop > Class Files > After Effects Class > Particle Skateboards > Assets and double–click skateboarder_rev.psd.
Set Import Kind to Composition (NOT Composition—Retain Layer Sizes).
Under Layer Options, select Merge Layer Styles into Footage.
Click OK.
Double–click on the skateboarder_rev composition (NOT the folder).
Hit Cmd–K (Mac) or CTRL–K (Windows), or go to Composition > Composition Settings and rename it to Skateboarder-MAIN.
Make sure your Composition Viewer is in 2-Views, with the left side showing Top View and the right side showing Active Camera.
Turn on the 3D switch
for all 3 layers.Using the Selection tool
, hover over the skateboarder layer in the Top view, until a small Z appears next to the arrow. Drag downward to move the skateboarder away from the background.In the Timeline, change the Position property to 640,360, –615.
Set the Scale to 65%. We have to reduce the scale because we’re bringing the skateboarder layer closer to camera. When scaling a 3D layer, we need to consider its effective scale by comparing the 3D layer to a 2D version of the same layer scaled to the same size, visually speaking. Notice how scaling the layer to 65% aligned the skateboarder’s document-sized layer handles, to the document edges. This means it’s perfectly aligned to its original 2D position from Photoshop.
Next, with the Particle Skateboards text layer selected, press P to show the Position property.
Change the text layer’s Position coordinates to 640,360, –1165.
Set the Scale to 34.4%, so that the outer bounds of the layer match the outer bounds of the document.
Rotating the Skateboarder in 3D
If you remember from the final movie, the skateboarder doesn’t appear right away. In the Timeline, move the playhead to 1:00.
Hit the left square bracket [ to start the layer at the playhead, or set its In column to 1:00.
Using the Pan-Behind/Anchor Point tool
 , drag the anchor point of the skateboarder to its center, near his belt. (If you wish to do this numerically in the Timeline, change the Anchor Point coordinates to 1004,209,0 and the Position coordinates to 877,262, -615.)
Under Transform, click the stopwatch
 to the left of Y Rotation.
Set Y Rotation to 2x+101°. This will make the skateboarder make two full 360-degree rotations rightward and then rotate 101 more degrees after that. Because we’re viewing this in perspective and the skateboarder layer is off-center, we have to go more than 90° (to 101°) to have the skateboarder be perpendicular to our view.
Move the playhead to 2:00.
Set Y Rotation to 0x+25°.
Keeping to our rule of always having some movement in our videos, we’ll have our skateboarder continue to spin. Move the playhead to 9:29.
Set Y Rotation to 0x–20°. (Make sure that’s negative 20.)
CTRL–click (Mac) or Right–click (Windows) on the second keyframe
 and go to Keyframe Assistant > Easy Ease In. This will slow the skateboarder layer down as it approaches the end of its spin. We’ll leave the first and third keyframes as linear, so we’ll see a steady rate of change near the first keyframes and between the second and third.
Scrub through with the playhead to see the rotation in action. Sweet moves!
Adding Motion Blur to Simulate Rapid Movement
When objects move in real life, our eyes usually perceive a bit of a blur, which we’ll add using the Motion Blur switches.
In the Timeline and a little to the left of the 3D Layer switch, click in the Motion Blur switch
 for the Skateboarder-MAIN tab’s skateboarder layer.
To also see the motion blur when we preview, go to the top middle of the Timeline and click the big Motion Blur button
 :
:
NOTE: Any layers with Motion Blur switches enabled, will export with Motion Blur, whether or not the big Motion Blur icon is enabled for the Composition.
To lower the amount of time and RAM needed to cache the movie for previewing, go to the bottom middle of the Composition panel, click the Resolution/Down Sample Factor Popup menu and select Third.
Press CTRL–0 (Mac) or the 0 key on the numeric keypad (Windows) to preview from the beginning. Fantastic!
Do a File > Save and leave this project open to use in the next exercise.