Noble Logo: Masking Layers & Parenting
What This Tutorial Covers
Layer Masks
Vector mask paths that reveal or hide layer content.
Parent-Child Hierarchy
Group layers so transforms cascade through the hierarchy.
Null Object Parents
Invisible nulls drive complex animation rigs.
Noble Desktop's Video Editing & Motion Graphics Certificate teaches After Effects alongside Premiere Pro, Cinema 4D, and DaVinci Resolve.
Dive into the details of making Noble Desktop letters rise up through pre-composing, using masks, and parenting in this After Effects tutorial.
Exercise Preview
![]()
Making the Letters Rise up Using Position Keyframes
Each Noble Desktop letter will start moving upward from around the bottom of the composition frame. They will overshoot their final positions, then settle down. It will be easiest to animate all the letters at once before staggering their in points.
Switch to After Effects, where yourname-Noble Logo.aep is open.
We want the letters to start moving up once the last rectangle in the logo is done scaling up. To find out when that is, go to the gold-07 layer and find the last keyframe
 (if you don’t see the keyframes, select the gold-07 layer and press S).
Hover over the last keyframe
to see a gray tooltip that displays the frame number, followed by its value. The frame number should say 32.Move the playhead to frame 32.
Collapse all the other layers:
- Select layer 1
- Shift–Click layer 7
- Click the down arrow
 to collapse.
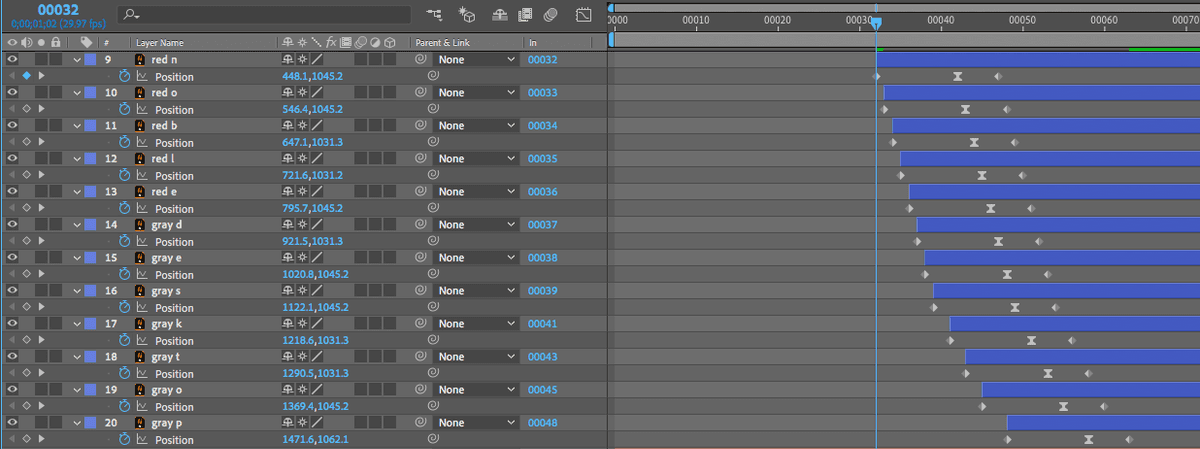
In the Timeline, select all the blue colored layers by clicking on layer 9 (red n) and Shift–Clicking on layer 20 (gray p).
Let’s use a shortcut to set the layers’ in (starting) points to the current time (frame 32). Press Opt–[ (Mac) or ALT–[ (Windows), and all the bars will get cropped.
When animating the Position property, it’s easiest to animate backwards. Move the playhead to frame 47, when the Noble Desktop letters will finish animating.
To quickly display the Position property for these 12 layers, press the letter P key.
Next to any selected layer’s Position, click the stopwatch
 to keyframe this property for all the letter layers.
Let’s bring up a grid that will help us reposition these layers. At the bottom left of the Composition panel, click the Choose grid and guide options button
 , and select Title/Action Safe.
For more info on title and action safety, visit tinyurl.com/safety-guides
- Move the playhead to frame 42, where the text will overshoot its final position.
- We want to move all the layers up by 80 pixels, so we need to change the second Position values (the vertical y-axis). With all the layers still selected, look at the topmost letter layer, red n. Notice its second Position value is 805.2.
- Press Shift–Up Arrow to move all the selected layers up.
- While looking at the red n layer’s second Position value, keep pressing Shift–Up Arrow until the value becomes 725.2.
Lastly, we need to move the letters down to where they’ll start animating in. As a shortcut to move the playhead to the layer’s in point (at frame 32), press the i key.
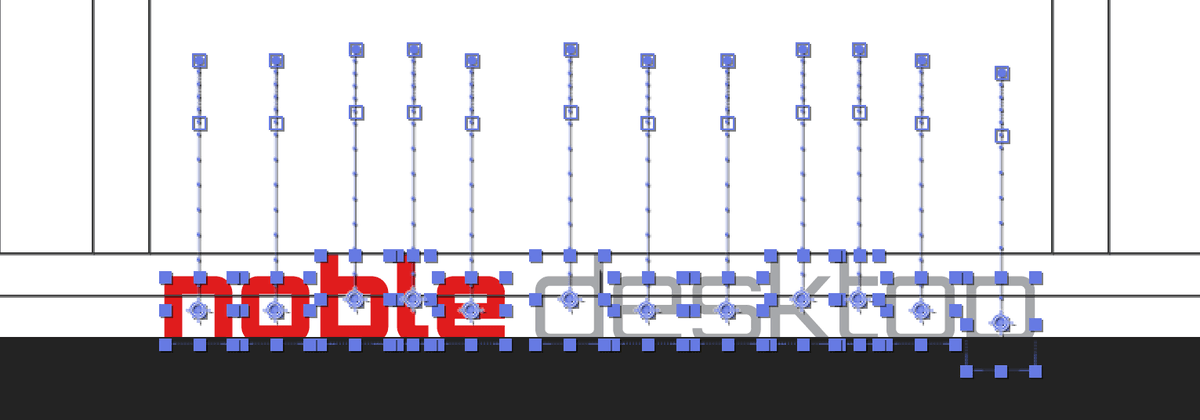
With all the layers still selected, press Shift–Down Arrow until the tops of the taller letters are just below the dark gridline as shown below:
For each layer, let’s add easing to the second keyframe
 at frame 42. To select all of those keyframes, drag a selection box around them, as shown below:
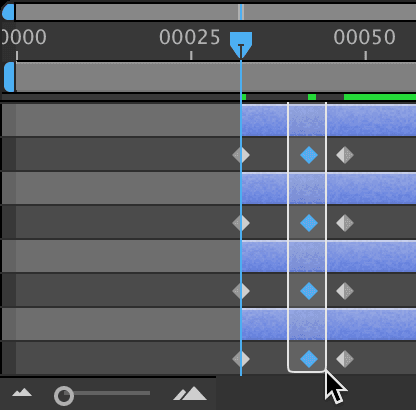
To make the animation slow down as it approaches and leaves these keyframes, press F9 to add an Easy Ease to all the selected layers (on some laptops you may have to press fn–F9).
To deselect all the layers, click in an empty area of the Timeline or use the keyboard shortcut Cmd–Shift–A (Mac) or CTRL–Shift–A (Windows).
One at a time, set the in points as listed below. To recap: click on the In column value for the appropriate layer, enter the new value, and click OK:
red o: frame 33 red b: frame 34 red l: frame 35 red e: frame 36 gray d: frame 37 gray e: frame 38 gray s: frame 39 gray k: frame 41 (more stagger to signal the animation is coming to an end) gray t: frame 43 gray o: frame 45 gray p: frame 48 Your letters should look as shown below:
Press the Spacebar to preview the animation.
The layer sequencing looks great, but it looks a little messy when the letters rise up from the very bottom of the composition frame. It would look better if we create a mask—an invisible rectangle (or other shape) below which the letters are not visible.
Hiding the Letters Before They Animate Using Masks
Masks in After Effects can block out part of a layer, giving you fine-tuned control over which parts of a video are visible, and which are hidden. We’ll draw a rectangular mask on the Noble Letters-PC pre-comp to hide the letters when they’re below the second to last dark gridline.
Move the playhead to frame 47, where the top of the gray d gets closest to poking the bottom of the Noble logo.
In the Tools panel at the top of the screen, choose the Rectangle tool
 .
.If no layers are selected, the Rectangle tool would create a shape layer. Instead, we want to create a mask on an existing layer. Go to the Timeline and select the [Noble Letters-PC] layer if it isn’t already.
NOTE: For more info on Shape Layers, visit tinyurl.com/ae-shape-layers
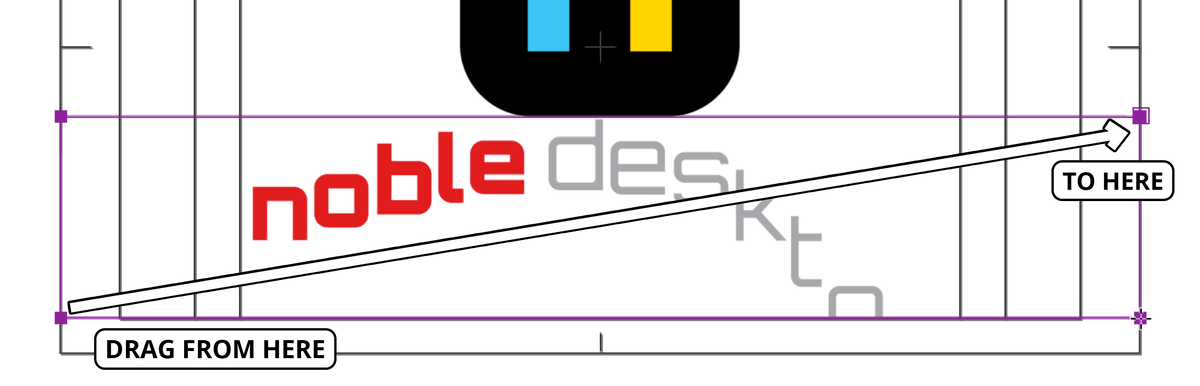
Drag out a rectangular mask as shown below:
NOTE: As you can see at the bottom of the screenshot, the mask hides any elements on the layer that lie outside the mask’s bounds. This is how masks drawn in After Effects work by default.
TIP: If you need to adjust the mask, in the Tools panel choose the Selection tool
 . Double–click on one of the 4 square handles to make them editable, drag any handle to resize, then press Return/Enter to commit.
To preview, go back to around frame 32 and scrub forward with the playhead. Success, the letters are not visible until they clear the bottom of our mask!
Moving the Entire Logo Away from the Rising Letters Using Parenting
From the perspective of the black square, the incoming letters are like a loud stranger that’s invading its personal space at way too fast a rate. It wants to get out of the way ASAP, but we want the 7 logo rectangles to come along for the ride. To accomplish this, we can set the black square as their parent.
Collapse any open layers by clicking their down arrow
in the Timeline.On the left side of the Timeline to the right of the switches
 near the top, locate the Parent & Link column.
NOTE: If you can’t see it, CTRL–click (Mac) or Right–click (Windows) on one of the columns (such as Layer Name). Go to the Columns menu and check on Parent & Link.
Select layers 1–7 (the green layers that comprise the Noble n).
Under any one of the selected layers’ Parent & Link column, drag the pick whip
 toward the black square layer name as shown below:
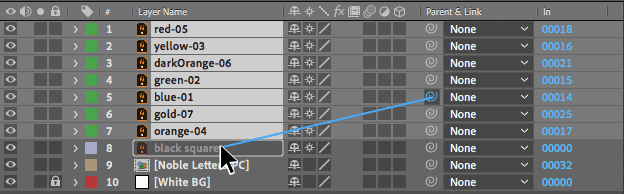
After you release, look in the Parent & Link column to see that 8. black square (our eighth layer) is now parenting all the layers you selected!
Parent & Child Layers
Child layers are like children tethered to a parent with leashes. The “kids” can move around on their own, but they’re going wherever the parent is heading. It’s important to keep in mind that child layers do not inherit Opacity or Effects from their Parent, only Position, Scale, and Rotation.
NOTE: In the most recent versions of After Effects, the Parent column is now the Parent & Link column. In addition to setting up Parent/Child relationships, now this column can be used to connect any property to any other property using After Effects Expressions (JavaScript), which is an advanced topic. To use “traditional” Parenting, collapse your layers before pick-whipping or using the Parent & Link column.
- Move the playhead to frame 53, where the black square’s final keyframe will be.
- Select the black square layer.
- Press P to reveal its Position property.
- Next to Position, click the stopwatch .
- To convey the logo’s rush to move away from the advancing letters, let’s add an overshoot keyframe. Move the playhead to frame 49.
- To move the logo up 30 pixels above its settle position, we need to subtract 30 from the black square layer’s current value. Set Position to 960, 396.2.
- We’ll set the initial keyframe 10 frames before the final one, so move the playhead to frame 43.
- Set Position to 960, 511. This is where the black square “kisses” the top of the advancing letter d’s stem.
- Select the second keyframe (the keyframe at frame 49).
- Press F9 (or fn–F9 on some laptops) to add an Easy Ease.
- Scrub forward with the playhead. Sweet moves!
Do a File > Save and leave this project open to use in the next exercise.