Noble Logo: Anchor Points & Animating with Overshoot
What This Tutorial Covers
Anchor Point Tool
Reposition transform pivots without moving the layer.
Overshoot Curves
Bezier eases that pass the target before settling.
Bounce & Settle
Combining overshoot with subtle decay for life.
Noble Desktop's Video Editing & Motion Graphics Certificate teaches After Effects alongside Premiere Pro, Cinema 4D, and DaVinci Resolve.
Enhance your animation skills by learning how to animate the Noble Desktop logo using After Effects, including converting an Illustrator file from CMYK to RGB, working with anchor points, and adding extra personality to your animations.
Exercise Preview
![]()
Converting an Illustrator File from CMYK to RGB
Most logos are originally designed in CMYK because they’ll be printed on paper. The Noble logo we’ll animate was designed in this color space, which is only for print design. Digital video uses the RGB color space, so we’ll need to convert the file to RGB to use it in After Effects.
On the Desktop, navigate into Class Files > After Effects Class > Noble Logo and double–click noble-logo-CMYK.ai to open it in Adobe Illustrator.
To convert the file, go to File > Document Color Mode and choose RGB Color.
When we import an Illustrator file into After Effects, it comes in at the same dimensions as the artboard. You always need to check to make sure your artboard is the same size as your desired composition size, and change it if it’s different. In the Tools panel on the left, choose the Artboard tool
 .
.In the docked panels at the right of the screen, if you don’t see the Properties panel, click on the Properties tab or go to Window > Properties.
In the Properties panel, notice the Width (W) is 1920 px and Height (H) is 1080 px.
This is the standard size for HD video. That’s the size of the composition we want to create in After Effects, so our artboard is the size we want!
On the right of the screen, click on the Layers tab to switch to that panel. (If you can’t find it, go to Window > Layers.)
At the bottom left of the Layers panel, notice it says there’s 20 Layers.
Each layer in an Illustrator file becomes a layer in After Effects. We want to animate each shape and letter separately, so this layer setup is great for our needs!
Notice that the layer names such as black square describe the content of the layer. (To see which elements are on which layers, click the circle to the right of a layer name, and that layer’s contents will be outlined in the artboard.)
While descriptive names are always a good idea, they’re even more important when importing into After Effects. That’s because thumbnails in After Effects just show what type of layer it is (composition, Photoshop, Illustrator, etc.), instead of showing a little preview of the layer as you see here.
NOTE: The 7 rectangles that comprise the Noble logo are named by color and the order in which they’ll animate into our composition (clockwise starting with the blue rectangle). They look “out of order” because some of them are overlapping each other, and changing their order in the layer stack would mess up its look.
We’re ready to bring this puppy into After Effects! Go to File > Save As and:
- Navigate into Desktop > Class Files > After Effects Class > Noble Logo
- Name the file yourname-noble-logo-RGB.ai
- Click Save.
In the dialog that appears, make sure Version is set to Illustrator 2020 (or whatever version matches After Effects) and click OK.
Press Cmd–Q (Mac) or CTRL–Q (Windows) to quit Illustrator.
Getting Started
Switch to After Effects.
Go to File > New > New Project.
Go to File > Save As > Save As and:
- Navigate into Desktop > Class Files > After Effects Class > Noble Logo
- Name the project yourname-Noble Logo.aep
- Click Save.
Remember that if we create a composition now, it’ll have the same duration as the last comp whose settings were changed. Let’s create another dummy composition as a workaround to get the settings we want. Go to Composition > New Composition.
Set the following (we aren’t naming it because we’re about to delete it):
Preset: HDTV 1080 29.97 (not the similar HDV preset!) Resolution: Full (so our layers appear as sharp as possible on-screen) Duration: 150 This assumes After Effects is showing you Frames. If you’re seeing Timecode instead (a number with semi-colons), then enter 5;00. Click OK to create the dummy composition.
- We want the Timeline to show Frame numbers (0,000). If you’re seeing Timecode instead, go to the top left of the Timeline. Hold Cmd (Mac) or CTRL (Windows) and click on the Timecode (0;00;00;00) to toggle it to Frames (0,000).
- Go to the Project panel, click on the new composition, and press the Delete key.
- Before we add the Illustrator file to our project, go to the bottom of the Project panel and click the Create a new Folder button
 .
. - Rename the new folder Assets and press Return (Mac) or Enter (Windows).
- With the Assets folder still selected, go to File > Import > File.
- Navigate into Desktop > Class Files > After Effects Class > Noble Logo.
- Click once on yourname-noble-logo-RGB.ai but do not open it yet!
- Near the bottom, find the Import As menu (Mac users may need to click the Options button).
- Set Import As to Composition – Retain Layer Sizes. This setting is good for importing final art that’s done being edited.
Click Open (Mac) or Import (Windows).
The Illustrator layers (and a comp that contains them all) will automatically get added to the Assets folder because it was selected.
- Let’s release the Composition from the Assets folder. Drag the yourname-noble-logo-RGB composition (the one with this icon
 ) down below the Assets folder, to release it.
 - In the Project panel, double–click the yourname-noble-logo-RGB composition to open it.
Before we move on, let’s make sure the background is white. Go to Layer > New > Solid and set the following:
- Name it White BG.
- Click the Make Comp Size button.
- Click the Color swatch at the bottom and select a White color by either clicking in the top-left corner or entering #FFFFFF near the bottom right.
NOTE: The Composition Settings window also allows us to change the background color, but this only works within After Effects. When we export our QuickTime or MP4 using Adobe Media Encoder, the Composition background color defaults to black—hence the need for a white solid.
- Click OK and then OK again.
- This will be our background, so in the Timeline drag the White BG layer below all the other layers.
- So that you don’t accidentally change the background, lock White BG by clicking in the empty box in the Lock column
 (to the left of the layer’s triangle).
 - Every layer was created in Illustrator, so they all have the same thumbnail. To keep organized in After Effects, we visually categorize layers by changing their label color. To separate the icon’s colored rectangles from the rest of the art, click on the topmost layer red-05.
- Hold Shift and click on layer 7 named orange-04.
Click on the colored square to the left of any one of the selected layer numbers and from the Label Color menu that appears, choose Green.
Notice the selection handles in the Composition panel and the layer bar color in the Timeline are now Green.
- Now let’s set a different color for the letters that make up the text “Noble Desktop”. Click on layer 9 named red n.
- Hold Shift and click on layer 20 named gray p.
- Click on the colored square to the left of any one of the selected layer numbers and choose Blue.
At the bottom left of the Composition panel, click into the menu with a zoom percentage and choose Fit so you can view the whole composition.
Animating the Black Square to Overshoot Its Final Size
We’ll add a little extra motion to the black square by adding an overshoot. An animated overshoot mimics the motion of real objects which move past (overshoot) the place where they’ll eventually end up, before settling in their final destination. We’ll add a scale keyframe between the start and end keyframes so that the square scales up to its overshoot size, before returning to its final size.
In the Timeline, select the black square layer (layer 8).
To the left of the layer name and to the right of the eye
 , locate the Solo switch column
  . Click in the empty space to toggle it on.
Turn on the Solo switch for the White BG layer also.
The Solo Switch
Soloing a layer views it in isolation. Use the Solo switch
whenever you want to focus on details without the distractions multiple layers can pose, or want to see a layer that is obscured by one or more layers above it.Sometimes it’s easier to animate backwards (from the final keyframe instead of the first), and this is one of those times. Move the playhead to frame 14, when we want the square to stop scaling up.
Click the arrow
 next to black square, then do the same for its Transform.
Next to the layer’s Scale property, click the stopwatch
 to add a keyframe.
On the keyboard, press the Home key (or Fn–Left Arrow on Mac laptops) to go back to the first frame at frame 0.
Change either Scale value to 0% to add another keyframe.
To preview the animation, go to the Preview panel and click the Play button
 .
.It’s smooth, but a bit lacking in personality. Let’s add an overshoot keyframe to make the square expand a bit too much before it goes back to its final size.
- Click the Stop button
 (where the Play button used to be).
 Overshoot tends to look most realistic near the end of an animation, so move the playhead to frame 10.
Change the Scale value from the current 71.4% to 120%.
- Let’s add easing to this keyframe. Go to Animation > Keyframe Assistant > Easy Ease to apply easing as it approaches and leaves this keyframe.
Press Spacebar to preview your work. Nice, that square looks so excited to be here!
Applying Automatic Easing to One or Both Sides of a Keyframe
There are 3 types of Easy Eases:
- Easy Ease applies a slowdown to both sides of a keyframe, as indicated by a fully curved hourglass
 .
. - Easy Ease In creates a slowdown as the playhead comes in to the keyframe it’s applied to, as indicated by a curvy shape
 on the left (in) side of that keyframe.
 - Easy Ease Out applies slowdown to the out going end (on the right side of a keyframe
 ), slowing down the start of an animation.
Changing Where the Rectangles Scale from by Moving Layer Anchor Points
By default, elements transform from their center, as you can see with the black square. However, it would look best if the rectangles that make up the Noble logo scale up from wherever they intersect with the previous layer. No worries—we can change where a layer’s transforms originate by repositioning its anchor point.
In the Tools panel at the top, select the Pan Behind (Anchor Point) tool
 .
.With the black square layer still selected, drag the anchor point
 from the center of the layer down to the bottom middle (on top of the square handle). We’re just testing it out, so don’t worry about being exact.
Go back to frame 0 and scrub through with the playhead to see the square grow from its anchor point on the bottom middle. This is because the anchor point’s location determines the center of any transform.
The Anchor Point Property
The Position and Rotation Transform properties also rely on the anchor point to determine where to move and rotate from. In this exercise, we only ever animate the Scale values, not the Anchor Point. It is often considered bad practice to animate the Anchor Point values, rather than the Transform properties that take information from it.
Press Cmd–Z (Mac) or CTRL–Z (Windows) to undo the anchor point move.
On the far left of the Timeline, toggle the black square layer’s Solo switch
 off.
off.Also turn off the Solo switch
for the White BG layer.All layers should now be visible.
To help us move the anchor points for the 7 rectangles, let’s zoom in. At the bottom left of the Composition panel, click into the Magnification ratio popup (a zoom percentage) and choose 200%.
Select the first rectangle we want to animate the blue-01 (layer 5).
Still using the Pan Behind (Anchor Point) tool
, start dragging the anchor point , then hold Shift as you drag it down to the bottom middle of the rectangle. Release when the anchor point’s two horizontal lines align with the rectangle’s edge, as shown below: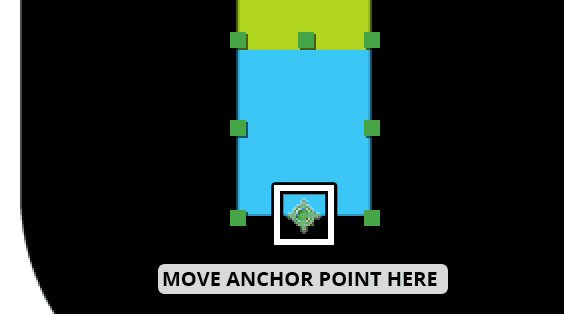
Repeat the process by selecting a layer, dragging its anchor point and then holding Shift as you drag to the point where the layer intersects with the previous one. You may need to use the Hand tool
 to help you move around the Composition Viewer panel.
Layer Where to Drag Its Anchor Point green-02 (layer 4) Bottom middle (like we just did) yellow-03 (layer 2) Bottom middle of the rectangle orange-04 (layer 7) Left middle (because it’s horizontal) red-05 (layer 1) Left middle of the rectangle darkOrange-06 (layer 3) Top middle (the previous shape is above it) gold-07 (layer 6) Top middle of the rectangle Now that we’ve got our anchor points where we want them, it’s time to animate! Select all of the green layers by clicking on layer 1 (red-05) and Shift–Clicking on layer 7 (orange-04).
Go to frame 14. This is when the black square has reached its final Scale value, so it’s a good time to start introducing more elements on-screen.
In the Timeline, hover over the start of the green time bar for any of the selected layers and you should see a resize icon
 .
.As shown below, hold Shift and drag right until all 7 bars snap to the playhead at frame 14 (Shift makes it snap when you get close):

To quickly display the Scale property for these 7 layers, press the letter S key.
In any selected layer to the left of Scale, click the stopwatch
to keyframe this property for all the rectangles.Change any value to 0% so they start scaling up at this point in time.
Move the playhead to frame 21, where the animation will end.
In any layer, change the Scale value to 100%, and they will all change.
To slow down the animation as it approaches these keyframes, CTRL–click (Mac) or Right–click (Windows) on any selected keyframe at frame 21 and choose Keyframe Assistant > Easy Ease In.
Why no overshoot? We’re going to stagger each layer’s keyframes like we did in the previous exercise, so if we had overshoot, some of the shapes would be getting too big around when other letter chunks were starting to appear—quite distracting!
- At the bottom left of the Composition panel, click into the zoom level menu that says 200% and choose Fit.
Choose Edit > Deselect All.
Setting Layer in Points Using the in Column
The animation looks fine, but it would look more interesting if we stagger the initial appearance of each rectangle. Let’s set different in points for each layer.
Near the top of the Timeline, look for an In column that displays each layer’s in point. If you don’t see it, read the instructions below the screenshot.

If you do not see the In column:
- Toward the top left of the Timeline, CTRL–click (Mac) or Right–click (Windows) on the Layer Name column.
- Go to the Columns menu and check on In.
We want the second rectangle to start animating in one frame after the first rectangle starts drawing on-screen, so go to the left side of the Timeline and select the green-02 layer (layer 4).
In the green-02 layer that’s selected, go to the In column and click on the value.
In the dialog that opens, set it to frame 15 and click OK.
Look in the Timeline to see that the entire layer bar shifted later in time by one frame (and its keyframes moved along with it).
Repeat the same process for the rest of the layers, setting the in points as listed below. To recap: click on the In column value for the appropriate layer, enter the new value, and click OK:
yellow-03: frame 16 orange-04: frame 17 red-05: frame 18 darkOrange-06: frame 21 gold-07: frame 25 NOTE: We speedily stagger most layers by one frame, but we slow down the last two rectangles’ animation by staggering them by more than one frame. This slowdown is a good way to indicate the animation is coming to an end.
Scrub through the Timeline to see all the rectangles appear one after another. Feels great!
Keeping Vector Layers Sharp As They Scale up
It’s very subtle, but our rectangles don’t look as sharp as vector graphics should be. (You may be able to see blurriness if you zoom in and examine their edges.) Before we move on to the next exercise, let’s take a look at this issue and learn how to fix it.
- It’ll be easiest to get a handle on this problem if we scale up one of the Noble Desktop letters. In the Timeline, select the gray d layer.
To the left of the gray d layer name, toggle its Solo switch
on.Press the S key so we can tweak its S cale.
Vector files are based on math, not static pixel data. Because of this, they can be scaled infinitely large. Change the Scale value to 500%.
The edges are pixelated because After Effects does not know a layer is based on a vector file until we tell it so using a switch. On the left-hand side of the Timeline, above the layers, make sure you are looking at the switches
 .
.If you don’t see them, go to the bottom of the Timeline and click the Toggle Switches / Modes button.
In the Timeline’s switches, find the Continuously Rasterize icon
 . For the gray d layer, click in the empty space under this column to turn the option on. You should notice the letter gets much sharper.
Turning on Continuously Rasterize tells After Effects to continuously recalculate the number of pixels in a vector layer, ensuring the layer will always stay sharp. For more info about this switch, go to tinyurl.com/ae-cont-rasterize
- Press Cmd–Z (Mac) or CTRL–Z (Windows) 3 times, or until the gray d layer is back at 100% scale, and is NOT soloed.
- We recommend turning on this switch for every vector graphics layer, just in case. Press Cmd–A (Mac) or CTRL–A (Windows) to select all our layers.
- In any selected layer, toggle on the Continuously Rasterize switch
 .
. To deselect all the layers, press Cmd–Shift–A (Mac) or CTRL–Shift–A (Windows).
It’s quite subtle for these layers, but you may notice them get a little bit sharper.
Do a File > Save and leave this project open to use in the next exercise.