Photoshop Tutorial: Using Channels to Make Hair Selections
Channel-Based Hair Selection Workflow
Open the Channels panel
Open the Channels panel and evaluate Red, Green, and Blue channels for the highest hair-to-background contrast
Duplicate the channel with
Duplicate the channel with the best contrast to create a working channel
Apply Curves to the duplicate channel to push the contrast
Apply Curves to the duplicate channel to push the contrast — darken the hair, lighten the background
Use a hard brush
Use a hard brush to paint black over the subject area and white over background areas
Cmd/Ctrl-click the channel thumbnail
Cmd/Ctrl-click the channel thumbnail to load it as a selection
Return to the Layers
Return to the Layers panel and apply the selection as a layer mask
Noble Desktop's Graphic Design Certificate includes advanced Photoshop techniques like channel-based selections alongside the complete professional design curriculum.
Topics: Making a selection using Channels & Curves, Refining the selection with the History Brush, Refining the hair mask
Exercise Preview

Photo courtesy of istockphoto, ianmcdonnell, Image #8884668
Creating & Refining a Selection Using Channels
-
Open the Channels panel (Window > Channels).
-
Click on each of the three color channels (Red, Green, and Blue). As you look at each channel think of black and white as being selected or deselected. We want high contrast between the hair and background for creating this selection.
The Blue and Green channels are clearly better than the Red, but the Green channel is probably better because the neck area of the Blue channel is a bit too dark and the dots in the background are more pronounced. We’ll use the Green channel instead.
-
To duplicate this channel, drag the Green channel down to the Create new channel button at the bottom of the Channels panel.
-
Double–click on the name Green copy and rename the channel hair.
-
This channel will need some work before it will be good enough to create a usable selection for us. First we will increase the contrast and try to get closer to white and black (the grays will be partially selected). With the hair channel still selected press Cmd–M (Mac) or Ctrl–M (Windows) or choose Image > Adjustments > Curves.
-
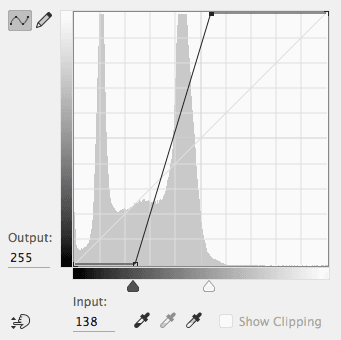
Drag the black point slider to the right until Input is about 61. Notice the darks becoming darker.
-
Drag the white point slider to the left until Input is about 138. Notice the highlights getting lighter. The final curve should look like this:
-
Uncheck and re-check Preview to see the change. The shadow in the background around the neck becomes too dark, which will make it hard to select, but we’ll fix that next.
-
Click OK.
Refining the Channel Using the History Brush
-
Let’s fix the dark area around the neck. Go to Window > History.
-
To undo the neck area parts we don’t like, we need to set the source of the History Brush to an older history state before the curves adjustment. Directly above the Curves action, click on the box to the left of Channel Options (as shown below) to set it as the source:

NOTE: It’s important that the Curves state is still selected (highlighted), but the source
 is checked on next to Channel Options.
 -
Select the History Brush tool
 .
. -
In the Options bar at the top of the screen choose a round brush about 90 px in size.
-
Set the brush’s Hardness to 50%.
-
Zoom in on the area around his neck.
-
Brush around the neck to remove the dark shadow (mostly it’s above the shoulder to the right of the neck that needs help).

Photo courtesy of istockphoto, ianmcdonnell, Image #8884668
-
Let’s fill in his face with black. Select the Brush tool.
-
Set the Foreground color to Black.
-
Once again choose a round brush about 90 px in size.
-
Set the brush’s Hardness to 50%.
-
In the Options bar at the top of the screen, set both Opacity and Flow to 100%.
-
What we’re trying to do here is define the areas we want selected (with black) and the areas we don’t want selected (with white). Brush black over his face, neck, and the interior of his hair.
-
You’ll need to darken some parts of his hair (like the large spike at the top of his head). Make the brush smaller by hitting the left bracket [ key. Use your own judgment as to how much you should paint black. Just block out the main areas, and don’t worry about painting in specific small hair areas.
-
When done you should have something that looks close to this:

-
We need to further adjust the contrast to try to push the gray background to white. Hit Cmd–M (Mac) or Ctrl–M (Windows) to do a Curves adjustment.
-
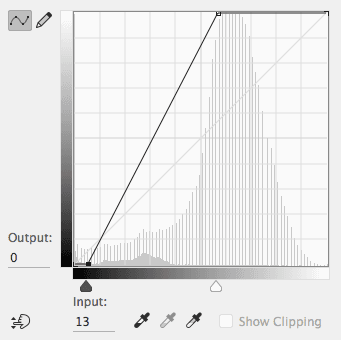
Drag the white point to the left to about Input: 145.
-
Drag the black point slightly to the right to about Input: 13. The final curve should look something like this:
-
Click OK.
-
On the right side there’s a fairly large arc of hair that is now missing detail after that curve adjustment. Let’s bring back some of the detail. Go to the History panel (Window > History).
-
Directly above the Curves action, click on the box to the left of Brush Tool (as shown below) to set it as the source:
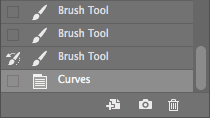
NOTE: It’s important that the Curves state is still selected (highlighted), but the source is checked on next to Brush Tool.
-
Select the History Brush tool.
-
Adjust your brush size as needed and paint over the arc of hair shown below:

Improving the Shoulder/Neck Area
-
The neck and shoulders area has a lot of dark gray, so let’s lighten that. Hit Cmd–M (Mac) or Ctrl–M (Windows) to do a Curves adjustment.
-
Drag the white point to the left until the gray background areas along the shoulders turn mostly white, around Input: 59. Focus your attention on the area around the neck, without paying attention to the rest of the hair (which will look bad).
-
Click OK.
-
We’ll use the History Brush to help us again. Open the History panel.
-
We’re going to do something different than we’ve previously done in this exercise. The change we made is only good for the area around the neck. It’s not good for most of the image. So step back one history state by clicking on the last History Brush tool state. Do not check the source icon, click on the state so that line is highlighted! The photo should now appear as it did before we applied the curve adjustment.
-
Next to the bottommost Curves state, click the source box so the History panel looks like this:

Notice that we’re on the second to last history state, but the last history state is the source. It’s like we’re painting back to the future. Trippy!
-
Select the History Brush tool.
-
Brush around the left and right sides of the neck, and it should remove most of the gray (but not quite all when it gets close to the neck on the right side).
-
Select the Brush tool
 .
. -
Hit the X key to set the foreground color to white.
-
Remove any remaining gray from the background that we don’t want, such as the gray around the neck as well as all the background dots. Be careful when you get close to the hair and resize the brush as needed.
-
You should end up with something like this:

Key Takeaways