Customizing the Sidebar
What This Tutorial Covers
Widget Areas
Define areas where widgets can be placed.
Widget Customization
Custom widget code for branded sidebar elements.
Conditional Sidebars
Show different sidebars on different page types.
Noble Desktop's WordPress Bootcamp teaches WordPress for site builders and developers.
Delve into this comprehensive WordPress tutorial and learn how to register new sidebars, add widgets to sidebars, and install an image widget.
Topics Covered in This WordPress Tutorial:
Registering New Sidebars, Adding Widgets to Sidebars, Installing an Image Widget
Exercise Preview
Exercise Overview
WordPress uses the term Sidebar to describe areas of dynamic content that are outside the main post. Sidebars can be added to any part of the page, including footers, headers, and yes: even sidebars. In this exercise, we will add Sidebars to make the page sidebar and footer dynamic and editable from the Dashboard.
If You Did Not Do the Previous Exercise
- In a web browser, go to localhost:8888/mrp/wp-admin (Mac) or localhost/mrp/wp-admin (Windows) and log in if prompted.
- On the left of the Dashboard, mouse over Appearance and click Themes.
- Click the Add New button.
- Click the Upload link, then the Browse (or Choose File) button.
- Navigate to Desktop > Class Files > WordPress.org Class and double–click mrpTheme-ready-for-sidebar.zip to open it.
- Click Install Now, then click Activate.
Registering the Sidebar
Just like the menu, when we want WordPress to recognize a sidebar, we have to register it in functions.php.
In your code editor, open functions.php from the mrpTheme folder.
Inside the load_on_init
()function, below the menu if statement, make sure the new sidebar function exists by adding the following bold code (around line 9):function load_on_init() { if ( function_exists( 'register_nav_menu' ) ) { register_nav_menu( 'header-menu', __( 'Header Menu' ) ); } if ( function_exists( 'register_sidebar' ) ) { } }If the register_sidebar
()function does exist, then we can call it. Add the function between the curly brackets:if ( function_exists( 'register_sidebar' ) ) { register_sidebar(); }Next, we need to add some extra information, starting with the name of the sidebar:
register_sidebar( array(
   'name' => 'Sidebar',
) );
NOTE: The trailing comma at the end of the name value is intentional. This is a common PHP coding practice to minimize errors due to accidentally forgetting that comma when you add a new value to an array. An array is a way of packaging multiple values together.
By default, WordPress will add
<li></li>around the sidebar, which we don’t want in this case. Add the following to tell it to not wrap the sidebar in any tags:register_sidebar( array( 'name' => 'Sidebar', 'before_widget' => '', 'after_widget' => '', ) );Another default for sidebars is to use
<h2>tags for the titles. In our design, the sidebar uses an<h3>tag, so add one more set of values to specify that:register_sidebar( array( 'name' => 'Sidebar', 'before_widget' => '', 'after_widget' => '', 'before_title' => '<h3>', 'after_title' => '</h3>' ) );Save the file.
Adding the Sidebar into a Page
Now that we have registered the sidebar, we can insert it into the page. WordPress needs to know where to display that information. We are going to place this sidebar into the sidebar.php file that is included on every page.
In your code editor, open sidebar.php from the mrpTheme folder.
We want the sidebar to replace all of this content, but we can leave what we currently have as a fallback in case the sidebar fails or is empty. Add the following around the current content:
<div id="aside">
<?php if ( dynamic_sidebar( 'Sidebar' ) ) : ?>
<?php else : ?>
   <h3>Our Promise To You</h3>
Code Omitted To Save Space
<h3>We Are An Authorized<br>
      Dealer For</h3>
   <img src="<?php bloginfo( 'template_directory' ); ?>/img/authorized-dealer-logos.png" ALT="" width="235" height="353">
<?php endif; ?>
</div><!—end aside—>
This basically says to use the dynamic sidebar called Sidebar (the name we set in functions.php), otherwise use what is below.
NOTE: You may see this without the else statement and written as:
<?php if (!dynamic_sidebar('Sidebar') ) : ?>They do the same thing, but our way may be more human readable. The ! is a not operator, which means the opposite of, or false in this case.Save the file.
Putting Text into the Sidebar
Text and many other things can be added to Sidebars through the Dashboard using Widgets. There are many included Widgets with every WordPress install and even more available to download.
- Open a browser and go to:
- Mac: localhost:8888/mrp/wp-admin
- Windows: localhost/mrp/wp-admin
Enter the username and password if asked.
On the left, go to Appearance > Widgets.
This is where the registered sidebars will appear, and where a user can add content to them. On the right, Sidebar should be added.
From the Available Widgets in the middle, drag the Text widget into the Sidebar (making the browser wide enough makes the widgets form two columns).
Under Title, enter: test
For the content, enter: sidebar text
In the bottom-right corner, click Save.
- Open up a new browser window or tab and go to:
- Mac: localhost:8888/mrp
- Windows: localhost/mrp
The test content should now be in the sidebar. Dynamic sidebar achieved!
Switch back to your code editor.
Open content-sidebar.txt from the mrpTheme folder.
Select All.
Copy it.
Close the file.
Switch back to the Dashboard browser window. If you closed it, open it again and go to the Widgets section.
In the Sidebar, expand the Text widget by clicking its arrow if it isn’t still open.
Change Title to: Our Promise to You
Replace the test content by pasting the copied content over it.
At the bottom, check Automatically add paragraphs.
In the bottom-right corner, click Save and collapse the widget by clicking its arrow.
Go to the window/tab with the site preview and reload it. The new content should appear in the sidebar.
Putting an Image into the Sidebar
Next, we’d like to add an image below, but there isn’t an image widget by default. Fortunately, there are a number of image widget plugins that can be easily downloaded and added.
In the browser, go to the window/tab with the Dashboard.
On the left side, go to Plugins > Add New.
In the search text field, type: Image Widget
Hit Return (Mac) or Enter (Windows).
Look for the plugin called Image Widget by Modern Tribe, Inc. (the author is the last part of the description paragraph).
Click Install Now (and click OK if the browser asks you).
After the plugin finishes installing, click Activate Plugin.
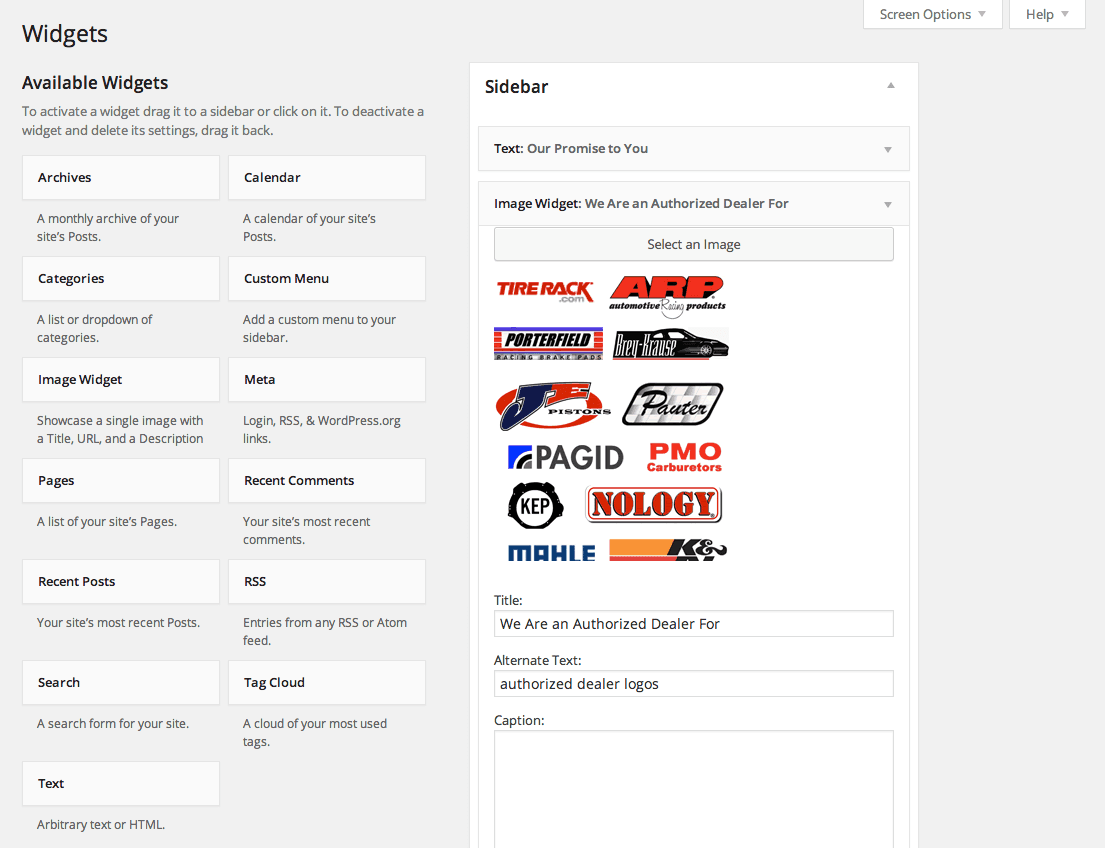
Now it should be available in Widgets. On the left, go to Appearance > Widgets.
Drag the Image Widget into the Sidebar below Text.
Click Select an Image.
In the panel that opens, click on the Upload Files tab.
- Click the Select Files button and navigate to:
- Mac: Hard Drive > Applications > MAMP > htdocs > mrp > wp-content > themes > mrpTheme > img
- Windows: C: > xampp > htdocs > mrp > wp-content > themes > mrpTheme > img
Double–click on authorized-dealer-logos.png to choose it.
After the image finishes loading, you can fill out the photo’s info.
For ALT Text, type: authorized dealer logos
Leave Caption and Description empty.
Click the Insert Into Widget button.
Leave Link blank.
For Size, select Full Size if it isn’t already selected.
For Align, select none if it isn’t already selected.
Change the Title to: We Are an Authorized Dealer For
At the bottom of the Image Widget, click Save.
Go to the window/tab with the site preview and reload it to view the site and the new image widget in action.
Bonus: Making a Footer Sidebar
The footer is another area that should be editable for users. We’ll have to create a new Sidebar in functions.php and then add the code into footer.php.
Switch back to your code editor.
If you closed functions.php, open it again.
Inside the if statement, below the Sidebar’s register_sidebar
()function, register a new sidebar for the Footer (around line 17):if ( function_exists( 'register_sidebar' ) ) { register_sidebar( array( 'name' => 'Sidebar', 'before_widget' => '', 'after_widget' => '', 'before_title' => '<h3>', 'after_title' => '</h3>' ) ); register_sidebar( array( 'name' => 'Footer', 'before_widget' => '', 'after_widget' => '', 'before_title' => '', 'after_title' => '' ) ); }NOTE: The Footer is very similar to the Sidebar code, except that it will not have a title, so we don’t need that code.
Save the file.
Open footer.php from the mrpTheme folder.
In the .contactInfo div, add the dynamic_sidebar
()function (around line 6).<div class="contentWrapper"> <div class="contactInfo"> <?php if ( dynamic_sidebar( 'Footer' ) ) : ?> <?php else : ?> Monteith Restoration & Performance • 856 S. Mt. Pleasant Rd., Lebanon, PA 17042 • 717-964-3345 • <a href="mailto:wes@monteithrestoration.com">wes@monteithrestoration.com</a> <?php endif; ?> </div> </div>Save the file.
- OK, that should do it. We should be able to edit this in the Dashboard. Open a browser and go to:
- Mac: localhost:8888/mrp/wp-admin
- Windows: localhost/mrp/wp-admin
If asked, log in.
On the left, go to Appearance > Widgets.
On the right, click the arrow next to Footer to expand it.
Drag a Text widget into the Footer.
In the content section, type: test
Click the Save button.
Click on the title Monteith Restoration & Performance at the top of the Dashboard to view the site and see if the footer text is working.
In the browser, press the back button to return to the Dashboard.
Switch back to your code editor.
We want the same text in the footer widget that we have here in the footer.php page. Select the text inside the else statement (around line 8):
Monteith Restoration & Performance • 856 S. Mt. Pleasant Rd., Lebanon, PA 17042 • 717-964-3345 • <a href="mailto:wes@monteithrestoration.com">wes@monteithrestoration.com</a>Copy it.
Switch back to the Dashboard browser window. If you closed it, open it again and go to the Widgets section.
Click the arrow next to Footer to expand it.
In the Footer, click the arrow next to the Text widget to expand it.
Paste the content from footer.php to replace the test content.
Leave the title empty.
Click the Save button and close the widget.
Click on the title Monteith Restoration & Performance at the top of the Dashboard to view the site and the new footer text.