April 1, 2026Noble Desktop Publishing Team/13 min read

Easels App with Test Driven Development: Part 1

Master Test-Driven Development with Ruby on Rails

What You'll Build

A complete task management application using Test-Driven Development principles, where you write failing tests first, then implement the minimum code needed to make them pass.

Topics Covered in This Ruby on Rails Tutorial:

Adding Gems for Testing, Test #1: Ensuring the User Can Visit the Easels Homepage, Test #2: Ensuring the User Can Create a To-do Via a Form

TDD Development Approach

Test-First Philosophy

Write tests that fail until you create the bare minimum production code to make them pass. This approach acts as your personal assistant in developing reliable applications.

Cleaner, Flexible Code

TDD advocates maintain this approach creates more maintainable code that's easier to modify and extend over time.

Exercise Overview

No comprehensive tour of Ruby on Rails would be complete without mastering the art of writing tests. You've likely noticed while generating models, controllers, and other components in previous exercises that Rails automatically generated corresponding files in the test folder. This isn't accidental—Rails was designed from the ground up with testing in mind. The philosophy is simple: as you build functionality into your application, you should simultaneously write tests to ensure everything works as intended.

These tests become invaluable when making large-scale changes to your application. In complex systems, a seemingly innocent modification to one component can create unexpected ripple effects throughout seemingly unrelated parts of your codebase. A comprehensive test suite (or series of tests) acts as your safety net, catching these issues before they reach production and potentially impact real users.

Some developers take this approach even further, embracing a methodology where tests are written before a single line of production code. Advocates of this approach—known as Test Driven Development (TDD)—argue that it produces cleaner, more flexible, and more maintainable code. TDD has gained tremendous traction within the Rails community, and for good reason: it forces developers to think about requirements and interfaces before diving into implementation details.

In this comprehensive four-part exercise series, we'll build a complete application using TDD principles: a streamlined task management app that enables users to track items as complete or incomplete on their personal to-do lists. This hands-on approach will demonstrate how TDD principles apply to real-world development scenarios.

The TDD workflow involves writing tests that initially fail, then implementing the minimal production code necessary to make those tests pass. This methodology essentially becomes your development GPS, guiding you toward building an application where all components function harmoniously while meeting your client's specific requirements.

In this foundational exercise, you'll write two critical tests that verify the most basic functionality every web application needs. First, we'll verify that users can successfully access the application's homepage. Then, we'll ensure they can interact with a form to add tasks to their task list—a core feature that demonstrates the complete request-response cycle.

TDD Development Cycle

1

Write Failing Test

Create a test that describes the functionality you want to implement. The test should fail initially since the feature doesn't exist yet.

2

Write Minimum Code

Implement just enough production code to make the test pass. Don't over-engineer or add unnecessary features.

3

Verify and Refactor

Run tests to ensure they pass, then refactor code while keeping tests green. This ensures functionality works as intended.

Getting Started

  1. Open the Finder and navigate to the Class Files folder.

  2. Open Terminal (in Applications > Utilities) if it isn't already open.

  3. Type cd and a single space (do NOT press Return yet).

  4. Drag the yourname-Rails Bootcamp folder from the Finder to the Terminal window.

  5. Make sure you're in Terminal and hit Return to change into the new folder.

  6. While Rails ships with a default testing suite called test-unit, it has fallen out of favor with most professional developers. Rails' flexible architecture allows you to choose any testing framework that suits your needs. We'll use the industry-standard RSpec gem for our tests, which offers more readable syntax and powerful features. To create an application with all standard folders except the default test folder (abbreviated as T), type the following in Terminal, then hit Return:

    rails new easels -T
  7. Review the Terminal output to confirm that Rails generated all the default application components, minus any test files. This clean slate gives us complete control over our testing setup.

  8. Before diving into tests, we need to establish our database schema. Run:

rails db:migrate
Rails Testing Flexibility

Rails ships with test-unit by default, but the framework is designed to work with any testing suite. We're using RSpec because it's more popular and has readable syntax.

Initial Setup Commands

0/2

Adding Gems for Testing

Setting up a professional testing environment requires adding several specialized gems to our application. Each gem serves a specific purpose in our testing toolkit, and understanding their roles will help you make informed decisions about testing strategies in your future projects.

  1. Open a browser and navigate to: rubygems.org

  2. We'll start with RSpec, the de facto standard testing framework in the Rails ecosystem. RSpec offers a comprehensive testing suite similar to the default test-unit, but with significantly more readable syntax that resembles natural language. In the search bar on the RubyGems page, search for rspec rails.

  3. Click on rspec-rails (it should be the first result).
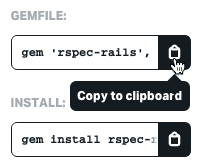
  4. Notice the impressive adoption statistics for this gem—millions of downloads indicate its widespread use in production applications. To copy the installation code for the latest version, under GEMFILE click the Copy to clipboard button as shown:

    rubygems copy rspec rails gemfile code

  5. Keep the browser window open—we'll need to search for additional gems shortly.

  6. In your code editor, open the newly created easels app folder (located in Desktop > yourname-Rails Bootcamp).

  7. Open the Gemfile.

  8. Locate the environment-specific gem groups around line 31. You'll see configuration similar to this:

group :development, :test do
    # Call 'byebug' anywhere in the code to stop execution and get a debugger console
    gem 'byebug', platforms: [:mri, :mingw, :x64_mingw]
end

  group :development do
  …

Rails' environment-specific gem loading is one of its most powerful features for managing dependencies efficiently. Until now, you've worked exclusively in the development environment, which is optimized for local development with features like detailed error pages and automatic code reloading. The production environment powers your live site with performance optimizations and security hardening. The test environment creates a completely isolated sandbox specifically for running your test suite, ensuring tests don't interfere with your development data.

  1. We want our test-related gems loaded exclusively in the test environment to keep our production bundle lean and secure. After the development group (around line 36), add a dedicated group for test-only gems:
group :test do

  end
  1. Inside this group, paste the rspec-rails gem code. Don't worry if the version number is newer than shown in this tutorial—RubyGems maintains backward compatibility:

    group :test do
       gem 'rspec-rails', '~> 5.0.0'
    end

    Notice that we're installing rspec-rails rather than the standalone RSpec gem. While RSpec can function independently as a testing framework for any Ruby application, rspec-rails provides Rails-specific integrations, generators, and helpers that dramatically simplify testing Rails applications.

    NOTE: Visit relishapp.com/rspec/rspec-rails/docs to explore the comprehensive documentation, including Rails-specific features and real-world examples that will accelerate your testing expertise.

  2. Return to the RubyGems page in your browser.

  3. In the search bar, look for capybara.

  4. Click on capybara (the first result).

    Capybara is a sophisticated web browser simulator that revolutionizes integration testing. It provides an intuitive, human-readable syntax for simulating user interactions—clicking links, filling forms, navigating pages—while making actual HTTP requests to your Rails server. This approach, known as behavior-driven development, ensures your tests mirror real user experiences rather than just testing isolated code units.

  5. Under GEMFILE, click the Copy to clipboard button rubygems copy to clipboard.

  6. Return to the code editor and add the Capybara gem to your test group in the Gemfile:

    group :test do
       gem 'rspec-rails', '~> 5.0.0'
       gem 'capybara'
    end

    NOTE: Explore rubydoc.info/GitHub/jnicklas/capybara for comprehensive documentation showing how Capybara integrates with RSpec and other testing frameworks to create powerful end-to-end test scenarios.

  7. Back on the RubyGems page, search for database cleaner.

  8. Click on database_cleaner (the first result).

    Database Cleaner solves a critical challenge in testing: maintaining clean, predictable data states between test runs. Every test potentially creates, modifies, or deletes database records. Without proper cleanup, these changes accumulate and contaminate subsequent tests, leading to false positives, mysterious failures, and unreliable test suites. Database Cleaner automatically wipes and rebuilds your test database between runs, ensuring each test starts with a pristine data environment.

  9. Under GEMFILE, click the Copy to clipboard button rubygems copy to clipboard.

  10. In the code editor, add Database Cleaner to your test group in the Gemfile:

    group :test do
       gem 'rspec-rails', '~> 5.0.0'
       gem 'capybara'
       gem 'database_cleaner'
    end

    NOTE: Visit GitHub.com/DatabaseCleaner/database_cleaner for detailed documentation on advanced configuration options and integration patterns with various testing frameworks.

  11. Save the file.

Essential Testing Gems

RSpec Rails

Rails-specific version of RSpec testing framework with readable syntax. More popular than Rails' default test-unit among developers.

Capybara

Simulated web browser that creates responsive tests mimicking user interaction. Enables behavior-driven development with understandable syntax.

Database Cleaner

Wipes and rebuilds test database between runs, ensuring tests don't contaminate each other with leftover data.

Environment-Specific Gems

Rails allows loading gems only in specific environments. Test-related gems should only load in the test environment to keep development and production clean.

Test #1: Ensuring the User Can Visit the Easels Homepage

Now we'll implement our first test, focusing on the fundamental requirement of any web application: users must be able to access the homepage. This seemingly simple test actually validates multiple layers of your application stack—routing, controller logic, and view rendering.

  1. Switch back to Terminal and navigate to the correct directory with cd easels.

  2. Install the newly added gems by running bundle install. This command downloads and configures all the testing dependencies.

  3. Before writing tests, we need RSpec to generate its configuration files and folder structure. RSpec provides specialized generators for this purpose. Run rails g rspec:install to create the essential RSpec files and configuration.

  4. Let's examine what RSpec created for our testing environment. Switch to your code editor.

  5. Open the newly created spec folder—this is your testing headquarters. Browse the two helper files RSpec generated. The rails_helper.rb file contains Rails-specific testing configurations, while spec_helper.rb handles general RSpec settings. The default configurations work well for most applications, but these files offer extensive customization options for complex testing scenarios.

    NOTE: The vendor folder also contains a .rspec file with additional testing preferences and output formatting options.

  6. Within the spec folder, create a new subdirectory called features. TIP: If you're using Sublime Text, CTRL–click or Right–click on the spec folder and choose New Folder. Name it features and press Return.

    Rails supports multiple testing approaches, each targeting different application layers—unit tests for models, controller tests for request handling, and integration tests for component interaction. We're creating a features folder for high-level acceptance tests that verify complete user workflows. These feature tests provide confidence that your application's core functionality works from the user's perspective, making them invaluable for catching integration issues that lower-level tests might miss.

  7. Generate your first feature test by running this command in Terminal:

    rails g rspec:feature user_visits_homepage

This generator creates the spec/features directory structure and generates a file called user_visits_homepage_spec.rb. The naming convention clearly indicates what functionality we're testing, making our test suite self-documenting.

  1. Open user_visits_homepage_spec.rb to see the basic RSpec feature file structure:

    require 'rails_helper'
    
      RSpec.feature "UserVisitsHomepages", type: :feature do
    pending "add some scenarios (or delete) #{__FILE__}"
    end

    The require 'rails_helper' statement loads essential Rails testing configurations. The RSpec.feature block defines our test feature, and we'll add one or more scenarios to test different outcomes (successful access, error handling, etc.).

  2. Let's refine the language and implement our first scenario:

    RSpec.feature "user visits homepage" do
       scenario "successfully" do
       end
    end

    We've removed the 'pending' line and created a clear, descriptive test structure. The feature name matches our filename, following Rails conventions. We're modeling the test around the user's action rather than technical implementation details—this user-centric approach makes tests more maintainable and meaningful.

  3. Implement the two essential steps for a successful homepage visit:

    scenario "successfully" do
       visit root_path
    
       expect(page).to have_css 'h1', text: 'To-Dos'
    end

    Our test simulates a user navigating to the root_path (homepage) and verifies they see the expected content. The CSS selector check ensures the page contains an h1 element with "To-Dos" text, confirming the page loaded correctly. This Capybara syntax reads almost like natural language, making tests self-documenting and easy to understand.

  4. Save the file and switch to Terminal.

  5. Execute all tests in your test suite by running rspec.

    The red F at the top indicates our test failed—exactly what we expect in TDD! This failure drives our development process.

  6. Analyze the error messages to understand what needs implementation:

    • The Failure/Error occurred during the visit root_path step, meaning users cannot access the homepage yet.
    • The NameError for undefined local variable or method 'root_path' indicates we need to establish routing for the homepage.
  7. In your code editor, open config > routes.rb and note the absence of any defined routes.

  8. Remove the commented code (approximately lines 2–55) to clean up the file.

  9. Add the root route configuration:

    Rails.application.routes.draw do
    
       root 'todos#index'
    
    end
  10. Save the file and return to Terminal.

  11. Run rspec again.

    Progress! The test fails for a different reason now. We see a RoutingError for uninitialized constant TodosController. The routing works, but Rails can't find the specified controller. This iterative error resolution is the essence of TDD.

  12. Generate the missing controller: rails g controller todos

  13. Re-run the test. Use the Up Arrow key twice to recall the previous rspec command.

    Now the failure indicates a missing index action in TodosController. Our routes.rb file specifies todos#index as the root, so we need to implement this action.

  14. Switch to the code editor.

  15. In app > controllers > todos_controller.rb, add the required index action:

    class TodosController < ApplicationController
    
       def index
       end
    
    end
  16. Save the file and return to Terminal.

  17. Run rspec again.

    Each error resolution brings us closer to a working feature. The current ActionController::MissingExactTemplate error confirms the controller works correctly—we now need the corresponding view template.

  18. In the code editor, navigate to app > views > todos and create a new view file: index.html.erb

  19. Return to Terminal.

  20. Run rspec once more.

    Excellent progress! We've moved past the rendering error to the content verification step. The test now fails because our view lacks the expected h1 element with "To-Dos" text.

  21. In the currently empty index.html.erb file, add the required heading: <h1>To-Dos</h1>

  22. Save the file and return to Terminal.

  23. Run rspec for the final verification.

    Success! The absence of red error messages and the presence of a green period (.) instead of red F confirms our test passes. Users can now successfully access our application's root page.

  24. Verify the results in a browser by starting the development server: rails s

  25. Navigate to localhost:3000 to see the Easels homepage displaying the To-Dos heading.

  26. Return to Terminal and press CTRL–C to stop the server.

Setting Up RSpec

1

Install RSpec

Run 'rails g rspec:install' to create RSpec files and folders. This generates the spec directory and helper files.

2

Create Features Folder

Create 'features' folder in spec directory for high-level acceptance tests that verify general app functionality.

3

Generate Feature Test

Use 'rails g rspec:feature user_visits_homepage' to create the test file with basic markup structure.

Feature Test Strategy

Feature tests are high-level acceptance tests that verify your app's general features work. While you can test individual components, feature tests give confidence that all parts function together.

Test #2: Ensuring the User Can Create a To-Do Via a Form

With basic homepage access working, we'll now test a more complex user workflow: creating new to-do items through a web form. This test validates the complete create-read cycle that forms the backbone of most web applications.

  1. Generate the test file in Terminal:
rails g rspec:feature user_creates_a_todo
  1. In the newly created file, establish the test structure (remember to load rails_helper first):

    require "rails_helper"
    
    RSpec.feature "User Creates a Todo", type: :feature do
       scenario "successfully" do
       end
    end
  2. Before implementing the test code, let's map out the user workflow. Successfully creating a to-do requires several steps: visiting the homepage, locating and using a form to enter task details, saving the information to the database, and verifying the new item appears on the page. Add these workflow comments for clarity:

    scenario "successfully" do
    
       #visit front page
    
       #user creates a to-do via a form
    
       #user saves the to-do to the database
    
       #verify that the page has our to-do
    
    end
  3. Implement each step using Capybara's intuitive browser simulation syntax. Note that form labels in Rails are automatically capitalized, so specify "Title" with proper capitalization:

    #visit front page
    visit root_path
    
    #user creates a to-do via a form
    click_on "Add a New To-Do"
    fill_in "Title", with: "paint house"
    
    #user saves the to-do to the database
    click_on "Add To-Do"
    
    #verify that the page has our to-do
    expect(page).to have_css ".todos li", text: "paint house"
  4. Save the file and switch to Terminal.

  5. Execute the test suite:

    rspec

    We now see one passing test and one failure (.F). The homepage works correctly, but Capybara cannot locate a link or button labeled "Add a New To-Do" because we haven't implemented the form interface yet.

  6. In the code editor, open app > views > todos > index.html.erb and add the link exactly as specified in our test:

    <h1>To-Dos</h1>
    
    <%= link_to "Add a New To-Do", new_todo_path %>

TDD Error-Driven Development

First Run

Missing Link Error

Capybara can't find 'Add a New To-Do' button

After Adding Link

Undefined Path Error

new_todo_path method doesn't exist

After Resources

Route Success

Resourceful routes provide needed paths

TDD involves slowly making progress, correcting errors one step at a time.
This iterative approach helps you build exactly what's needed without over-engineering solutions.

Key Takeaways

1Test-Driven Development writes failing tests first, then implements minimum code to make them pass
2RSpec provides more readable syntax than Rails' default test-unit framework
3Capybara simulates browser interactions for behavior-driven development testing
4Feature tests verify high-level app functionality and user workflows
5Database Cleaner ensures test isolation by wiping data between test runs
6TDD follows an iterative cycle: write failing test, implement minimal code, verify and refactor
7Rails environments (development, test, production) can load different gems for specific purposes
8Error-driven development in TDD helps build exactly what's needed without over-engineering

RELATED ARTICLES