The Interview: Color Correction & Exporting in Premiere Pro
What This Tutorial Covers
Lumetri Color
Premiere's professional grading toolkit.
White Balance
Neutralize casts for natural-looking footage.
Export Settings
H.264 presets matched to delivery platform.
Noble Desktop's Video Editing & Motion Graphics Certificate teaches Premiere Pro alongside After Effects, DaVinci Resolve, and the full motion design toolkit.
Dive into this in-depth tutorial on using Lumetri Color in Premiere Pro to carry out color correction in an interview video shot with multiple cameras.
Exercise Preview
Lumetri Color in Effect Controls
From the Project panel, open the Interview-Multicam-edit sequence (if it isn’t already open).
Move the playhead over the first interview clip. Then move it over the second.
Notice that the first clip has more of a cold color cast, while the second has a more warm cast.
Let’s see how we can get the shots to visually match, and enhance the color while we’re at it. Select the first interview clip and make sure the playhead is over the clip.
Go to the Effects panel and make sure nothing is in the search bar.
Navigate to Video Effects > Color Correction and locate Lumetri Color.
Drag Lumetri Color and drop it onto the first interview clip on V1.
To adjust the effect settings, go to the Effect Controls panel and expand into Lumetri Color > Creative.
To the right of Look, click the menu and choose Fuji ETERNA 250D Kodak 2395 (by Adobe). (We’ve found through trial and error that this one works the best for this particular clip.)
NOTE: Feel free to collapse the other effects in Effects Controls to make things easier to sort through and view.
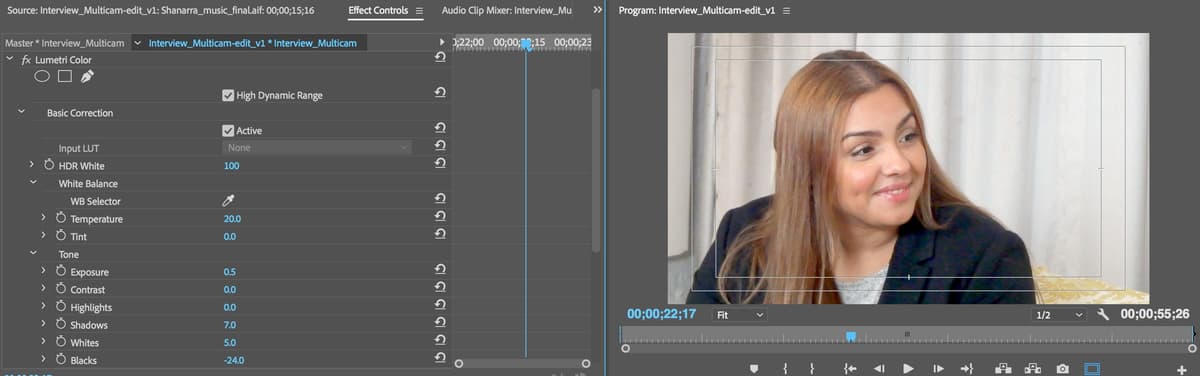
Still in Effect Controls, under Lumetri Color, expand into Basic Correction.
Scroll down and click the Auto button.
Under Tone, set Exposure to 0.5 to make things brighter overall.
Under White Balance, set Temperature to 12.2 to make the scene warmer (less blue, more yellow).
- To check out the cumulative effect of your changes, click the fx icon
 to the left of Lumetri Color and look at the Program Monitor.
 Click the fx icon
back on when you’re done previewing.
Pasting Attributes
Now that we’ve got our color settings, we can copy and paste these settings onto every clip that was shot with this camera (all the wide shots), using a useful trick called Paste Attributes.
In the Timeline, make sure the first interview clip is selected. If the audio has also been selected, at the top left of the Timeline, turn off Linked Selection
 and select only the first interview clip.
Hit Cmd–C (Mac) or CTRL–C (Windows) to copy it. Yes, the whole clip!
To save time, we can select both of the remaining wide shots. In the Timeline, select the next wide shot (MC1).
Shift–click the last wide shot (MC1).
CTRL–click (Mac) or Right–click (Windows) on one of the selected clips and choose Paste Attributes. Alternatively, you can find Paste Attributes in the Edit menu.
Now we can choose which attributes we want to paste. In the dialog that opens, make sure the following are checked (uncheck any others):
- Effects
- Lumetri Color
Click OK.
Scrub through the Timeline to see that the effects we pasted have transferred to the wide shots. Looking good!
In the Timeline, zoom in on any one of the wide shot clips. Notice the fx icon
 for these clips is now purple (instead of gray). This indicates that effects have been applied to them. Neat!