Skin Retouching Using Frequency Separation
What This Tutorial Covers
Frequency Separation
Split skin into tone and texture for natural retouching.
Texture Preservation
Keep pores and detail while smoothing color transitions.
Non-Destructive Workflow
Smart Objects and adjustment layers throughout.
Noble Desktop's Graphic Design Certificate covers Photoshop alongside Illustrator and InDesign — the complete Adobe toolkit.
Learn how to use the frequency separation technique in Photoshop for fine-tuned control in skin retouching, featuring a step-by-step guide on loading the frequency separation action, creating frequency separation layers, and evening out skin tones.
Exercise Preview
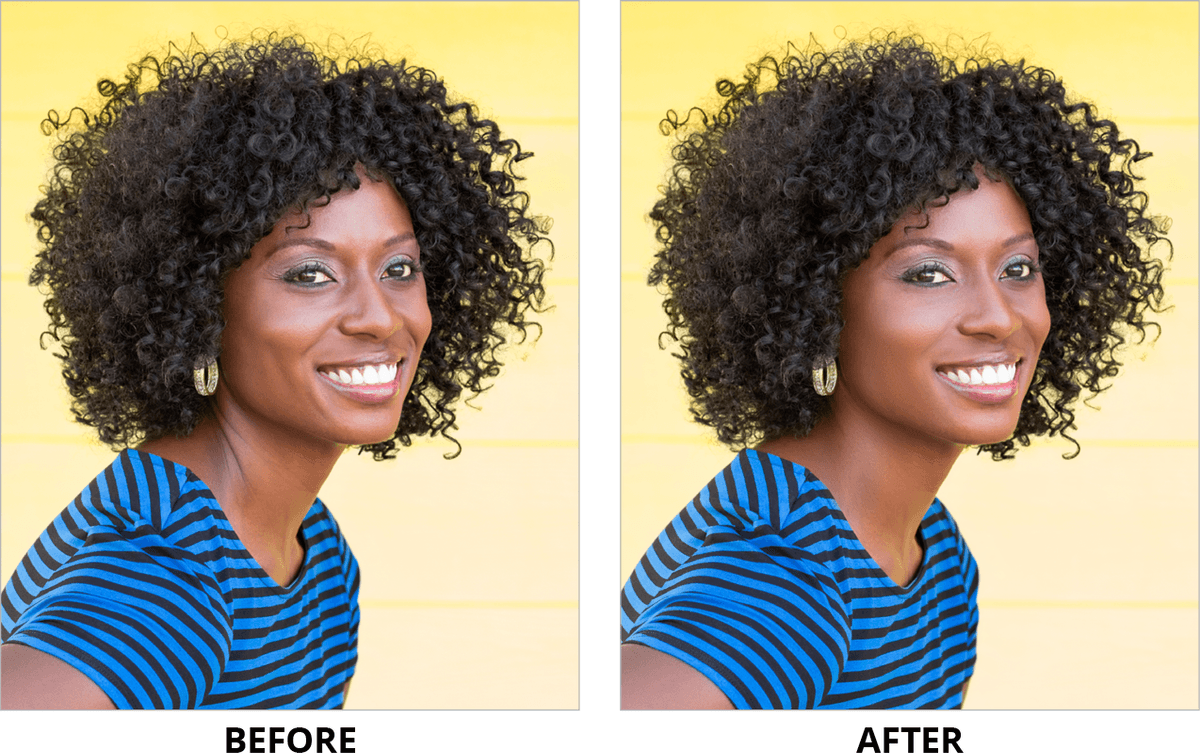
Photo courtesy of istockphoto, © LL28, Photo #23058113
Loading the Frequency Separation Action
Photoshop actions allow you (or someone else) to record a set of steps so that you can “play” it back later on. While we could create the frequency separation layers manually, there’s no real benefit, and an action will create them much faster. So before we start retouching, we must load the frequency separation action.
Launch Photoshop.
Open the Actions panel (Window > Actions).
We only need to load the action once into Photoshop. Adding the same action multiple times will create duplicates in the Actions panel.
You probably only have a few actions, and FX-Ray Retouch action should not be one of them. If you do already have it, you must have previously loaded it and you can skip to the next section.
At the top right of the Actions panel, go into the panel menu
 and choose Load Actions.
In the dialog that opens, navigate to Desktop > Class Files > Skin Retouching Class > Frequency Separation Photoshop Action and double–click the action for your version of Photoshop:
CC and higher: FX-Ray_Retouch_CC.atn CS5 and CS6: FX-Ray_Retouch_CS5.atn NOTE: You can find multiple actions for frequency separation online, but we like the one from FX-Ray the best. We’ve included a copy of their action in the class files (in case their website is not available in the future), but the original download is from fx-ray.com/tutorials/fs
In the Actions panel, open the FX-Ray Retouch folder to see the list of actions, including some frequency separation actions we’ll use a bit later.
Close the Actions panel for now.
Creating the Frequency Separation Layers
The frequency separation action we’re about to run will separate the image into two main parts: the sharp details and the color/tones (which are a blurred version of the image).
Zoom to 100% by hitting Cmd–1 (Mac) or CTRL–1 (Windows).
Re-open the Actions panel (Window > Actions).
You’ll need to be able to see the model’s face as we run the action. Adjust things so you can see the face and the Actions panel at the same time.
In the Actions panel, make sure the FX-Ray Retouch folder is expanded.
Select the Advanced Frequency Separation action, and at the bottom of the panel click the Play button
 .
.If you have your Actions panel set to Button Mode, you just click the red Advanced Frequency Separation action.
NOTE: You may notice there are multiple Frequency Separation actions. We chose the Advanced one because in addition to the two frequency layers the Simple version creates, it also gives you edit layers that allow you to keep your changes separate from the original. This is important so you can later compare your progress to the original image.
A Gaussian Blur dialog will pop up. The action needs us to choose the amount of blur that works with this particular image. This blur will only be applied to one of the layers. The action will create another layer that brings back all the detail.
Adjust the Radius slider as follows:
- The amount will vary depending on the size and resolution of the image, and the size of the subject within the photo.
- Start out low, and increase the radius until you no longer see unwanted textures. You want to blur out the details for a subtle smoothing, but don’t go too high.
- For this image we recommend a Radius of around 5 Pixels.
Click OK to apply the blur and complete the action.
After the action is done (which should only take a moment), close the Actions panel.
In the Layers panel, collapse the topmost folder, Check Layer. We will not use it in this exercise.
Notice the Frequency Separation folder has many layers inside. Hide and show the Frequency Separation folder by clicking the eye
 .
.Notice that the image looks exactly the same as before. This is a good thing! It means that the only change was that the details were split onto a different layer from the color and tone, which will allow us retouch them separately.
Make sure the Frequency Separation folder is visible before continuing.
Hide the High Frequency layer (NOT the corresponding Edit layer).
You should now see the blurry Low Frequency layer below. The colors/tones are on the Low Frequency layer, while the details are on the High Frequency layer.
How was this done? After creating the blurred Low Frequency layer, the action used Photoshop’s Apply Image command to calculate the difference between the original image and the blurred Low Frequency layer. The difference is literally the details. All the details were then put onto the High Frequency layer.
Show
the High Frequency layer to bring back all the details.Select the High Frequency layer.
Look at the top left of the Layers panel to see that the blending mode is Linear Light.
To see what Linear Light does, let’s see how the layer appears normally. Go into the blending mode menu and change Linear Light to Normal.
Notice that the majority of the layer is a neutral 50% gray, with the details being lighter or darker. The Linear Light blend mode burns or dodges colors darker or lighter than 50% gray. When blending this layer into the underlying layers:
- Colors lighter than 50% gray will brighten (dodge) the underlaying layers.
- Colors darker than 50% gray will darken (burn) the underlaying layers.
- 50% gray produces no change to the underlying layers, so it disappears.
Change the blending mode back to Linear Light to so the details are blended back into the underlying (blurry) layer.
Smoothing Out Tones Using the Low Frequency Layer
Now we’re ready to start retouching! When using the frequency separation technique, we typically start with the Low Frequency areas to change the feeling of the light, color, and structure of the face, by further blurring the areas that need it.
In the Layers panel, select the Low Frequency Edit layer. It is handy to retouch on the Edit layer because it lets us hide/show our edits and compare it to the original Low Frequency layer.
In the Tools panel, select the Lasso tool
 .
.Let’s start with the cheeks. Draw a selection over the prominent cheekbone and dimple, roughly as shown:

In the Options bar at the top of the scren, click the Refine Edge button.
To soften the edge of the selection, set Feather to 15 px.
Click OK.
We want to do another Gaussian Blur. Because that was the last filter we applied (via the action), just hit Cmd–Opt–F (Mac) or CTRL–ALT–F (Windows) to bring up the blur dialog with options.
Hit Cmd–H (Mac) or CTRL–H (Windows) to hide the selection marquee so we can see the area without any distractions.
Mac users only: If you get a dialog asking you what to do with the shortcut, click Hide Extras.
Slowly move the Radius slider to the right.
Notice that the shading of the skin changes but the texture is completely maintained. That’s the beauty of having the texture on a different layer!
Let’s go a bit light-handed this time. Later we can do another blur to specific areas that need more work. Follow these guidelines to find a radius you like:
- We want to smooth out the cheekbone, without losing all of its structure.
- If you go too high, the colors will blend too much and become unsightly.
- For this first pass we like something around 12 Pixels, but it’s up to you.
Check Preview off and on to see the before and after.
Hit OK to apply the blur.
Hit Cmd–D (Mac) or CTRL–D (Windows) to deselect. Remember that the selection was hidden!
We’d like to further smooth out her dimple. Draw a selection over the model’s dimple (the dark part on the cheek) and the surrounding area, roughly as shown:

In the Options bar at the top, click the Refine Edge button.
Once again, set Feather to 15 px and click OK.
Hit Cmd–Opt–F (Mac) or CTRL–ALT–F (Windows) to bring up the blur dialog.
Hit Cmd–H (Mac) or CTRL–H (Windows) to hide the selection marquee.
Set Radius to 16 Pixels to get rid of most of the dark dimple.
Check Preview off and on to see the before and after.
Hit OK.
Hit Cmd–D (Mac) or CTRL–D (Windows) to deselect.
Let’s not forget about her other cheek. First though, let’s make the 15 px feather a default so we don’t have to keep setting it for each selection. In the Options bar, set Feather to 15 px.
On her other cheek, select the shadowed wrinkle and some of the surrounding area:

Use the same process you used before:
- Hit Cmd–Opt–F (Mac) or CTRL–ALT–F (Windows) to bring up the blur dialog.
- Hit Cmd–H (Mac) or CTRL–H (Windows) to hide the selection marquee.
- Set a Radius you like. We liked 10 Pixels because it maintains enough of the shadow while applying a natural-looking smoothing.
- Check Preview off and on to see the before and after. Then hit OK.
- Hit Cmd–D (Mac) or CTRL–D (Windows) to deselect.
Hit Cmd–S (Mac) or CTRL–S (Windows) to save your progress.
If you get a message about Maximize Compatibility, click OK.
Retouching Textures on the High Frequency Layer
Now that the tones in the cheeks look nicer, it’s time to retouch their texture.
In the Layers panel, select the High Frequency Edit layer (which contains all the textures).
Be sure to select the Edit layer, not the corresponding original layer.
Zoom in so you can see the unwanted texture and wrinkles around her mouth.
Let’s take care of the largest wrinkle on the left side of the image first. In the Tools panel, select the Healing Brush tool
 .
.In the Options bar, make sure the Sample menu is set to Current Layer.
Choose a brush size of about 15 Pixels. You can press the ] key to increase or [ key to decrease the size.
Hover over an area near the wrinkle that has texture you like, then Option–click (Mac) or ALT–click (Windows). Don’t worry about light versus dark or color. This layer only contains texture so that’s all you need to look for!
In a single stroke, paint over the largest wrinkle on the left of her mouth.
Go to Edit > Fade Healing Brush.
NOTE: Photoshop only allows you to do this right after you paint over a blemish. This will only fade the last stroke you applied, which is why we had you paint in one stroke.
Lower the Opacity to about 60% or whatever you think looks good.
Click OK to apply the fade.
Using the Fade command is great when you want to you diminish the appearance of unwanted elements without removing them completely!
Continue using the Healing Brush (and fading it as needed) until the following areas look on the cheeks look nice to you:
- Finish up the wrinkle on the left side of the lip if it still needs work.
- The wrinkle near the bottom lip.
- The wrinkle on the right side of the lip. When choosing a sample source, remember that this High Frequency texture layer does not contain color. So focus on finding a texture you like, and don’t worry if the color or brightness does not seem to match. It can still work!
TIP: Keep in mind that we do not want to remove every ounce of facial structure unless that’s the look you’re going for.
Let’s see how the retouching is coming along. Hit Cmd–0 (Mac) or CTRL–0 (Windows) to see the entire image.
In the Layers panel, toggle the eye
next to the Frequency Separation group.We’ve made some nice progress with both the texture in the High Frequency and the color in the Low Frequency layer! When done, make sure the group is showing.
Retouching the Rest of the Face
We want to use similar techniques to retouch the forehead and the nose.
Let’s even out the color first. Select the Low Frequency Edit layer in the Layers panel.
In the Tools panel, select the Lasso tool
.Select the forehead roughly as shown:

Once again, to smooth out the tones use Gaussian blur by hitting Cmd–Opt–F (Mac) or CTRL–ALT–F (Windows).
NOTE: We liked a Radius of 9 Pixels.
Hit Cmd–D (Mac) or CTRL–D (Windows) to deselect.
Select the area on the left side of her nose roughly as shown:

Once again, hit Cmd–Opt–F (Mac) or CTRL–ALT–F (Windows) to apply a blur. We liked a Radius of 10 Pixels, but feel free to adjust.
Hit Cmd–D (Mac) or CTRL–D (Windows) to deselect.
Hit Cmd–S (Mac) or CTRL–S (Windows) to save your progress.
Using the Mixer Brush Tool to Retouch the Upper Face
Let’s use a different technique to retouch the colors in the upper face. The Mixer Brush is similar to the Smudge tool but it gives you more control of the resulting mixture.
In the Tools panel, select the Mixer Brush tool
 . You’ll probably have to click and hold on the Brush tool
  to find it.
You want to make sure it’s not picking up colors. In the Options bar, deselect Load the brush after each stroke
 so it is not depressed.
Choose the following settings to get a dry brush that does not load much color, giving us a low mixture that doesn’t move too much color when we brush:
Wet: 30% Load: 30% Mix: 30% Flow: 70% Choose a brush size of about 35 Pixels. Press the ] key to increase or [ key to decrease the size.
TIP: Pay attention to the direction of your brush strokes. Pushing from light colors into dark will lighten those areas, whereas pushing from dark color into light will darken those area.
Brush over the following areas to smooth out their color/tone. You may need to brush over them a few times because it’s better to keep the effect subtle at first.
- The side of the nose
- The cheekbones
- The bags/wrinkles under the eyes can use some lightening.
- Same goes for the crow’s feet at the edge of her eyes.
- Remember that you can fade your last stroke by hitting Cmd–Shift–F (Mac) or CTRL–Shift–F (Windows).
- If you overdo too many strokes, you can go into the History panel (Window > History) to undo the work you don’t like.
As you work be sure to check your progress. In the Layers panel toggle the eye
next to the Low Frequency Edit layer to hide and show the cumulative effect.
Finishing up the Face
Let’s clean up some of the facial texture. In the Layers panel, select the High Frequency Edit layer.
In the Tools panel, select the Healing Brush tool
.Use a small brush (around 5 Pixels) to retouch the bags/wrinkles under the eyes and the crow’s feet (remember to Option–click (Mac) or ALT–click (Windows) an area that looks good).
As you work, go into the Layers panel and toggle the eye
next to the High Frequency Edit layer to hide and show it so you can compare the before/after.When you’re satisfied with your progress, hit Cmd–S (Mac) or CTRL–S (Windows).
Retouching the Neck Folds
Let’s smooth out the neck’s folds and wrinkles. We’ll start off by using the same techniques to blur the color of the wrinkle and removing the some of the texture.
In the Layers panel, select Low Frequency Edit so we can edit the tones.
In the Tools panel, select the Lasso tool
.Select the neck wrinkle roughly as shown:

Once again, blur the area. Let’s diminish the wrinkles so they don’t stand out as much. We used a Radius of 20 Pixels because it keeps a naturalistic amount of highlights and shading. Use your best judgment and keep it consistent with your previous edits.
NOTE: Do not worry about the coloring of this area for now. It doesn’t match so will fix that a bit later.
Make sure to hit Cmd–D (Mac) or CTRL–D (Windows) to deselect.
Let’s get rid of at least some of the neck wrinkle textures. In the Layers panel, select the High Frequency Edit layer.
In the Tools panel, select the Healing Brush tool
.Option–click (Mac) or ALT–click (Windows) an area near a wrinkle that looks good.
Brush over the wrinkles with the following in mind:
- Sample different surrounding colors to keep a natural texture.
- You can fade the last stroke by hitting Cmd–Shift–F (Mac) or CTRL–Shift–F (Windows). To keep things looking natural, you probably do not want completely remove all the wrinkles.
Evening Out Skin Tones
The color of the neck wrinkles area does not match the rest of her skin tones. In the Tools panel, select the Lasso tool
.Select the cooler colored neck area without selecting any of the shirt.
In the Layers panel, make sure that the High Frequency Edit is still selected. (We want to create the new layer above this one.)
Go to Layer > New Fill Layer > Solid Color.
In the dialog that opens, select the following options:
Name: neck color Mode: Color NOTE: We choose color, because only want the color to blend through into the luminosity (lightness/darkness) of the underlying layer. Otherwise we’d have a flat looking color that has a single luminosity, rather than the underlying layer’s variable luminosity.
Click OK to close this dialog and bring up another one.
We want to sample some of the skin tones around the wrinkle area, so move the Color Picker dialog if it’s covering that area.
In the Options bar, set Sample Size to 31 × 31 Average so it’s averaged out. A point sample is too small and could pick up a large variety of different colors.
Click around the skin multiple times to sample its tones, concentrating on shadow areas that already look nice (like on face). We don’t want it to be too gray since we want to add warmth.
As long as most of the color looks good, don’t worry if some parts are too intense. Next we’re going to apply a mask to adjust where we see this color.
If you’re curious, we ended up with the color #7b5445 (R:123 G:84 B:69).
When the result looks pretty natural, click OK.
There are probably some places where you’d like to hide (or show) the newly applied color. In the Layers panel, click on the neck color layer’s black and white mask thumbnail.
In the Tools panel, select the Brush tool
. Click and hold on the Mixer Brush to find it.Choose a soft brush and lower the Opacity so you can make subtle adjustments.
To remove (or add) the color:
- Paint with black to hide the color.
- Paint with white to show the color.
- You may want to add some of this warmer color to other parts of the skin such as the dark shadow of her cheekbone near the earing, and the wrinkle in the small strip of skin to the right of her smile.
When you think you’re done, go into the Layers panel and toggle the eye
next to the neck color layer to see the before and after.When you’re satisfied with your progress, save the file by hitting Cmd–S (Mac) or CTRL–S (Windows).