April 1, 2026Dan Rodney/7 min read

More Advanced jQuery Showing/Hiding

Master Advanced jQuery Animation and DOM Traversal Techniques

What You'll Master in This Tutorial

SlideToggle Animation

Learn to create smooth animated transitions with customizable timing controls for revealing hidden content dynamically.

DOM Traversal Methods

Master jQuery's powerful sibling and parent targeting to manipulate specific elements within complex document structures.

Dynamic Image Swapping

Implement conditional logic to swap button images based on current state using jQuery attribute manipulation.

Topics Covered in This JavaScript & jQuery Tutorial:

Master advanced jQuery techniques by adding smooth animations to reveal hidden content, implementing precise DOM traversal to target specific elements, and creating dynamic button states with seamless image swapping functionality.

Exercise Preview

show hide toggle

Exercise Overview

Building on foundational show/hide concepts from previous exercises, this tutorial elevates your jQuery skills with sophisticated content revelation techniques. You'll master the slideToggle() method's timing controls while developing a deeper understanding of DOM traversal strategies—essential skills for creating polished, professional user interfaces.

This exercise demonstrates real-world application patterns commonly found in modern web development, from expandable FAQ sections to progressive content disclosure in mobile-first designs. By the end, you'll have hands-on experience with jQuery's most powerful targeting methods and animation controls.

Building on Previous Knowledge

This exercise extends basic show/hide functionality by adding smooth animations and precise element targeting. You'll work with the slideToggle() method and learn advanced DOM traversal techniques.

Getting Started

  1. Launch your preferred code editor (Visual Studio Code, Sublime Text, or similar).

  2. Close any existing project files to maintain focus on this exercise.

  3. Navigate to the Show-Hide-Advanced folder located in Desktop > Class Files > yourname-JavaScript jQuery Class. For optimal workflow, open this entire folder in your code editor if it supports project-level file management.

  4. Open history-news-jQuery.html from the Show-Hide-Advanced folder.

  5. Preview the page in your browser to understand the current user experience.

    Notice the page structure: each content section contains expandable text areas controlled by toggle buttons. The additional content is initially hidden using CSS through the .moreText class. Our jQuery implementation will transform these static toggles into smooth, animated interactions that enhance user engagement without sacrificing performance.

  6. Keep the browser tab open for iterative testing—you'll be switching between code and preview frequently.

  7. Return to your code editor to begin implementation.

    Modern jQuery development requires proper script loading and organization. We'll link to the jQuery library and establish a dedicated JavaScript file for our custom code, following industry best practices for maintainable, scalable web applications.

  8. Locate line 91 (approximately) and add these script references immediately before the closing </body> tag:

    </div>
    <script src="js/vendor/jquery-2.1.0.min.js"></script>
    <script src="js/main.js"></script>
    </body>
  9. Save the file using Ctrl+S (Windows) or Cmd+S (Mac).

  10. Navigate into the js folder and open main.js.

  11. Establish jQuery's document ready wrapper—this ensures our code executes only after the DOM is fully constructed:

    $(document).ready(function() {
    
    });

Project Setup Process

1

Open Project Files

Navigate to the Show-Hide-Advanced folder and open history-news-jQuery.html in both your code editor and browser for preview.

2

Link jQuery Library

Add script tags for jquery-2.1.0.min.js and main.js before the closing body tag around line 91.

3

Initialize jQuery

Create the document ready function in main.js to ensure jQuery code executes after the DOM is fully loaded.

Adding an Animation to Reveal Hidden Content

With our foundation established, we'll implement the core animation functionality. jQuery's slideToggle() method provides smooth, hardware-accelerated animations that work consistently across browsers—a significant advantage over custom CSS transitions in legacy environments.

  1. We need to capture click events on the More buttons, which share the changeTextButton class. Add this event handler within your document ready function:

    $(document).ready(function() {
       $('.changeTextButton').click(function() {
    
       });
    });

    This establishes an event listener that responds to clicks on any element with the changeTextButton class. The anonymous function() parameter defines the callback that executes when the event fires—a fundamental pattern in event-driven JavaScript programming.

  2. Now implement the animation logic by targeting the hidden content areas. Add this slideToggle call inside the click handler:

    $('.changeTextButton').click(function() {
       $('.moreText').slideToggle(500);
    });

    The slideToggle() method intelligently shows hidden elements and hides visible ones with a sliding animation. The 500 parameter specifies duration in milliseconds—experiment with values between 200-800ms to find the timing that best suits your interface design goals.

  3. Save the file and return to your browser to test the initial implementation.

  4. Click any More button to observe the behavior. You'll notice all content areas expand simultaneously—this demonstrates jQuery's powerful selector matching, though it's not our intended behavior yet.

Animation Timing Control

The slideToggle(500) method creates a smooth animation lasting 500 milliseconds (half a second). You can adjust this value to make animations faster or slower based on your design needs.

Initial Implementation Results

Buttons Affected
100
Desired Targeting
33

Targeting the Proper Div: Traversing the Document

The current implementation affects all content areas because we're selecting all .moreText elements globally. Professional jQuery development requires precise element targeting, which we'll achieve through DOM traversal—navigating the document structure to find specific related elements.

  1. Return to main.js in your code editor.

  2. Replace the global selector with the this keyword to reference the specific clicked element:

    $('.changeTextButton').click(function() {
       $(this).slideToggle(500);
    });

    In jQuery event handlers, this refers to the DOM element that triggered the event. This provides the foundation for relative element targeting—a critical skill for building scalable, maintainable interfaces.

  3. Save and test this change in your browser.

  4. Click a More button—you'll see the button itself slides away, demonstrating successful element targeting.

  5. Return to your code editor to implement proper traversal logic.

  6. Understanding DOM relationships is crucial for effective jQuery development. Consider this structural hierarchy:

    parent containers and siblings example

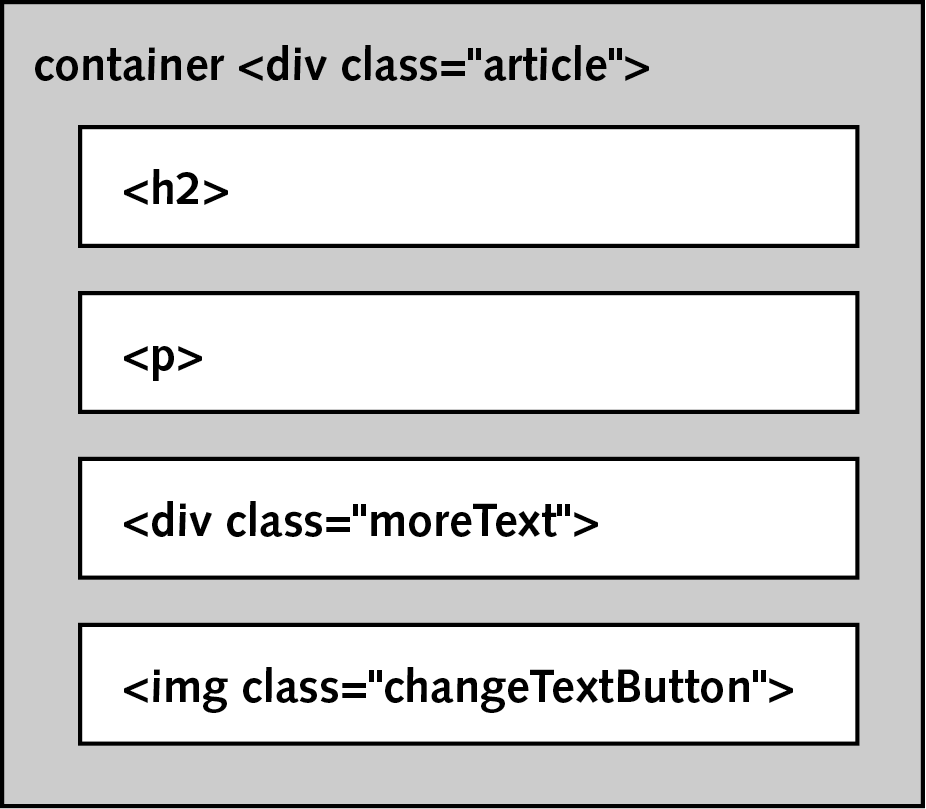
    The .moreText div and .changeTextButton img exist as sibling elements within the same parent container. jQuery's traversal methods leverage these relationships to navigate between related elements efficiently, eliminating the need for complex selector queries.

  7. Implement sibling targeting using jQuery's .siblings() method:

    $('.changeTextButton').click(function() {
       $(this).siblings().slideToggle(500);
    });

    The siblings() method returns all elements that share the same parent container as the clicked button. This approach scales well in complex layouts where multiple content sections exist independently.

  8. Save the file and test the updated functionality.

  9. Switch to your browser and reload history-news-jQuery.html.

  10. Click a More button—the hidden content appears, but other elements in the container disappear. This demonstrates successful sibling targeting, though we need further refinement.

  11. Return to your code editor for the final targeting adjustment.

  12. Narrow the selection to target only the specific content div by filtering siblings with a class selector:

    $('.changeTextButton').click(function() {
       $(this).siblings('.moreText').slideToggle(500);
    });

    By passing .moreText as a parameter to siblings(), we filter the results to include only sibling elements with that class. This precision targeting is essential for complex layouts with multiple interactive elements.

  13. Save your changes and test the complete functionality.

  14. Return to the browser and reload the page for testing.

  15. Click any More button—you now have perfectly targeted, smooth content expansion that works independently for each section. This represents professional-grade interactive functionality achieved with minimal code.

jQuery Targeting Approaches

FeatureGlobal SelectionSpecific Targeting
Code Example$('.moreText')$(this).siblings('.moreText')
Elements AffectedAll matching elementsRelated elements only
User ExperienceConfusing behaviorIntuitive interaction
Recommended: Always use specific targeting with 'this' and traversal methods for better user experience

DOM Relationship Concepts

Parent Container

The wrapping element that contains multiple child elements. In this case, the article div that holds both the button and hidden content.

Siblings

Elements that share the same parent container. The More button and moreText div are siblings within the same article container.

Swapping the Button Image with jQuery

Professional user interfaces provide clear visual feedback about interactive element states. Currently, our buttons maintain the same "More" label even when they're configured to hide content—a usability oversight we'll address with dynamic image swapping.

  1. Return to your code editor to implement state-aware button functionality.

  2. Add conditional logic below the slideToggle animation to detect the current button state:

    $(this).siblings('.moreText').slideToggle(500);
       if ( $(this).attr('src') == 'img/more-button.png' ) {
    
       }
    });

    The .attr() method retrieves HTML attributes from elements. Here we're examining the image's src attribute to determine its current state, enabling intelligent button behavior based on context.

  3. Implement the state change logic within the conditional block:

    if ( $(this).attr('src') == 'img/more-button.png' ) {
       $(this).attr('src', 'img/less-button.png');
    }

    When the button shows "More," clicking it should reveal content and change to "Less"—this creates intuitive user feedback about the button's next action.

  4. Save and test the partial implementation.

  5. Switch to the browser and reload history-news-jQuery.html.

  6. Test a button—it should change to "Less" after revealing content, but won't revert when clicked again. This demonstrates the need for bidirectional state management.

  7. Return to your code editor to complete the state toggle logic.

  8. Add an else condition to handle the reverse state change:

    if ( $(this).attr('src') == 'img/more-button.png' ) {
          $(this).attr('src', 'img/less-button.png');
       }
       else {
    
       }
    });

    The else clause executes when the initial condition fails, providing the complementary logic needed for complete state management. This pattern is fundamental in creating responsive, stateful user interfaces.

  9. Complete the bidirectional toggle by implementing the reverse state change:

    if ( $(this).attr('src') == 'img/more-button.png' ) {
       $(this).attr('src', 'img/less-button.png');
    }   
    else {
       $(this).attr('src', 'img/more-button.png');
    }

    This creates a complete toggle cycle: "More" buttons become "Less" buttons when clicked, and vice versa, providing users with clear visual indicators of both current state and next available action.

  10. Save your completed implementation.

  11. Return to the browser for final testing and reload history-news-jQuery.html.

  12. Thoroughly test all buttons to ensure proper functionality across multiple content sections.

    For reference implementation and troubleshooting, consult the completed files at Desktop > Class Files > yourname-JavaScript jQuery Class > Done-Files > Show-Hide-Advanced. This fully functional example demonstrates professional-grade jQuery implementation suitable for production environments.

Image Swapping Logic

1

Check Current State

Use $(this).attr('src') to examine the current image source and determine whether it shows 'More' or 'Less'.

2

Conditional Swapping

Implement if/else logic to swap between more-button.png and less-button.png based on current state.

3

Update Attribute

Use $(this).attr('src', 'newimage.png') to dynamically change the image source for immediate visual feedback.

Complete Functionality Achieved

With the if/else conditional logic in place, buttons now properly toggle between 'More' and 'Less' states, providing clear visual feedback that matches the content visibility.

Key Takeaways

1jQuery's slideToggle() method provides smooth animation effects with customizable timing measured in milliseconds
2The 'this' keyword in jQuery event handlers refers to the specific element that triggered the event, enabling precise targeting
3DOM traversal methods like siblings() allow you to navigate document structure to find related elements efficiently
4Combining traversal methods with class selectors like siblings('.moreText') provides granular control over element selection
5Attribute manipulation using attr() method enables dynamic content changes such as swapping images based on application state
6Conditional if/else statements in jQuery allow for sophisticated state-based interactions and visual feedback
7Proper element targeting prevents unintended side effects where actions affect multiple elements simultaneously
8jQuery significantly reduces code complexity compared to vanilla JavaScript for common animations and DOM manipulation tasks

RELATED ARTICLES