Getting Started: Working with Text
What This Tutorial Covers
Text Frames
Containers for type with their own dimensions.
Character & Paragraph
Two panels for type-level styling.
Threaded Frames
Flow text across multiple frames and pages.
Noble Desktop's Graphic Design Certificate covers InDesign alongside Photoshop and Illustrator.
Delve into the basics of InDesign with this tutorial, covering topics like setting preferences, the Control panel, text frames, basic text attributes, and keyboard shortcuts through hands-on exercises, including creating a simple letter.
Exercise Preview

Creating the Letter
- From the File menu, select New then Document.
- Set the following:
- At the top of the dialog that opens, click on the Print tab.
- Click once on the Letter (8.5 X 11 in) preset.
- On the right, uncheck Facing Pages.
- Expand the Margins section if needed.
- Under Margins, make sure the link button
 is checked on, enter 1 in for any side, then press Tab to apply it to all sides.
- Click Create.
- InDesign starts with a minimal default workspace that does not show some useful panels. It includes a better workspace though, so go to Window > Workspace > [Advanced].
- Workspaces remember how they were last set up. To reset any possible changes to your workspace, go to Window > Workspace > Reset Advanced.
Choose the Type tool
 .
.The pointer arrow (shown below) is the point you aim with for positioning the text frame you’ll create. The arrow it is normally black as shown below, but turns white when you hover directly over or near a margin or the edge of a page.

- On the page, drag to create a text frame using the margin guides to make the text frame fills the whole area inside the guides.
- A cursor should now be blinking in the text frame. If not, click back into it.
- From the File menu, select Place.
- Navigate to the Desktop, then go into the Class Files folder, then into the InDesign Class folder. Double–click the text file named Letter Text.txt.
- From the View menu, select Zoom In.
Scroll so you can see the top right-hand corner of the page.
TIP: An alternative to using scrollbars is to use the Hand tool
 . To use the Hand tool via a keystroke, hold Option–Spacebar (Mac) or ALT–Spacebar (Windows). Just be sure to hold Option/ALT first, before pressing Spacebar.
- Choose the Rectangle Frame tool
 .
. - Create a small frame in the upper right-hand corner of the page (about 3 in wide X 2 in high).
- With the frame still selected, go into the File menu and select Place.
- Double–click Letter Address.txt.
- With the frame still selected, choose the Selection tool
 .
. - Hold Shift and click on the large main text frame. Now both text frames should be selected.
- Select the Type tool .
The Control panel that is docked to the top of the screen should be showing the type options shown below.
NOTE: If this panel isn’t open, you can open it by choosing Window > Control.
It has 2 sets of options: Character
 and Paragraph
  Formatting Controls. The 2 buttons on the left switch between them. On smaller screens InDesign only displays one section, but on wider screens, InDesign will display some of the other section’s options in whatever space it has to the right.
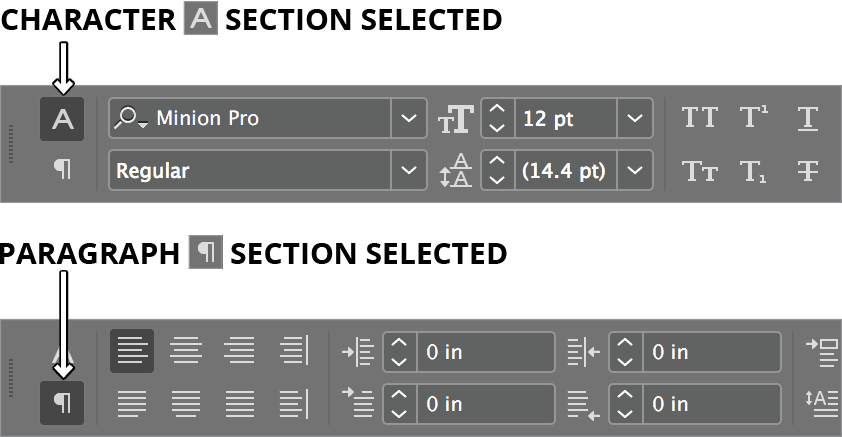
As shown below, in the Control panel, set the following:
Font: Myriad Pro Regular (or Myriad Variable Concept Regular) Font Size  :
:14 pt 
Navigating the Document: Zooming & Scrolling
Let’s get a better feel for moving around within InDesign. We want to see the text larger on-screen. Select the Zoom tool
 .
.Click a few times on the text. With each click it will appear larger.
To zoom out, hold Option (Mac) or ALT (Windows) and click a few times.
Let go of the keys. Let’s zoom in a different way by dragging. On the page, drag to the right to zoom in, and drag to the left to zoom out.
Select the Type tool
.Click on one of the text boxes as though you are ready to edit the text.
To scroll around, hold Option–Spacebar (Mac) or ALT–Spacebar (Windows) and drag anywhere on the document (be sure to hold Option/ALT first; see sidebar for details).
When done, let go of the mouse and the keys.
Scrolling Best Practices
You may notice that sometimes you can scroll by using just Spacebar or Option/ALT. Since it depends on which tool you’re using, we teach you to always use Option/ALT, then Spacebar so that you don’t make unexpected duplicates of objects, or add unwanted space characters to your text.
To zoom back out and see the entire page, go to View > Fit Page in Window (or press Command–0(zero) (Mac) or Control–0(zero) (Windows)).
Instead of using the Zoom tool
, we can use keystrokes:Mac: Command–Plus(+) to zoom in and Command–Minus(-) to zoom out Windows: Control–Plus(+) to zoom in and Control–Minus(-) to zoom out From the File menu, select Save As.
Name it yourname-letter.indd and before clicking Save:
Mac: If you are already in the InDesign Class folder, just click Save. If not, navigate to Desktop > Class Files > InDesign Class and click Save. Windows: If the top bar with a file path already says InDesign Class, just click Save. If not, from that menu choose Desktop. Then go into Class Files > InDesign Class and click Save. NOTE: The document will be saved as yourname-Letter.indd because it is an InD esign D ocument.
Creating Text Frames (Which Tool to Use)
You may wonder why we used the Rectangle Frame tool instead of the Type tool to create the address’ text frame. It’s because we already had a text frame under the place where we wanted to create a new text frame. If we had clicked there with the Type tool we’d have started editing the text in the frame that was already there. By making a Rectangular frame first, we don’t have to worry about accidentally editing the text underneath.
TIP: How can you tell if you can use the Type tool to create a new text frame? If you see your cursor with a box around it  it means you can create a new text frame. If it’s just the I-beam
  it means you would be editing the text in the frame underneath the cursor. In which case you will need to use the Rectangle Frame tool to create a new text frame.