Illustrating a Shirt Design
What This Tutorial Covers
Vector Artwork
Build artwork that scales for any print size.
Color Separations
Spot colors prepped for screen printing.
Mockup Presentation
Show the design on a realistic shirt template.
Noble Desktop's Graphic Design Certificate covers Illustrator alongside Photoshop and InDesign.
Dive into this detailed Illustrator tutorial that covers the use of Photoshop and Illustrator together, creating and editing clipping masks, and working with compound paths.
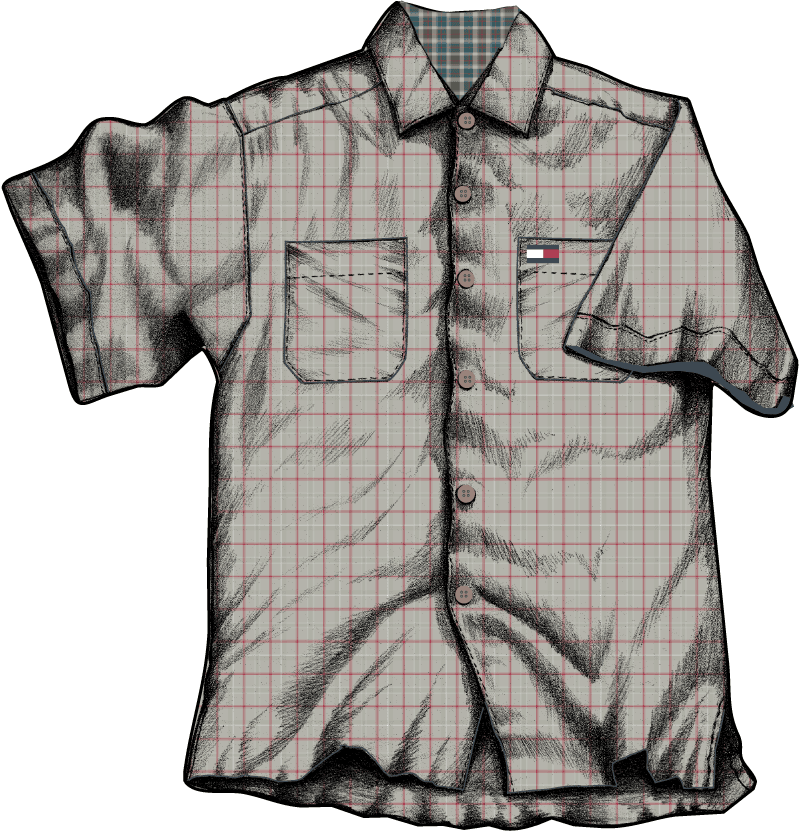
Exercise Preview
Importing the Plaid Pattern & Shirt Drawing
- Go to File > New to create a new document.
- At the top of the dialog that opens, click on the Print tab.
- Double–click the Letter preset.
- Go to File > Place.
From the Illustrator Class folder, select plaidpattern.psd BUT make sure the Link option is checked before clicking Place (Mac users may need to click the Options button).
Click once on the artboard to place the file at its actual size. (Do NOT click and drag, which will resize the file you’re placing.)
NOTE: This pattern was created in Photoshop but if you had made a pattern here in Illustrator and filled a rectangle with it, the rest of these instructions would still work.
Drag it so that it’s centered on the artboard.
Open the Layers panel (Window > Layers).
Double–click on the name Layer 1 and rename it Shirt.
Hit Return (Mac) or Enter (Windows) to apply.
While we are looking at the Layers panel, go into its panel menu
 and make sure Paste Remembers Layers is NOT checked. If it is checked, select it to uncheck it.
Do another File > Place.
From the Illustrator Class folder, select tankshirt.psd BUT make sure the Link option is checked before clicking Place (Mac users may need to click the Options button).
Click once on the artboard to place the file at its actual size. (Do NOT click and drag, which will resize the file you’re placing.)
NOTE: The reason this graphic comes in with no white background is because it was scanned as a bitmap (which means black and white only, no grays).
POWERUSER TIP: If you ever need to import a grayscale image that has a white background, use the Transparency panel’s Multiply blend mode to make the white disappear. (This is easily accessible from the Properties panel by clicking on the word Opacity.)
Drag the shirt so that it fits completely on the plaid pattern.
Select File > Save As. Name it yourname-plaidshirt.ai.
In the dialog that appears, Include Linked Files should NOT be checked.
Using Photoshop to Trace the Shirt
Go to your Desktop. Do NOT go to File > Open or Place. Leave Illustrator and go to your Desktop!
Go into the Class Files folder and open the Illustrator Class folder.
Double–click the tankshirtgrayscale.psd file.
The file should open in Photoshop.
Select the Magic Wand tool
 . (If you don’t see it, click and hold on the Quick Selection tool
  to get it.)
- In the Options bar at the top of the screen, make sure the following are set:
- New selection
 is pressed.
 - Tolerance: 32
- Anti-alias and Contiguous are both checked.
- New selection
Click on the white area outside the shirt. It should select the whole white area.
Do a Select > Inverse.
Open the Paths panel (Window > Paths).
Click on the Paths panel menu
located at the top right of the panel, and from the menu, select Make Work Path.Make the Tolerance 5 pixels and click OK.
Choose the Path Selection tool
 .
.Click anywhere except the shirt to deselect the work path.
Click on the edge of the shirt to select the path that was drawn around the shirt (click on the path in the image window, NOT the Paths panel).
Do an Edit > Copy.
Switch back to Illustrator.
Do an Edit > Paste.
In the Paste Options that appear, choose Compound Shape (fully editable) and click OK.
Move the outline so it matches the shirt. Use the mouse and the Arrow keys to perfect it. Make sure the plaid pattern is completely covered by the shirt.
Masking the Pattern
Before masking out the excess plaid pattern, let’s take a look at our objects in the Layers panel. Click the Arrow
 to the left of the Shirt layer.
You should see these objects:
<Compound Path>, tankshirt, and plaidpattern.Let’s rename the
<Compound Path>so it will be more meaningful to us later on. Double–click it and name it Shirt Mask.You are now going to mask the remaining objects. The outline you pasted is on top, which is the most important concept of masking. Do a Select > All.
Go into Object > Clipping Mask > Make.
You will see the shirt take shape. Illustrator has also grouped the objects in our mask, as you can see in the Layers panel.
The shirt would look better though with a nice black outline around it. To do this, first deselect everything (Select > Deselect).
In the Layers panel, click the Arrow
to the left of <Clip Group>to reveal its sublayers.As shown below, select the Shirt Mask using the Layers panel. To do this, just click in the area to the right of the target circle.

Switch to the Properties panel and make the stroke 3 pt and black. Looking good!
Adding Extra Graphic Elements to Enhance the Shirt
In the Illustrator Class folder, open shirtelements.ai.
Switch to the Layers panel and notice that there are three layers: neck masking object, button and logo, and shirt seams.
Select everything by doing a Select > All or hit Cmd–A (Mac) or CTRL–A (Windows).
Copy the elements (Cmd–C (Mac) or CTRL–C (Windows)).
Close the file and don’t save changes. You should be back in yourname-plaidshirt.ai.
Go into the Layers panel menu
and turn Paste Remembers Layers on.Hit Cmd–V (Mac) or CTRL–V (Windows). The new objects come in on their own layers.
Move the elements until the seams line up (don’t forget that you can use your Arrow keys for fine movements or Shift–Arrow keys for larger increments).
Deselect everything.
Zoom in so you can place the button properly.
Move the new button over one of the buttons in the scan.
Option–drag (Mac) or ALT–drag (Windows) the new button to make copies and place them over all the other buttons in the scan.
In the Layers panel, click on the neck masking object layer.
Select File > Place.
Select neckie.psd BUT check on the Link option before you click Place (Mac users may need to click the Options button).
Click once in the center of the artboard to place the file at its actual size. (Do NOT click and drag, which will resize the file you’re placing.)
Move the placed image so it covers the center of the collar.
With the pattern still selected, do an Object > Arrange > Send to Back. (Note that Send to Back only sends to the back of the layer, not to the back of the whole drawing.) Now you should see the triangle that will mask the pattern.
Select both the triangle and the pattern.
Go to Object > Clipping Mask > Make.
As you can see, our neck masking object is not quite the right shape. If you feel ambitious, use your path editing skills to fix the shape so the top of the collar is visible.
Go to View > Fit Artboard in Window or Fit All in Window.
Deselect all and admire your work!