Vacation Stripes: Working with Masks from Illustrator
What This Tutorial Covers
Vector Mask Import
Bring Illustrator paths in as After Effects masks.
Path Editing
Refine imported paths for animation.
Mask Animation
Animate path shape and position over time.
Noble Desktop's Video Editing & Motion Graphics Certificate teaches After Effects alongside Premiere Pro, Cinema 4D, and DaVinci Resolve.
Dive deep into the intricate process of using Adobe Illustrator to create masks in After Effects, animate photo stripes sequentially, and gain fine-tuned control over your video's visible and hidden parts in this comprehensive tutorial.
Exercise Preview
Setting up the Black & White Freeze Frame
Switch to After Effects, where yourname-Island Vacation.aep is open.
In the Timeline, make sure you are in the Vacation-MAIN tab. If you aren’t, look at the top left of the Timeline. If you see the Vacation-MAIN tab, click on its name to go into this comp. If you don’t see this tab, go to the Project panel on the top left and double–click on the Vacation-MAIN comp to open it in a new Timeline tab.

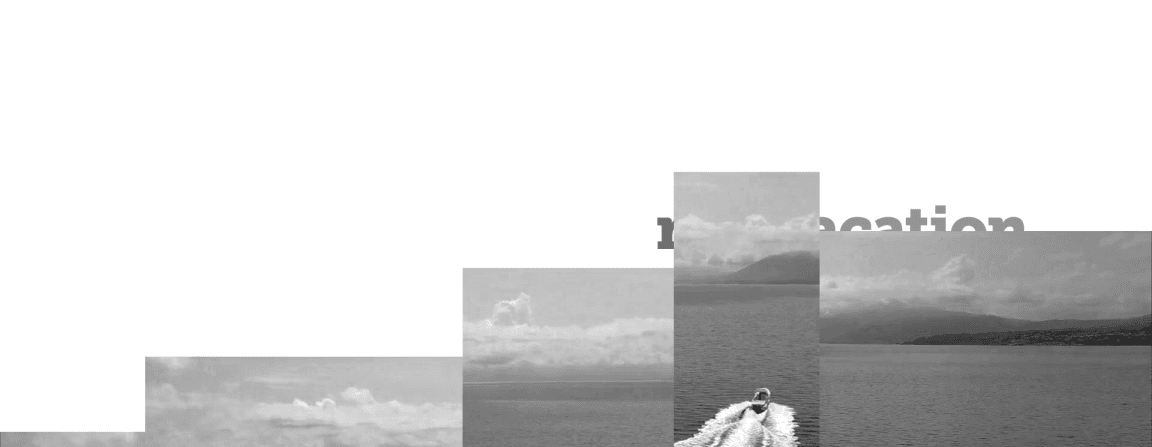
The black and white freeze frame you just saw in the video is a still image of the moving motorboat clip’s first frame. Go to the Project panel on the top left and use the arrows
 to expand into the Assets > Stills folder if it isn’t already.
Drag motorboat-BW.jpg from the Stills to the Timeline, dropping it below the audio layer and above the [01-title-PC] pre-comp layer.
We want to keep track of where each layer starts, so let’s make sure our In column is showing. Go to the right-hand side of the Timeline. If you don’t see the In column to the left of the colored layer bars:
- Toward the left of the Timeline, CTRL–click (Mac) or Right–click (Windows) on the Layer Name or Source Name column.
- Go to the Columns menu and check on In.
In the [motorboat-BW.jpg] layer, go to the In column and click on the value.
In the Layer In Time dialog that pops up, type 225 and click OK. We want the motorboat photo “slices” to arrive on the musical phrase immediately after this.
Press the I key to move to the layer’s in point at 2;25.
In the Timeline, click on the colored square to the left of [motorboat-BW.jpg]’s layer number and from the Label Color menu that appears, choose Yellow.
Notice the selection handles in the Composition panel and the layer bar color in the Timeline change to Yellow. This will make it easier to see as we animate.
Using Illustrator to Create Masks in After Effects
We use vector shapes to mask in After Effects. We drew the masks in Adobe Illustrator because it’s specially designed for drawing vector graphics. After Effects works well in tandem with other Adobe products, so let’s copy the masks from Illustrator, then paste and arrange them in After Effects.
Keep After Effects open and switch to the Desktop.
Navigate into After Effects Level 2 Class > Vacation Stripes > Assets > Vectors and double–click motorboat-masks.ai to open it in Adobe Illustrator.
Once the file opens in Illustrator, look in the docked panels at the right of the screen. Make sure you are in the Layers panel. If you aren’t, click on the tab name or go to Window > Layers.
Notice that this file has one layer with several
<Path>sublayers and an<Image>sublayer below them all. It’s locked because it’s only here for your reference.
Next to the topmost
<Path>, click on the circle on the right to select and show the path outline. When it’s selected, it will have a blue square next to it as shown below: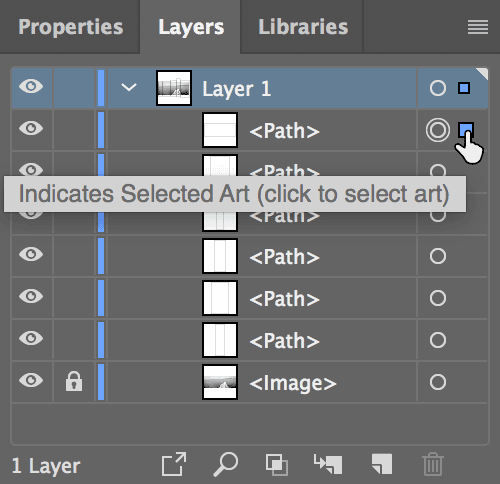
Notice that this path (a group of points that make up a shape) is masking the exact dimensions of the artboard. When we paste the paths into After Effects, we’ll use this path as a “reference mask” to align our other masks to the comp’s edges.
When copying and pasting between Adobe applications, we use the Clipboard, so we need to make sure the Clipboard preferences are set correctly. Go to Illustrator CC (Mac) or Edit (Windows) > Preferences > File Handling & Clipboard.
In the Clipboard section at the bottom next to On Quit:
- Check on AICB (no transparency support) if it isn’t already.
- Make sure Preserve Paths is selected.
Click OK.
Go to Select > All, or press Cmd–A (Mac) or CTRL–A (Windows).
Go to Edit > Copy, or press Cmd–C (Mac) or CTRL–C (Windows).
Without quitting out of Illustrator, return to After Effects.
With the [motorboat-BW.jpg] layer still selected, go to Edit > Paste.
If you can’t see the mask outlines, go to the bottom of the Composition panel and click the Toggle Mask and Shape Path Visibility button
 so it becomes blue.
Press the M key to see the paths from Illustrator have been added as Masks 1–6.
If you zoom in using the period (
.) key and temporarily disable Toggle Mask and Shape Path Visibility (so it becomes gray), you’ll see a few black and white vertical stripes. The masks are currently blocking out all but these areas of the [motorboat-BW.jpg] layer, showing almost all of the layer below it (the title card).To get the masks to show the JPG layer, we need to change the mask mode. With all the masks still selected, go into the menu to the right of any of the masks and change Difference to Add, as shown below:
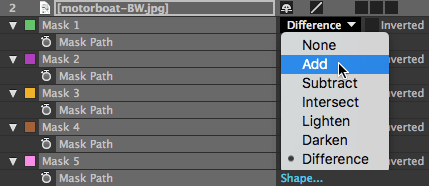
NOTE: Both masking modes add the masks together, but the Add mode shows the layer that has the mask, and Difference adds masks unless they overlap, in which case, the lower mask is subtracted from the ones above it. For more on mask modes and to see a helpful illustration, go to Adobe’s help article at tinyurl.com/ae-mask-modes
Now we need to align our masks. Unfortunately, the Align panel only works for layers. We need to see the mask outlines so we can position by eye. If you haven’t already, go back to the bottom of the Composition panel and make sure the Toggle Mask and Shape Path Visibility button
is blue.In the Composition panel, use the Arrow keys to align the “reference mask” to the edges of the comp’s frame. Feel free to zoom in (using the period (
.) key) or out (using the comma (,) key) if needed. When done, your masks should look as shown: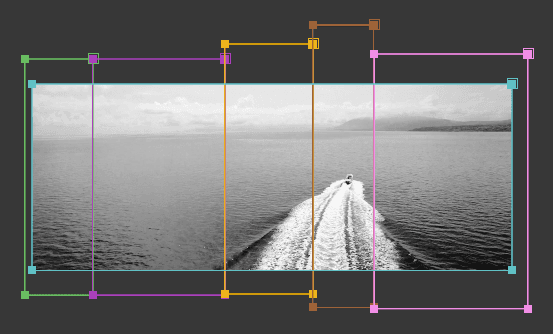
Click into any empty area of the Timeline to deselect everything, or go to Edit Menu > Deselect All.
Now that our inside masks are in the correct place, we no longer need the “reference mask”. In the [motorboat-BW.jpg] layer, select Mask 6 and press the Delete key.
To get the animation we want, we want each mask to be on a different layer. Let’s make five boat layers and then delete the excess masks.
If we rename the layer to end with the number 1, After Effects will automatically name the duplicates starting with number 2. Select the [motorboat-BW.jpg] layer and press Return (Mac) or Enter (Windows) to start renaming.
Type boat1 and press Return (Mac) or Enter (Windows) to commit the name.
Go to Edit > Duplicate or use the shortcut Cmd–D (Mac) or CTRL–D (Windows).
Notice you get a boat2 layer. Neat!
Do an Edit > Duplicate (or use the shortcut) three more times until you have five boat layers ending with boat5.
We want each layer to only have one mask on it. Each boat# layer should have the same Mask # associated with it. Select the boat1 layer. If the masks aren’t still showing, press the M key.
To delete everything except Mask 1:
- Click on Mask 2 and Shift–click on Mask 5.
- Press the Delete key on your keyboard.
Select the boat2 layer and press M to see its masks.
To delete everything except Mask 2 (which also corresponds with its layer name):
- Click on Mask 1 and Shift–click on Mask 5.
- Hold Command (Mac) or Control (Windows) and click on Mask 2 to remove it from the selection.
- Press the Delete key on your keyboard.
Continue to delete all the masks on each layer except for the one associated with it. (For instance, boat3 should only have Mask 3, etc.)
Remember that to make things easier, you can Shift–click to select all the masks, then Cmd–click (Mac) or CTRL–click (Windows) on the mask you want to keep. Then delete everything still selected.
Resizing Masks
If we look at the mask outlines in the Composition panel, it looks like there’s a bit of a gap between the rightmost mask and the mask to its left. Let’s fix that.
In the Timeline, select the boat5 layer if it isn’t already.
Click on the word Mask 5 to show the mask outline in the Composition panel.
In the Tools panel at the top, make sure the Selection tool
 is highlighted.
Double–click on any one of the rectangle’s corners so the mask outline turns gray and squares for resizing appear. This will allow us to transform the mask.
Hover over the left edge resize square until you see resize handles
 . Click and drag towards the left a couple of pixels so that it overlaps with the mask beside it.
TIP: To check your work, feel free to zoom in to at least 400% using the period (
.) key and temporarily switch off Toggle Mask and Shape Path Visibility. Turn it back on when done.Go to the bottom left of the Composition panel and from the Magnification ratio popup menu with a zoom percentage, choose Fit.
Animating the Five Stripes to Arrive Sequentially
We’ll animate each of the image stripes to come on-screen with slightly different timing. The boat is the focal point of the image, so let’s make its mask (Mask 4) arrive first.
In the Timeline, select the boat4 layer and press the P key.
The Mask Path Property
Each mask has a Mask Path property that can be animated. It’s useful to animate it whenever you want a mask to expand, contract, or do some other movement. So why are we animating the layer’s Position property instead?
We’re doing so because we are assembling the image from slices made using masks. We are physically moving the masked artwork. If we were animating the masks, the artwork would remain static and the mask shape would reveal the artwork slice by slice, like rows of wallpaper being rolled on (versus panels of artwork sliding on).
In addition, layers have an anchor point
 from which positions are calculated, allowing you to enter exact coordinates if you want. Masks, however, do not. To move a mask, you would need to position by eye.
When keyframing the Mask Path property, you’re telling After Effects what you want the mask’s shape to look like at a given point in time. Because there’s no coordinates for that, there are no dimensions that you can separate. So you cannot use the Value Graph to customize a Mask Path ease! That’s why when we animate this property in a later exercise, we won’t use the Graph Editor.
While we’ll be using the Keyframe Velocity dialog to speed up our workflow, let’s make sure we can also check our work in the Value Graph. CTRL–click (Mac) or Right–click (Windows) on the word Position and select Separate Dimensions.
Click in an empty area of the Timeline to deselect both the separated properties.
Move the playhead to 3;25, when we want this layer to fully cover up the title card.
Next to Y Position (which should currently be 373), click the stopwatch
 to add a keyframe.
We want each slide animation to last for 1 second, so press the I key to go back to the layer’s in point at 2;25.
Change Y Position to 1129, placing the stripe fully off-screen at the bottom.
On the right-hand side of the Timeline, select both keyframes by drawing a selection box
 around them.
Go to Animation > Keyframe Assistant > Easy Ease or use the shortcut F9.
Click in an empty area of the Timeline to deselect the two keyframes.
CTRL–click (Mac) or Right–click (Windows) on the first keyframe
 and choose Keyframe Velocity.
Under Outgoing Velocity, change the Influence to 20% and click OK.
CTRL–click (Mac) or Right–click (Windows) on the second keyframe
 and choose Keyframe Velocity.
Under Incoming Velocity, change the Influence to 90% and click OK.
NOTE: Because our first keyframe has a small amount of influence on the animation, the stripe will have a tiny slowdown at the beginning of the sequence. The second keyframe slows it down much more radically, so the sequence will start pretty fast, then slow to a crawl as the stripe gets closer to the top of the comp frame. To see what the curve looks like in the Value Graph, at the top of the Timeline you can click the Graph Editor icon
 , and then the Fit all graphs to view icon
  at the bottom of the Graph Editor.
Because the Position property has coordinates associated with it, we can copy these keyframes to the other boat layers (which isn’t the case with the Mask Path property). After Effects will even separate the dimensions for us automatically! Under boat4, click on the word Y Position to select both the keyframes.
Do an Edit > Copy or press Cmd–C (Mac) or CTRL–C (Windows).
Move the playhead to 2;27.
Select boat5 and paste the keyframes by going to Edit > Paste or pressing Cmd–V (Mac) or CTRL–V (Windows).
Press U to view the keyframes.
To finish up our animation sequence, go to the timecodes indicated and paste the keyframes onto the following layers. Be sure to press U after pasting, to check your keyframe placement.
2;28: boat3 3;00: boat2 3;02: boat1 Hit Spacebar to play back and see our completed sequence. Nice!