Rotating Wedge: Null Objects & Hold Keyframes
What This Tutorial Covers
Null Objects
Invisible parents that drive other layers' transforms.
Hold Keyframes
Step changes — values stay until the next keyframe.
Layer Hierarchy
Build complex animation rigs using parent-child relationships.
Noble Desktop's Video Editing & Motion Graphics Certificate teaches After Effects alongside Premiere Pro, Cinema 4D, and DaVinci Resolve.
Master creating a photo slideshow with a graphic wedge that wipes on text as it moves through this in-depth After Effects tutorial.
Exercise Preview

Getting Started
Switch to After Effects.
Go to File > New > New Project.
Let’s create a dummy composition to get the settings we want. Go to Composition > New Composition.
Set the following (we aren’t naming it because we’re about to delete it):
Preset: HDTV 1080 29.97 Resolution: Full (so our layers appear as sharp as possible on-screen) Click OK to create the dummy composition.
At the top left of the Timeline, the current time display will be showing either Frames (0,000) or Timecode (0;00;00;00).
We want it to see Timecode (0;00;00;00), so if it’s displaying Frames (0,000), hold Cmd (Mac) or CTRL (Windows) and click it to toggle it to Timecode (0;00;00;00).
We only created it to get the duration we want, so go to the Project panel, click on the new composition, and press the Delete key.
The Standard Television HD Preset & Semi-Colon Timecodes
The preset (the TV standard for North America) not only sets the comp’s width and height. It also sets the Frame Rate to 29.97 with Drop Frame enabled, which change the timecode so it uses semi-colons instead of colons. Drop frame and the way it counts frames only affects durations longer than 1 minute, as the timecode will “jump” 2 frame counts every minute, except the 10th minute. For more info, please see tinyurl.com/drop-frame-timecode
Go to File > Import > File.
Navigate into Desktop > Class Files > After Effects Class > Rotating Wedge, and click once on the Assets folder. Do not double–click on it!
Click Open (Mac) or Import Folder (Windows).
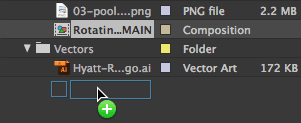
In the Project panel, expand the Assets folder and the Photos and Vectors subfolders.
We should have 3 photos and a flattened Illustrator file (we don’t need its layers). If Hyatt-Regency-logo.ai came in as a Composition and folder, delete both and “File > Import” only that file, as “Footage” with “Merged Layers”.
Let’s create our composition. Select everything inside the Photos folder by clicking on 1-spa-lady.png and Shift–clicking on 3-pool-lady.png.
Still in the Project panel, CTRL–click (Mac) or Right–click (Windows) on any selected photo and choose New Comp from Selection.
In the dialog that appears, choose the following options:
- Under Create, make sure Single Composition is selected.
- In the Use Dimensions From menu, keep 1-spa-lady.png selected. Each photo is 1920 X 1080, (HD video size), so it’s easiest to stick with what it chose.
- Set Still Duration to 0;00;04;00 so each still photo will be on-screen for 4 seconds.
- Check on Sequence Layers.
- Check on Overlap.
- Set Duration to 0;00;00;15 so the layers overlap by 15 frames (not 15 seconds!).
- Set Transition to Dissolve Front Layer.
Click OK and After Effects will automatically create a slideshow!
Cross-Dissolves in After Effects
Typically a cross-dissolve involves one layer fading out while another layer fades in. After Effects doesn’t quite work like that with full-frame images. To create a cross-dissolve we instead have one layer fade up or down in opacity on top of another layer, while the bottom layer stays static.
In the Timeline, slide through with the playhead to see that it created a slideshow with 15 frames of overlap between layers. During that overlap, we get nifty cross-dissolves during which the previous layer fades away to reveal the next layer in the sequence. Your layers should look like a set of stairs going down with slight overlaps.
While all the layers are still selected, press the U key to show all keyframes.
Notice that everything except the last layer already has Opacity keyframes! These were added automatically when we set Transition to Dissolve Front Layer.
This shows that when you tell After Effects to automatically create a cross-fade, only the layer that’s fading away has keyframes. As it fades away, you see more of the next photo, which stays static throughout the transition.
The composition is named 1-spa-lady because that’s where After Effects took the dimensions from. To change it, go to Composition > Composition Settings and:
- Rename it to Rotating Wedge-MAIN
- Set Background Color to Black
- Click OK.
In the Project panel, drag the new Rotating Wedge-MAIN composition out of the Assets folder to an empty area of the Project panel, as shown below:
In the Timeline, click in an empty area to deselect all.
Let’s fade the first photo (the spa lady) up from black. Move the playhead to 0;15.
To the left of the [1-spa-lady.png] layer’s Opacity property, click the diamond
 .
.Because the diamond was gray, you just added a keyframe here (turning it blue).
Press the Home key (or Fn–Left Arrow) to go back to the video’s first frame at 0;00.
To complete the fade-up, set the [1-spa-lady.png] layer’s Opacity to 0%.
Scrub the playhead from 0;00 to 0;15 to see the spa lady photo fade up from black.
Go to File > Save As > Save As and:
- Navigate into Desktop > Class Files > After Effects Class > Rotating Wedge
- Name the project yourname-Rotating Wedge.aep
- Click Save.
To make the scaling easier, we’ll Parent all three photo layers to a null object. With the [01-spa-lady.png] layer selected, go to Layer > New > Null Object.
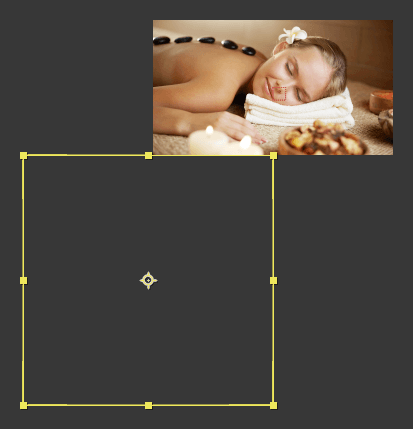
In the center of the spa lady photo, notice a small square with its anchor point
 in the top-left corner. We’ll make this layer grow throughout the animation.
To remind us of its purpose, let’s rename it. In the Timeline, select the new [Null 1] layer and press Return (Mac) or Enter (Windows) to make its name editable.
Type: Scale Null and press Return (Mac) or Enter (Windows) to end renaming.
We are going to connect our pictures to this Scale Null so it can control their scale. Find the Parent & Link column on the left side of the Timeline panel (to the right of the switches
 or modes).
If you do not see the Parent & Link column, CTRL–click (Mac) or Right–click (Windows) on one of the columns (such as Layer Name) and choose Columns > Parent & Link.
Collapse all of the layers
 so that you only see the layer names.
Let’s use the null object as a driver/mover for all the photo layers. Select all the photos: click on [1-spa-lady.png] and Shift–click on [3-pool-lady.png].
Under one of the selected layers’ Parent & Link column, drag the pick whip
 to the Scale Null layer name as shown below:
After you release, look in the Parent & Link column to see that 1. Scale Null (our first layer) is now parenting all the layers you selected.
In the Timeline, move the playhead to 0;00
Select the Scale Null layer and expand
 into its Transform properties.
Next to the Scale property, click the stopwatch
 to add a keyframe here at 0;00.
Press the End key (or Fn–Right Arrow) to get to the last frame at 10;29.
To the right of Scale, click on either 100%, type 120%, and press Return (Mac) or Enter (Windows). This will add a new keyframe
 .
.It’s important to be mindful of the original sizes of the photos so you don’t scale them up too much. (Ours are the size of the composition.) We recommend that you scale up photos and other pixel-based footage no more than 125–130%. We’re in the safe zone by scaling the null object (and hence its child photo layers) to 120%.
In the Timeline, go to 0;00 and scrub through to see all the photos grow slightly.
Creating a Color Wedge Using a Shape Layer
The revolving shape you saw in the final video is a square Shape Layer. Let’s create it and set it up so it will rotate on its top-right edge.
In the Timeline, click into any empty area to deselect, or go to Edit > Deselect All.
In the Tools panel at the top, choose the Rectangle tool
 . You may need to click and hold on the Ellipse tool
  and then select the Rectangle tool.
In the Tools panel to the right of the tools, you’ll see two options appear, for Fill and Stroke. First make sure the checkbox next to Bezier Path is NOT turned on.
Still in the Tools panel, click on the blue word Fill (not its swatch!) and:
- In the row of icons, choose the second option, Solid Color
 .
. - Make sure Opacity is 100%.
- Click OK.
- In the row of icons, choose the second option, Solid Color
To the right of the word Fill, click the color swatch.
In the bottom field for hex codes, set the color to #098AA3 (a relaxing blue).
Click OK to set the color.
Back in the Tools panel, click on the blue word Stroke (not its swatch!) and:
In the row of icons, choose the first option, None
 .
.Click OK.
In the center of the Composition viewer panel, hold Shift and drag to draw a large square instead of a rectangle. Any size is fine for now as we’ll be changing it soon.
After you release, you’ve created a shape layer! Look on the left side of the Timeline to see that the topmost layer has a star
 before its Layer Name. This is how you know it’s a shape layer.
Press UU (two U s in quick succession) and in the Timeline you can see all the property settings for Shape Layer 1 that have been changed from their defaults.
In the Timeline under Contents > Rectangle 1 > Transform: Rectangle 1 (which should be the last option), change the Position values to 0,0 to center the square.
Positioning a Shape Layer
Each shape layer comes with at least 1 group. (In this case Rectangle 1 is our only group.) Each group contains a Path shape, Stroke, Fill, and its own set of Transform properties that contains unique properties such as Skew, as well as a Position property. These values are based on the center of the screen.
To confuse things further, shape layers have traditional Transform properties too, and within those, the Position values are based on the top left of the screen. Going into the shape group’s Position values and zeroing them out at the start simplifies things so that we can keep animating as we’re used to, with the traditional Transform > Position property.
Under Rectangle Path 1, change the Size values to ,000,,000.
Above the options you just set, click on the Shape Layer 1 layer name and press Return (Mac) or Enter (Windows) so we can rename it.
Type Wedge and press Return (Mac) or Enter (Windows) again to finish renaming.
To get a better look at the new shape, do the following:
- In the Timeline to the left of Wedge’s layer number, click on the colored square (the Label Color) and from the menu, choose Yellow so we can see it better.
- At the bottom left of the Composition panel, click into the menu with a zoom percentage and choose 12.5%. You should be able to see the entire square with its bounding box and square selection handles.
To prepare to move the square into position:
- In the Tools panel at the top, choose the Selection tool
 .
. - In the Composition panel, hold Spacebar to switch to the Hand tool
 and drag the composition frame to the top of the panel so you can see plenty of space below and to the left of it.
- In the Tools panel at the top, choose the Selection tool
As shown below, click and hold anywhere inside the square and drag it down and to the left, so its top-right handle is roughly positioned just below the center of the frame to get the result shown below (don’t worry about exact positioning yet).
Changing the Wedge’s Anchor Point
Like other layers, a shape layer revolves around its anchor point
, which by default is in the middle. We want our square to revolve around its top-right corner, so we need to move the anchor point. In the Tools panel, choose the Pan Behind (Anchor Point) tool  .
.Using the Pan Behind (Anchor Point) tool
, drag the anchor point to the square’s top-right corner (on top of the selection handle).To make sure the square is perfectly placed, let’s input exact values. First, to make sure you won’t get confused, go to the Timeline and use the arrows
to close up the entire Wedge layer.Open up the layer’s traditional Transform properties (not the ones within the Rectangle 1 shape group!) and set the following exact values:
Anchor Point: ,000, –,000 Position: 960,1080 (960 is half the width of our 1920 px frame) It will be nice to see the entire square as we animate it. At the bottom of the Composition panel, make sure the zoom level is still 12.5% and keep it there until we tell you to zoom in.
Animating Spin with the Rotation Property
We want the wedge to rotate clockwise on its anchor point. We can animate this using the Rotation property. Let’s give it a spin!
There’s another way to move the playhead. At the top left of the Timeline:
- Click on the timecode
 and it’ll become editable.
 - Type in 15 and press Return (Mac) or Enter (Windows) to get to 0;15. Neat-o!
- Click on the timecode
In the Timeline under the Wedge layer’s set of traditional Transform properties, locate the Rotation property.
Enable keyframing by clicking the stopwatch
next to Rotation.Go to 4;00 by clicking on the timecode
and typing in 400.In the Timeline, change Rotation from 0x+0.0° to 1x+0.0° to add a keyframe.
Look in the Composition panel to see that the square hasn’t budged. That’s odd…
Back in the Timeline in the layer’s Transform properties, look at the Rotation value of 1x+0.0° once more and let’s break this down:
- The 1x portion indicates how many full Revolutions (times it goes back to its starting point) it will make.
- The 0.0° portion is the Tilt, as expressed in degrees. When you don’t want something to make a perfect revolution, you change this part of the property.
- In After Effects, positive values rotate an object clockwise, and negative values rotate it counterclockwise.
Still in the Timeline, drag the playhead from 0;15 to 4;00 to see the wedge rotate clockwise on its top-right corner, making one full revolution.
The difference between two Rotation keyframes determines how much it’ll spin. After Effects subtracted the first value from the second one to get the difference (1x minus 0x equals 1, which means it will fully revolve around a single time).
We want the wedge to make two more full revolutions. Go to the timecodes indicated and change the Rotation property as follows:
7;15: 2x+0.0° (2x minus 1x equals 1, which means we’re adding one more full revolution) Last frame (10;29): 3x+0.0° Keep in mind that because these are complete revolutions, the square won’t appear to move until you scrub the playhead along the Timeline to see that it’s spinning.
Let’s zoom in so we get a bigger preview of the rotation sequence. Go to the bottom left of the Composition panel and from the Magnification ratio popup with a 12.5% zoom percentage, choose Fit.
In the Preview panel on the right, make sure Play From is set to Start Of Range (to see this option you may need to resize the panel by dragging it’s bottom border down).
Hit Spacebar to examine your work. A good start, but there’s no text yet. Let’s add that next.
Adding Text & Scaling It up
In the Tools panel at the top, select the Horizontal Type tool
 . Don’t click anything yet!
On the right-hand side of the screen, in the Character panel, set the following:
Font family: Proxima Nova (if you don’t have it, do the Before You Begin: Syncing Adobe Fonts exercise at the beginning of the book) Font style: Regular Font size  :
:85 px Leading  :
:Auto (choose it from the menu) Tracking  :
:0 Still in the Character panel, to the right of the font menu, click the Fill Color swatch. If the Fill Color swatch isn’t already active (in front of the stroke), you will need to click it twice to open the Color settings.
In the Color dialog that appears, set it to #FFFFFF (white) and click OK.
We don’t want a stroke on the text, so make sure the Stroke swatch looks like
 . If it’s not, activate the swatch and then click this icon
  next to it.
If you can’t see the Paragraph panel on the right, go to Window > Paragraph.
In the Paragraph panel, click the Center text icon
 if it isn’t already selected.
Text Alignment & Anchor Points
Choosing a text alignment option sets where the text’s anchor point
 will be. Text anchor points are always at the bottom of the text. Center alignment places the anchor point in the bottom center. Left alignment places it in the bottom left, and Right alignment places it in the bottom right.
If the playhead isn’t at 0;00, press Home (or Fn–Left Arrow) to go there.
In the Timeline, make sure the Wedge layer is selected so the layer we’re about to create will get added on top of it.
Do NOT click with the Type tool! Instead go to Layer > New > Text. The cool thing about creating a text layer this way is it places the cursor in the middle of the screen, exactly where we want it.
Type Luxurious Amenities and keep the Type tool selected.
The text in this layer will change a few times throughout the video, so let’s rename the layer. In the Timeline, click on the Luxurious Amenities layer and press Return (Mac) or Enter (Windows).
Rename it to Text and press Return (Mac) or Enter (Windows) again.
With the layer still selected, expand into the Text layer’s Transform properties.
Enable keyframing on the Scale property by clicking the stopwatch
next to it.Press the End key (or Fn–Right Arrow) to get to the last frame of the video.
To match the scaling of the photos, change either Scale value to 120%.
Changing Text Values Using Hold Keyframes
Let’s animate the text changes we saw in the final video.
There’s another way to keyframe navigate. Swivel closed every layer except the Text layer to try it out:
- Press the J key to return to the selected layer’s previous keyframe (the Scale keyframe at 0;00).
- Then press the K key to advance to the selected layer’s next keyframe (the Scale keyframe at 10;29).
- Press J once more to return to the first keyframe at 0;00.
If other layers are open, these shortcuts will keyframe navigate on all open layers.
In the Timeline, swivel open the Text layer’s set of Text properties.
Next to the Source Text property, click the stopwatch
to add a keyframe.Look in the Timeline and notice the square-shaped keyframe
 . That indicates it’s a hold keyframe.
While normal diamond-shaped (linear) keyframes transition from one keyframe to another, hold keyframes hold their value until it reaches the next keyframe in the sequence. This means the text will abruptly change when it gets to our next keyframe—exactly what we want!
Go to 4;00 (you can click on the timecode and type in 400).
With the Horizontal Type tool
click in the Luxurious Amenities text.Go to Edit > Select All or press Cmd–A (Mac) or CTRL–A (Windows).
Replace the text with World-Class Dining and notice a new hold keyframe has been added at this point in the Timeline!
Go to 7;15 and replace the entire text by selecting it all and typing Stay with Us. (including the period) over it.
In the Timeline, use the arrow
to collapse the Text layer.In the Preview panel, press Play
 to see that the text changes at each keyframe we set, but just stays there on-screen. We’ll fix that in the next exercise.
- In the Tools panel, choose the Selection tool .
Do a File > Save and leave this project open to use in the next exercise.