Cellphone Commercial: Rotoscoping
What This Tutorial Covers
Roto Brush
AE's automated tool for separating subjects from backgrounds.
Refine Edge
Fine-tune tricky areas like hair and motion blur.
Frame-by-Frame Cleanup
Manual fixes for shots Roto Brush misses.
Noble Desktop's Video Editing & Motion Graphics Certificate teaches After Effects alongside Premiere Pro, Cinema 4D, and DaVinci Resolve.
Dive into this comprehensive After Effects tutorial where you'll learn techniques such as copying a rotoscoping path from Illustrator, arranging comp windows side-by-side, and rotoscoping with mask path keyframes to correct visual errors and enhance your footage.
Exercise Preview
Setting up for Adding the Fingers Mask
When they filmed Star Wars, the actors sparred with average run of the mill sticks. So how did their visual effects artists make the lightsabers look so epic? They used a powerful technique called rotoscoping! They traced over the moving sticks, isolating them from everything else. This allowed them to enlarge the sticks so they could add that signature glow effect to just the sticks—and nothing else.
The most precise way to rotoscope footage in After Effects is to draw masks that can be animated. Before we can add the masks, we need to do a bit of setup.
You should still have yourname-Cellphone.aep open in After Effects. If you closed it, re-open it now. We recommend you finish the previous exercises (3A–4A) before starting this one. If you haven’t finished them, do the following:
- Open Cellphone-Ready for Roto Fingers.aep (from the Cellphone > Finished AE Projects folder).
- Save the file as yourname-Cellphone.aep in the Cellphone folder.
In the Timeline, switch to the Cellphone-MAIN tab if you aren’t already there.
Move the playhead to 1;26.
Zoom in closer to the phone.
Watch closely as you step forward frame-by-frame and notice that Janet’s fingers get cut off/hidden by the Cellphone screen. That’s not good!
Double–click the [2-Janet-phone] layer to open it in a new tab.
Since we’ve already keyed and color corrected the janet layer, we can pre-compose it to itself so if we need to make any changes to the key or the levels, we can do it in one place and it’ll update for both the main body of the shot and the fingers.
Select the janet layer.
Press Cmd–Shift–C (Mac) or CTRL–Shift–C (Windows) and set the following:
- Name it Janet Keyed & CC-PC (the CC stands for C olor C orrected).
- Select Move all attributes into the new composition.
- Check on Adjust composition duration to the time span of the selected layers.
- Make sure Open New Composition is unchecked.
Click OK.
Switch off the audio
 for [Janet Keyed & CC-PC].
With the [Janet Keyed & CC-PC] layer selected, duplicate it.
Rename the top copy to Fingers Roto.
Drag Fingers Roto to the top of the layers.
Rename the remaining [Janet Keyed & CC-PC] layer to Janet Body.
Conveniently, we’ve been provided with the first frame of the mask path for the rotoscoping of the fingers. Go to 2;25, where we’ll start rotoscoping.
Select Fingers Roto and press Opt–[ (Mac) or ALT–[ (Windows) so it starts at 2;25.
Copying the Rotoscoping Path from Illustrator
To save time, we already drew a path around Janet’s fingers. We’ll copy it from the original Adobe Illustrator file, so we can use it as a mask in After Effects. (If you were creating your own masks, you would use the Pen tool.)
Launch Illustrator so we can open the rotoscoping path there.
In Illustrator, go to File > Open, navigate to Class Files > After Effects Level 2 Class > Cellphone > Assets and double–click Janet-WSphone-mask.ai.
In the Layers panel on the right, expand masks and notice that there are two paths—one that goes around the whole image, as well as a path for just the fingers.
Select all so that both masks are selected.
Copy them. Don’t quit Illustrator yet.
Return to After Effects.
Make sure you’re still at 2;25.
Select the Fingers Roto layer and paste the mask layers.
At the bottom left of the Composition panel, click the Toggle Mask and Shape Path Visibility button
 to turn it on (blue) if it isn’t already.
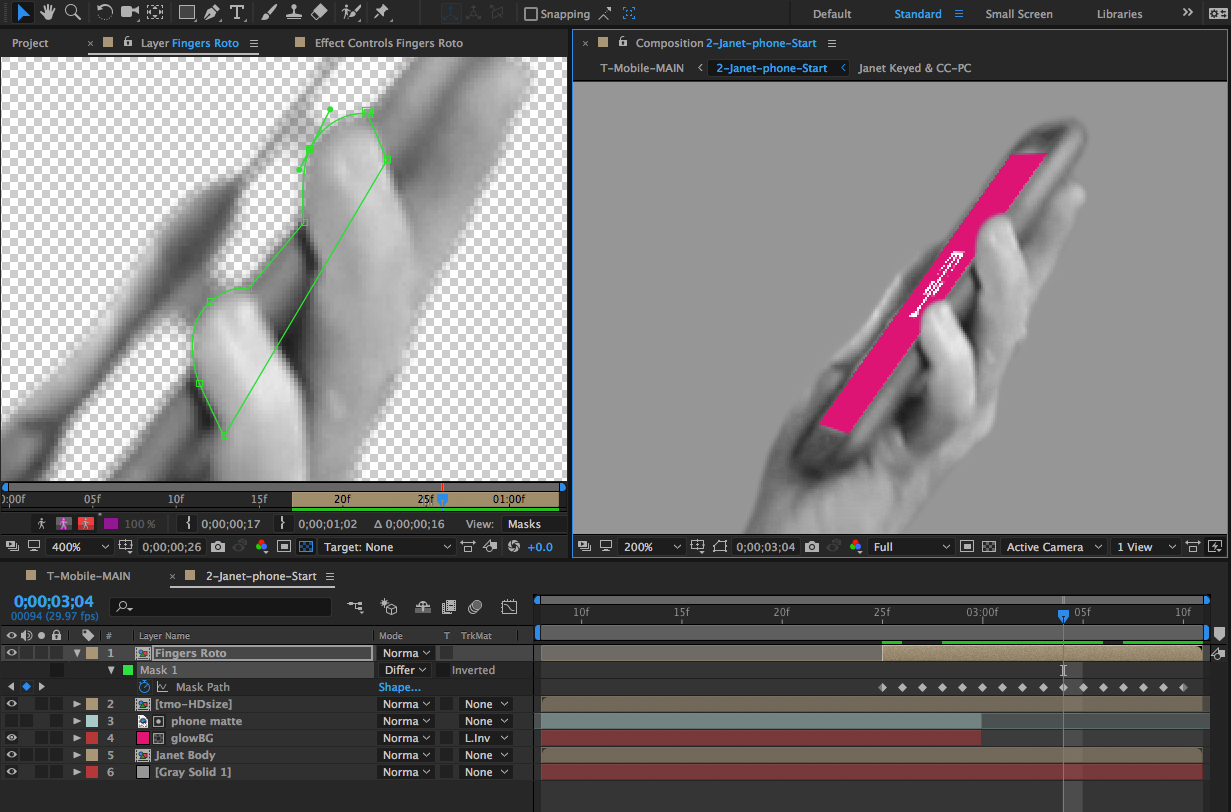
You should now see the path we’ll be using. Notice that the mask has two rounded shapes—one for each fingertip that covers the screen in the upcoming frames.
Arranging the Mask & the Final Result Side-By-Side
While rotoscoping, we need to align the mask in each frame so it moves in sync with the fingers. Let’s display the mask outline and the final result side-by-side to help us.
Select the Fingers Roto layer and press M to show the masks.
Mask 1 is the fingers mask and Mask 2 is the frame mask. We only needed Mask 2 to properly place Mask 1, so now we can go ahead and delete Mask 2.
If the fingers mask is hard for you to see, click the color swatch to the left of Mask 1 and in the Mask Color window, change the color to something brighter (neon green works well).
In the Fingers Roto layer, under Mask 1, click the stopwatch
 next to Mask Path.
CTRL–click (Mac) or Right–click (Windows) on the Fingers Roto layer and choose Open Layer to open the pre-comp into a Layer view.
Hover your cursor over the Fingers Roto Layer view and press the tilde (~) key to expand the view (this works for any panel).
You may not be able to see the entire contents of the layer because it’s masked. To fix this, at the bottom right of the Fingers Roto Layer view, uncheck the Render box.
With your cursor hovering over the Fingers Roto Layer view, press the tilde (~) key again to return to the normal view.
We want to be able to see the Fingers Roto Layer view side-by-side with the Composition panel. If the Fingers Roto Layer view opened in the same panel as the Composition, drag from the top of its tab where it says Layer to reposition it in the Project panel area. Alternately, if you have a 2-monitor setup you could drag one tab over to the other monitor.
Adjust the size of the two views so that you can see both of them well.
In the Composition panel, click the Toggle Mask and Shape Path Visibility button
to turn it off (make it turn gray).We also want to turn off the mask’s bounding box. In the Composition panel, at the top right of the 2-Janet-phone tab, click the panel menu icon
 and choose View Options.
In the View Options window, uncheck Layer Controls and click OK. This allows us to have a less cluttered view while we’re working.
NOTE: To turn the Layer Controls back on, you can either go back into the View Options window or simply click the Toggle Mask and Shape Path Visibility button
.Make sure you’re viewing in Full Resolution.
Press the Z key to get the Zoom tool
 .
.In the Fingers Roto Layer view, click on the finger path until you are at 400%.
Rotoscoping allows us to fine-tune our compositing, deepening the illusion that Janet’s phone was already displaying the Cellphone screen when we filmed her. Super nifty! The obvious drawback is the amount of time it takes to move the mask in each frame. To get a great result while being efficient with our time, let’s work smart.
We’re going to start by setting keyframes every four frames. Then we’re going to go back and set them every two frames, and then every frame. By doing this, we will get the smoothest possible rotoscoping. It might seem like a lot of work, but this technique of going a few frames forward at a time, then going back in and filling in the gaps, is not only faster than starting out going frame by frame, but it’s also much more accurate.
You should currently be at 2;25. We want to move four frames forward, so click into the timecode, type in +4 and press Return (Mac) or Enter (Windows) to get to 2;29.
In the Timeline, under Fingers Roto > Mask 1 select Mask Path. This is important so you’ll be able to drag the entire mask as a whole.
With the Selection tool
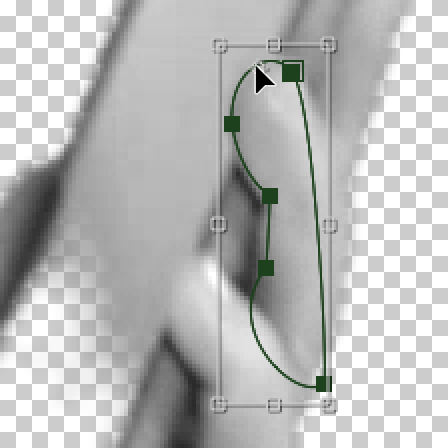
 , go to the Fingers Roto Layer view. Click and hold the outline and drag the entire mask path over the fingers, lining up the topmost part of the mask with the top tip of the top finger.
TIP: Hold down the Spacebar to move the view.
At the bottom of the panel, click the Toggle Transparency Grid icon
 if it’s not enabled already (highlighted in blue).
Double–click the topmost vertex to get a transform box.
IMPORTANT: Do not independently move this topmost vertex because it has been designated as the First Vertex. After Effects uses the First Vertex to organize the mask points. You can identify it because it is larger than the other vertices and it has a double outline. If you ever want to change which vertex is the First Vertex, simply select the vertex and go to Layer > Mask and Shape Path > Set First Vertex.
In the center of the mask’s bounding box, notice the anchor point. It looks a bit different because it only appears in this box and is not a layer anchor point, but it works the same way. So the layer will rotate around a different center point, drag the bounding box’s anchor point over the topmost part of the mask:
To align the mask path so it kisses the edges of the fingers, follow the steps below:
- Rotate
 the entire mask so that it matches the fingers’ angle. Notice it rotates around the bounding box’s anchor point!
 - Drag the mask so it aligns with the two fingers that are over the phone screen.
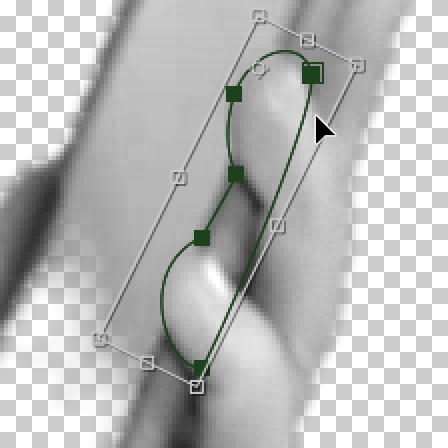
- Rotate
Once you have a good alignment, press Return (Mac) or Enter (Windows) to exit the transform.
It will actually be easier for us to see the alignment if the fingers were in color rather than black and white. In the Timeline, double–click on the Fingers Roto layer.
To the right of the janet layer, click the fx icon
 to turn it off (you may need to show its switches).
Go back to the 2-Janet-phone tab.
It should already be pretty good, but the mask may need a bit of tweaking to better match the fingers. Follow the guidelines below to adjust the mask path on the Fingers Roto Layer view as needed:
To move a single vertex: Click on the vertex you wish to move and drag it into position with the mouse and/or Arrow keys.
To move a section of vertices: This often gives a more precise result. Click on one vertex, then hold Shift and drag a selection box around the other points of the section. (You can also click between two points to select both.) Then you can move the group.
Feel free to move the bounding box’s anchor point if you want to rotate from a different point.
TIP: When reshaping the mask, be careful not to subtract vertices over time. When a vertex is deleted, it will be removed from all frames, not just one! It’s perfectly fine to add points, however.
Move forward four frames in the Timeline to 3;03.
In the Timeline, select Mask Path so we can move the entire path.
Move the mask path and realign it with the fingers.
Select the Fingers Roto layer in the Timeline and move the vertices as needed.
Repeat this at 3;07. Remember to keep checking both the Layer view and the Composition.
The last frame at 3;10 won’t be four frames from the previous one, but go ahead and align the path here as well.
Aligning the Path Every Two Frames & Then Every Frame
When you’re done aligning every four frames, go back to the first keyframe at 2;25.
To go to 2;27, go to the timecode, type in +2 and press Return/Enter.
Align the mask path to the fingers using the previous methods.
Move forward to 3;01 and align here.
Repeat the process at 3;05 and 3;09.
TIP: Even if there is a frame at which you don’t move the path, make sure to add a keyframe by clicking the diamond-shaped dip
 .
.Move the playhead to 2;26 and align the path here.
Repeat the process at all the remaining in-between frames (2;28, 3;00, 3;02, etc.).
When you’re finally done aligning the mask at all frames, it’s time to preview. Hover your cursor over the Composition panel, and press the tilde (~) key to expand the view.
Set the zoom to Fit.
Press the Spacebar to play.
The preview goes pretty fast, so feel free to just step through frame-by-frame using the Cmd-Left Arrow and Cmd-Right Arrow (Mac) or Page Up and Page Down (Windows) keys to get a better look.
Press tilde (~) again to go back to the normal view.
Fine-Tuning the Mask Path
Because rotoscoping is created using vector masks, the edges are sharp. Let’s give the mask path a realistic blur, and finish tweaking it to perfection.
There are a couple little adjustments we could make to finesse the mask. Zoom in to the fingers on the Composition panel.
In the Timeline, under the Fingers Roto layer, collapse Mask 1, then expand it again to show all its options.
Increase the Mask Feather slightly to around 1 (i.e whatever works best for you) to soften the mask edges.
Increase or decrease the Mask Expansion as needed if it’s a bit too small or big.
Now that we’re done adjusting the mask, remember to make janet black & white again. Go to the Janet Keyed & CC-PC Timeline tab. (If you closed it, double–click the Fingers Roto layer to go into its parent pre-comp.)
Click the janet layer’s fx switch
back on.Close the Janet Keyed & CC-PC tab and return to the 2-Janet-phone tab.
Scrub through with the playhead to make sure the mask looks good and make adjustments as needed.
When done, close the Fingers Roto Layer view.
If you want to quickly resize the left-hand panel to its normal size, feel free to go to Window > Workspace > Reset “Standard” to Saved Layout.
Collapse the layers in the Timeline and close the tabs other than Cellphone-MAIN.
Save the project and leave it open. We’ll continue working on it in the next exercise.