Shared XD Libraries
What This Tutorial Covers
Cloud Documents
Cloud-hosted files synced across the team.
Shared Assets
Colors, character styles, and components.
Live Updates
Library changes propagate to every linked file.
Noble Desktop's UX/UI Design Certificate teaches Figma — Adobe paused major XD development, so most teams have moved on.
Discover the steps to effectively utilize Adobe XD libraries and manage your shared assets across multiple documents and different users, keeping your design process streamlined and efficient.
Exercise Preview
Publishing a Library
We can create a shared cloud library that can be used across files. It can be shared with other people for them to use as well. When the original library is updated, all files (and across everyone’s computers) will be updated!
- In Adobe XD, go to File > Open from Your Computer or hit Cmd–Shift–O (Mac) or CTRL–Shift–O (Windows).
- Navigate into Desktop > Class Files > Adobe XD Class > Libraries and double–click on Pulse Design System.xd to open it.
For you to share a library it must be a cloud document. Do File > Save As and:
- The Save As name should already be Pulse Design System
- Click Save.
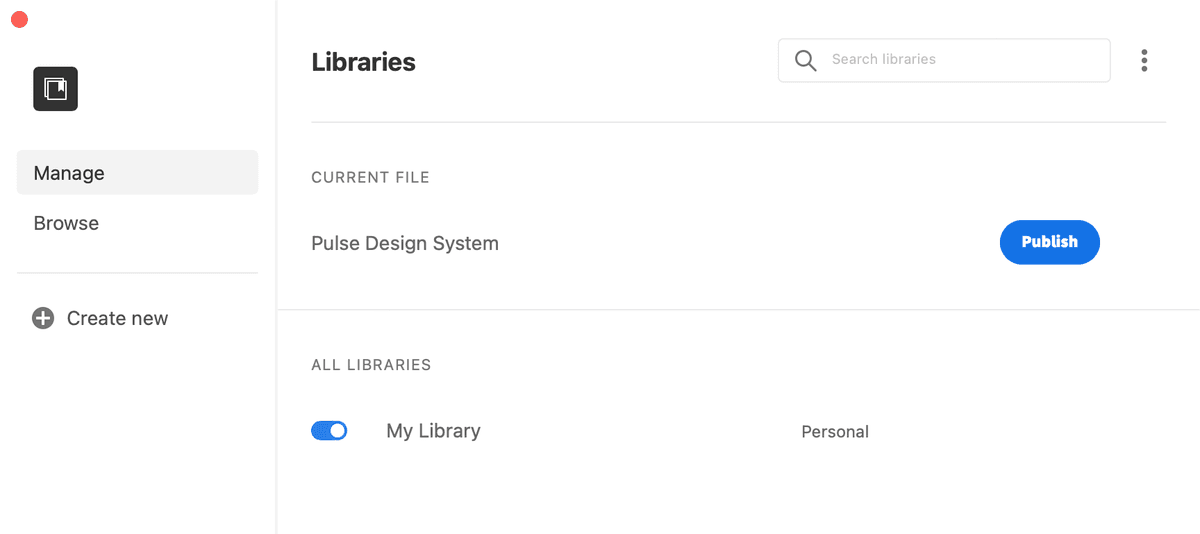
- If the Libraries panel is not open, at the bottom left of the window click the
 icon.
icon. - At the top right of the Libraries panel, click the Publish as a library button
 .
. - Under Current File, to the far right of Pulse Design System click Publish.
A window where you can invite people will appear. If you’re working with a team this is where you’d invite others to also use this library. You can define where they can merely view, or edit the library.
We won’t need to invite anyone now, so close the window so you’re back in your main XD file.
Using a Published Library
Now that we have a library, let’s see how to use it in other files.
- Go to File > Open from Your Computer or hit Cmd–Shift–O (Mac) or CTRL–Shift–O (Windows).
- Navigate into Desktop > Class Files > Adobe XD Class > Libraries and double–click on Women.xd to open it.
- If the Libraries panel is not open, at the bottom left of the window click the icon.
- At the top left of the Libraries panel, click the arrow
 to go back to libraries.
 - In the list of libraries, click on Pulse Design System.
- You can now see everything in the shared library. Drag the navbar component to the top of the artboard.
- Select the New Autumn Attire text.
- In the Libraries panel click on the Heading character style to apply it.
- Select the text cozy women’s styles for the fall season
- In the Libraries panel click on the subeading character style to apply it.
- At the top left of the Libraries panel, click the arrow to go back to libraries.
In the list of libraries, click on Document Assets.
Here you can see the assets within this file. Notice they are all linked (to the shared library).
- Go into the Window menu and choose Pulse Design System to switch back to that file.
- Double–click on the navbar’s background color.
- In the Libraries panel, click on the dark brown color #704738 to change the navbar’s background color.
At the bottom of the window in the blue bar that appears click Update now. If you missed the blue bar and it went away:
- At the top right of the Libraries panel, click the Publish as a library button .
- Under Current File, to the far right of Pulse Design System click Update.
- Close the Libraries window so you’re back in the Adobe XD file.
- At the top right of the Libraries panel, click the Publish as a library button
- Do a File > Save.
- Go into the Window menu and choose Women to switch back to that file.
- In the Libraries panel you should see the link icon to the right of navbar is now a blue circle (it may take a moment for it to register). If you still don’t see the change after a while, try closing the Women.xd file (save the changes) and re-opening it.
- In the Libraries panel hover over the navbar’s blue circle link icon to see the new navbar previewed on the artboard.
Click the blue circle link icon to update the component.
NOTE: If you do not want to accept the change, you’d CTRL–click (Mac) or Right–click (Windows) on the component and choose Make local. But keep in mind that this asset will no longer get updates when the shared library is updated (because you’ve broken the link and made this asset unique to this file).
We’re done with this exercise, but read on to learn about managing published libraries.
Managing Libraries from Within Adobe XD
- When viewing a shared library in the Libraries panel of XD (NOT Document Assets), at the top right of the Libraries panel click the Invite to Library button
 .
. In the window that opens:
- If you don’t automatically see the Invite options, hover over the library’s name and to the right click the ••• button and choose Invite people.
- You can add new people.
- To remove access click a member’s Can view or Can edit menu to the right of their name and choose Remove.
Managing Libraries from Adobe Creative Cloud App
Another way to manage libraries is using Adobe Creative Cloud app. Here’s how:
- Launch Adobe Creative Cloud app.
- At the top left, click on the Files tab.
- On the left, click on Your libraries.
Here you can:
- CTRL–click (Mac) or Right–click (Windows) on a library and choose what you want to do (Invite people, Delete, etc.)
- Click on a library to see its contents.