April 1, 2026Dan Rodney/5 min read

Character Styles: Free Adobe XD Tutorial

Master Adobe XD Character Styles for Better Design

Prerequisites

This tutorial assumes basic familiarity with Adobe XD interface and file navigation. You'll need Adobe XD installed and the provided class files downloaded to your desktop.

Topics Covered in This Adobe XD Tutorial:

Creating & Editing Character Styles

What You'll Learn

0/4

Exercise Preview

preview character styles

Exercise Overview

Character styles are the backbone of consistent, scalable design systems. In this hands-on exercise, you'll master Adobe XD's character style functionality—a critical skill for maintaining typographic consistency across complex projects. You'll learn how to create, edit, and organize character styles that will save you hours of manual formatting while ensuring brand consistency across all your designs.

Cross-Platform Compatibility

Adobe XD can open Sketch files directly, though conversion may not be perfect. Always inspect converted files closely to ensure design integrity is maintained.

Creating Character Styles

We'll begin by setting up a working file and creating our first character styles. This workflow demonstrates how XD seamlessly integrates with other design tools while establishing the foundation for systematic typography management.

  1. In Adobe XD, go to File > Open from Your Computer or hit Cmd–Shift–O (Mac) or CTRL–Shift–O (Windows).
  2. Navigate into Desktop > Class Files > Adobe XD Class and double–click on iTastify Design Done.sketch to open it.

    NOTE: Notice that this is a Sketch file, and XD can open it directly! While XD's cross-platform compatibility continues to improve in 2026, the conversion may not be perfect—always inspect converted files closely to ensure text formatting, layer effects, and spacing translate accurately.

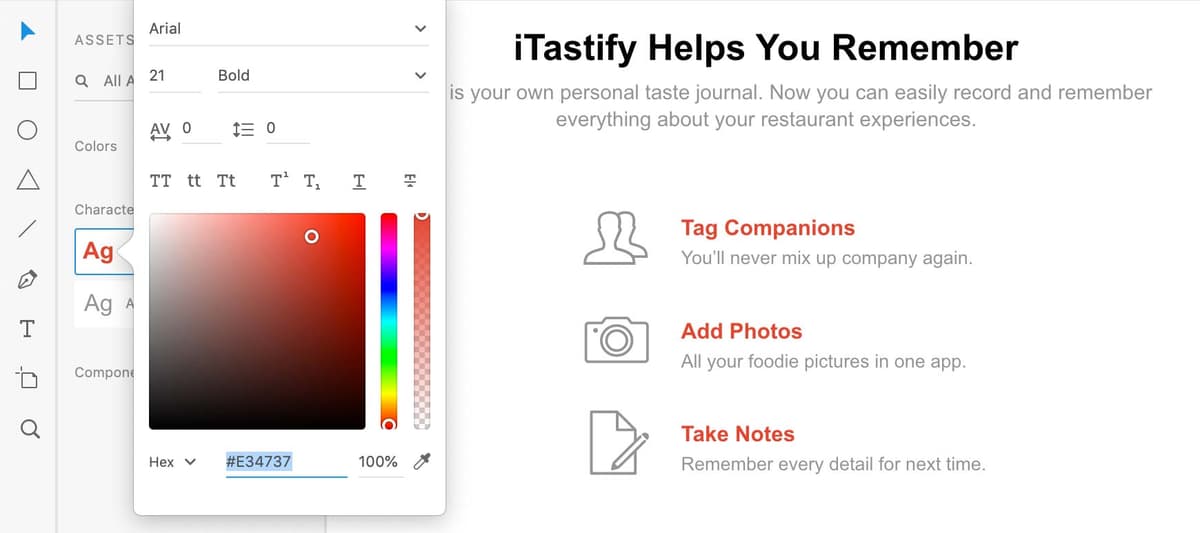
  3. Zoom in on the iTastify Helps You Remember section (below the hand holding an iPhone).
  4. There are 3 features, each with an icon and 2 lines of text. Try clicking on any of them to see the whole section is grouped.
  5. CTRL–click (Mac) or Right–click (Windows) on any of them and choose Ungroup.
  6. Click in an empty area of the artboard to deselect the text.
  7. To open the Libraries panel, at the bottom left of the window click the libraries panel icon icon.
  8. Select the Tag Companions heading of the first feature.
  9. In the Libraries panel, click the + button to the right of Character Styles to save it as a style.
  10. Let's explore an alternative method for creating styles. CTRL–click (Mac) or Right–click (Windows) on the feature's description: You'll never mix up company again and choose Add Character Style to Assets.

    This context-menu approach is particularly efficient when working with existing designs, allowing you to quickly extract and systematize typography without interrupting your creative flow.

Two Methods to Create Character Styles

1

Libraries Panel Method

Select text, open Libraries panel, and click the + button next to Character Styles to save the formatting as a new style.

2

Context Menu Method

Right-click directly on text and choose Add Character Style to Assets from the context menu for quick style creation.

File Setup Requirements

File Location

Navigate to Desktop > Class Files > Adobe XD Class to find the iTastify Design Done.sketch file. Use keyboard shortcuts Cmd-Shift-O (Mac) or CTRL-Shift-O (Windows) to open files quickly.

Ungroup Elements

The iTastify features section is grouped by default. Right-click and choose Ungroup to access individual text elements for style creation.

Editing Character Styles

Now that we've created our character styles, let's explore their most powerful feature: global editing. This capability transforms how designers manage typography at scale, enabling instant updates across entire projects.

  1. Click in an empty area of the artboard to make sure nothing is selected.
  2. In the Libraries panel, CTRL–click (Mac) or Right–click (Windows) on the Arial—21pt style and choose Edit.
  3. Drag to choose any new color (it doesn't matter what you choose) and notice that the color changes on all 3 headings instantly!

    Character Styles function as intelligent design systems, similar to how we saw with Colors in the previous exercise. When you edit a style, XD automatically updates every instance of that exact text formatting throughout your entire project. Unlike traditional design tools that require manual style application, XD creates these connections automatically based on matching typography properties—think of it as smart search-and-replace for design. This approach dramatically reduces maintenance overhead in complex projects and ensures consistency that would be nearly impossible to maintain manually.

  4. Click on an empty part of the artboard to close the style options.
  5. In the Libraries panel, CTRL–click (Mac) or Right–click (Windows) on the Arial—20pt style and choose Edit.
  6. Change the size from 20 to 18 and hit Return (Mac) or Enter (Windows) to apply the change.

    Notice how all three descriptions update simultaneously, demonstrating the power of systematic typography management. This level of control becomes invaluable when working with design systems, responsive layouts, or when client feedback requires typography adjustments across multiple screens or components.

  7. Click on an empty part of the artboard to close the style options.

When you edit a style, XD will change every place that exact same text formatting appears in the entire file. Think of this more like a search and replace for type styling.
Adobe XD automatically links identical text formatting without manual application, unlike many other design applications.

How to Edit Character Styles

1

Access Edit Mode

In the Libraries panel, right-click on any character style name and choose Edit to modify its properties.

2

Make Changes

Adjust color, size, or other typography settings. Changes apply instantly to all matching text throughout the document.

3

Apply Changes

Click empty artboard space to close style options, or press Return/Enter to confirm size changes.

Naming Character Styles

Effective naming conventions are crucial for maintaining organized design systems, especially in collaborative environments. Generic auto-generated names like "Arial—21pt" become problematic as projects scale—semantic naming ensures your character styles remain meaningful and discoverable.

  1. Make sure nothing is selected.
  2. Double–click on the Arial—21pt style name, type in feature name and hit Return (Mac) or Enter (Windows) to apply the change.

    NOTE: You must be in List View list view assets panel to see and edit style names. This view also provides better organization when managing dozens of character styles in enterprise projects.

  3. Double–click on the Arial—18pt style name, type in feature description and hit Return (Mac) or Enter (Windows).

    Pro tip: Establish consistent naming conventions early in your projects. Consider using hierarchical names like "heading-primary," "body-large," or "caption-emphasis" that reflect content hierarchy rather than visual properties. This approach creates more resilient design systems that adapt better to future changes.

List View Requirement

You must be in List View to see and edit character style names. Double-click on the default name to replace it with something more descriptive and memorable.

Default vs Custom Style Names

FeatureDefault NamesCustom Names
ReadabilityArial—21ptfeature name
PurposeArial—18ptfeature description
Team ClarityTechnical specsFunctional description
Recommended: Use descriptive names that indicate the text's purpose rather than its technical specifications for better team collaboration and file organization.

Pro Tips for Working with Character Styles

Understanding how to navigate and audit your character styles is essential for maintaining clean, efficient design systems. XD provides several tools for tracking and managing typography relationships across your projects:

  • In the Libraries panel CTRL–click (Mac) or Right–click (Windows) on a style and choose Highlight on Canvas. A blue border will appear around any text using that style, providing instant visual feedback about style usage patterns.
  • On the artboard CTRL–click (Mac) or Right–click (Windows) on any text element and choose Reveal Character Style in Assets. This reverse-lookup function is invaluable when auditing existing designs or troubleshooting inconsistent typography—you'll immediately know which style controls that text element.

These discovery tools become increasingly valuable as your design system matures and you need to maintain oversight across multiple artboards, components, and collaborative team members.

Style Navigation Techniques

Highlight on Canvas

Right-click a style in Libraries panel and choose Highlight on Canvas. Blue borders will appear around all text using that specific character style throughout your design.

Reveal Character Style

Right-click any text element and choose Reveal Character Style in Assets. This will show you exactly which style that text is using in your Libraries panel.

Style Selection Limitation

Unlike some design tools, Adobe XD does not automatically highlight the matching style in the Libraries panel when you select text. Use the Reveal Character Style feature to identify which style a text element is using.

Key Takeaways

1Adobe XD offers two methods for creating character styles: using the Libraries panel plus button or right-clicking text to add character styles to assets
2Character styles in Adobe XD work automatically by matching identical text formatting throughout the entire document without manual application
3Editing a character style instantly updates all text with matching formatting across the entire file, functioning like a search and replace for typography
4Adobe XD can open Sketch files directly, though designers should carefully inspect converted files for potential formatting issues
5Custom style names should describe the text's function rather than technical specifications for better organization and team collaboration
6The Highlight on Canvas feature helps identify all text elements using a specific character style by displaying blue borders around matching text
7The Reveal Character Style feature allows designers to identify which style any selected text element is using in the Libraries panel
8List View is required in the Libraries panel to edit character style names, and changes are applied by pressing Return or Enter

RELATED ARTICLES